Tuesday, June 21, 2011

Nuno Magazine : Rustle

Today is the first day of Summer! Huzaa! The weather has been amazing for all sorts of things like T-ball games, family picnics and gardening. But when it rains it pours right? And sometimes it is just too darn hot and sunny (SPF 700 anyone?) to be outside. So you know what I like to do then? Make pretty things. You too? Well then, you will love the digital magazine Nuno then.

For those of you unfamiliar with Nuno magazine it is a seasonal digital format (PDF only) magazine created by the talented sister duo Elizabeth and Rachel Abernathy. Nuno focuses on crafts and art created from recycled and found materials.Some of my favourite examples fromt his issue are:
This curvy clutch made from recycled linen.

And these gorgeous water colour butterflies made from recycled book pages.

Some of my favourite past projects include:

This knitted fern pillow (Pattern included in issue) from the premier issue fall 2010. Made from from recycled yarn. 

These beautiful "kokeshi doll inspired finger puppets" from the winter issue titled Shades of Gray had my gears turning. 

The latest issue Rustle is guaranteed not to disappoint. With projects like this beautiful crocheted Irish rose purse.
And at $3.75 how can you resist this 95 page ad free, independently published, beautifully photographed periodical? It's a steal! But for those of you who haven't the dollars to spare check out the three previews below complete with projects.


Click here to purchase the 95 page Spring 2011 Issue Rustle for $3.75.


Winter 2010/2011 Shades of Gray Issue Purchase the 125 page magazine here for five dollars.


Purchase the 150 page Fall 2010 issue here for five dollars.

For more great projects, tutorials, inspiration and vintage and artsy photo goodness, visit Elizabeth Abernathy's blog. For more photos and free projects from Nuno magazine, visit the website here.
Now I am going to grab a coffee and re-read my issues of Nuno.

Saturday, June 18, 2011

Reader Question : DIY Ring Storage & Display

ally74 asked you:
hello: i am a new follower and i really love a lot of ur ideas, i was wondering if u have any for storing rings! i have over 100 rings and i love to wear a different one every day most of them are chunky rings, do u have any idea's?
&eahrts;♥
Thanks for following and thanks for the great question!
This one was a little bit trickier than when I did a post on chunky necklace storage. There are far fewer posts on ring storage, and even less DIY ring storage posts but I did find a couple absolutely awesome ones!
Easy peasy and super practical (Not to mention eco friendly) is this egg carton displays from Whimsy Love. Not only to they display each ring perfectly but thy make great storage for your home (Label each carton with fat markers) or craft show booth. Bonus: Dust Free. Found via Etsy Handmade MN
These are black BEANS! I know super clever right? While they might be more practical for a craft show booth, it is a totally viable, practical and green solution for a dressing room table or dresser top. Photo belongs to Lean Dog Pottery & Jewelry and was found via Etsy Handmade MN
I think this is my favourite. Completely customizable in size (Most craft stores sell two three different sizes) and in finish (Have at 'er with Mod Podge and paint!) it hangs on the wall or sits on a dressing room table/dresser. C'est tres bon oui? Source: Punky Style
This super adorable cigar box holder was made by Stef with an old sweater folded accordion style. You needn't use a cigar box, you can use whatever sort of box you have laying around. Bonus: Dust Free. Full how to here @ Craftside.
Take a trip to your local dish washing aisle and you have some pretty adorable ring holders. While this is not practical for those of you with dozens of rings (Lucky ladies!) this is great for those of us with much more modest collections. Visit the how to here at Dana's Fashion Blog.
Some of you may recognize this photo from Tumblr user Legally Crafty (She has some great DIYs). A simple chocolate box turned ring storage is very eco chic (And I bet it smells divine every time you open it!). Bonus: Dust Free.
Last but not least we have the clear pocket hanging organizer. While not super fun in a crafty recycling sort of way it is super efficient storage. For those of use with next to no storage space, slim solutions like these are both dust free and see through making it a very practical choice.
And that concludes our lesson for today class! I hope you enjoyed the post and thanks for the super duper question! As always, I love to answer them (Even though they might take me awhile.) So keep them coming! Cheers,M.

Friday, June 17, 2011

Reader Question : Any Good Moving Box DIYs?

tiaras-tumblr asked:
I have a bunch of boxes from where I just moved and I'm not sure what to do with them. Got any ideas of any D.I.Y.?
Yes, yes I do! Well, they are not my ideas, more like my suggestions after some super fun Googling. :)
Tell me this shelf is not gorgeous? The one pictured is made by Leo Kempf but a DIY version can be found here at Instructables.

Cardboard Lamps made by Joe Manus of Shiner International. Made in Atlanta Georgia. goto.interiordesign.net Found via Inspirationgreen.com. I don't have a DIY link but I am sure with some thought and research you could Jimmy-rig yourself up a couple.
For the craftier sort of DIY's:

To make this show stopping recycled vase and bouquet visit Inspiration&Realisation.

At first I thought these little pretties were a wall installation, but in fact they are magnets! So cute! For the how to click here for the PDF link.

Romantic bird houses are easily made with glue, paint and lace. Source: This Recycled Life.
For the more artistically gifted or adventurous sort of DIY'er you could also try your hand at sculpting with cardboard.

With layered flat cardboard like Chris Gilmour.

Or blended like paper pulp and then sculpted like clay and finished like wood. This AMAZING table was made in Domingos Tótora's studio, Maria da Fe, Brazil

For some truly inspiring cardboard pieces of design and sculpture visit this post at Inspirationgreen.com.
I hope this post was both helpful and inspirational! I had so much fun writing it up, and now I am on the hunt for some boxes! Cheers,M.

Thursday, June 16, 2011

Wednesday on Wednesday (Or Thursday)

For this week's installment of Wednesday on Wednesday I was going to share with you some wonderful photos of Wednesday helping her daddy in the garden dressed in her faery princess skirt and looking incredibly adorable. But, last night we went to a fun fair for Wednesday's nursery school and there was face painting. I know you're thinking "That's nice..?" Well it was, but this was nicer:

 Only Wednesday goes to a face painting booth and gets her feet painted.


First thing this morning she insisted o more face paint. So Daddy obliged her, water colours mostly come off...

Thursday, June 9, 2011

Storage Geek on Facebook


Hey guys! I finally made a page for Storage Geek on Facebook! But, before they'll give me a facebook.com/storagegeek address I need twenty five likes. Could you guys be dearies and click THIS link and like me? I'd really appreciate it!
Cheers, M♥

Wednesday, June 8, 2011

Wednesday on Wednesday

Good morning! I know I am a couple weeks behind with this but things got pretty hectic around here what with nursery school, T-ball and well...summer! That's right, Captain Awesome and I are parents to a little leaguer. We found a great program that does T-ball for six weeks and then soccer for six weeks and we couldn't be having more fun. Well, most of the time, I mean it is like herding cats right? But cute! Oh my goodness the cute. I took a ridiculous amount of photos at her first game and so it took me forever to sort through them. I'll of course keep this post to a minimum but prepare for the cute!

Checkin' it all out.
The cute! It hurts!
In toddler preschool t-ball there are no strikes, no outs and every hit is a home run. I heart it.
In Wednesday's world there is always time for a little song and dance.
A little action.
The fruit of their labours. The kids only make it through the four innings because they know at the end there will be iced treats at the end.

We have since been to a couple games and it is so much fun, for us and her. We have some close friends with kids in the same league as well as a close mom friend of mine and a playmate of Wednesday right on her team so that is always nice. As well, Ron is amazing he helps the kids and keeps Wednesday on track I think he should be a coach next year.

Do you have children in organized sports? Have any tips for us newbie parents?

Sunday, June 5, 2011

How To : Rock N' Roll Ballet Flats

Whoo! *Kicks tumbleweeds aside* I'm back! And with a tutorial no less! Have a looksie at a super fun how to I did up today!
Last summer I found a couple pairs of ballet flats at Wal-Mart for nine or ten bucks a pair so I thought I would be cool and grabbed two pair (One black and one purple) well, not five minutes into wearing the first pair I got the beginnings of a blister. Gosh darnit! I was stubborn though, instead of taking back the unworn pair and donating the other I kept them. The first pair I carefully removed the grosgrain ribbon and voila! No blisters except now I had a very boring pair of shoes. Which also looked a little unfinished. So the two pair sat in my to-do box for a year until I could figure out how to use them. Enter Ebay and the awesome cone studs I found. I couldn't wait to attach those bad boys to my girly shoes and when I did, I was in love.
Now they are not only much more comfortable they are cute too! Also, I found that with the studs, the stitching holes worked perfectly.
They were super easy to make. The hardest part is getting your hands on these little babies. I bought mine from an Ebay seller called Crush Crush, I think they also have an Etsy account but don't quote me on that. I bought ten and I wish now I had bout a hundred (Instead of the pyramid studs that I can't seem to lay straight!) they are so much fun to use.
Step 1: Using a razor blade or seam ripper remove sewn in trim. (Mine was gros grain ribbon.)
Step 2: Remove bow (Or other decoration), again I use a razor blade as mine was sewn on.
Step 3: To colour in the vinyl, I just used a black Sharpie, if your shoes are more colourful may I suggest a coordinating fabric marker?
Step 4: Thanks to the threaded bottom of the stud, all you need to do to fasten one to your object is make a hole big enough for the threaded bit to fit through and screw the cone stud on top. Easy peazy lemon squeezey!
I really think they turned out fabulous. Just a little bit of rock and roll for this soccer mom you know what I mean?
I haven't quite decided what to do with the purple pair yet, I am thinking a bright contrasting ribbon of yellow or orange woven around the edge, not sure but I'll share them when I get to it.


Linking to these great parties:
Skip To My Lou Made By You Mondays
Between naps on the Porch Metamorphosis Mondays

I know my blogging has seen less sporadic days but I am trying to figure things out! Thanks for sticking with me and thanks to my new followers as well! ♥ M

Wednesday, May 18, 2011

Wednesday on Wednesday

Wednesday has the performing gene. We are not sure where it came from but we love it. When she is not singing and dancing she is "playing guitar" I am hoping next year to have her in lessons. Until then we delight in her rendition of Workin' on the Railroad.

Tuesday, May 17, 2011

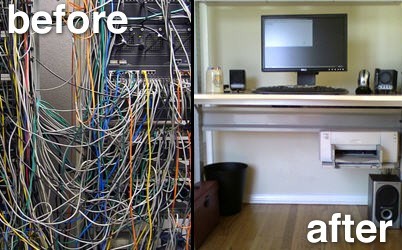
Reader Question: DIY Hiding Cables & Wires

Over at my Storage Geek blog, I get asked advice questions on organization and storage. (I know! Isn't that just the coolest?!) And since the posts take some time to search and type I thought I would post them here as well. 
Photo Credit: Adam Pash
imakesht asked: Do you know of any ways to store/hide wires both inside a house and out? It's making my place look cluttered and disorganized.


Cables got you down? Wires tripping you up? Go wireless. Just kidding. Unfortunately, wireless doesn't work for power cords. Boo-urns! But I did some searching and found a lot of options. Unfortunately, most are not cheap and/or little effort required.
The other thing was without clarification on where your wires were located I just kind of collected a general assortment of cable corralling solutions. So lets start with the cheapest and easiest first.
This computer cord tamer from Instructables user trainwiththom is fashioned from wire hanger and hangs off the back of your flat screen monitor. Super easy and super cheap. Bonus. But unfortunately not a help to thos of us with lap tops (Or giant pre-flat screen monitors).
Photo Credit: Adam Pash
The first step in hiding your cords and cables is to corral them together. At your computer area (If you have a desk) you can use an under desk basket like this one from Ikea to keep them flowing together tangle free and in the same direction (toward your surge protector and/or cable outlets). Use a few cable ties to keep them neat. You could also cable tie them to your desk legs if you have legs on your desk.
This is my new favourite. Created by Karl Zahn for the 2006 MUJI International Design Competition it is not in production yet but could easily be DIYed for little to no money I think. The effort is there though with the cutting, painting and installing but I think it would be totally worth it. Some 1/4" thick plywood, paint and double sided tape and your sitting on a lovely little fence.
That pretty much takes care of the minimal effort alternatives. After that you can install WireTracks CM which "WireTracks CM WireTracks CM kits turn regular crown molding into removable wiring channels that you can use to hide low voltage or electrical cables (check your local codes). They can be used for simple jobs such as getting wiring from the front of a home theater to the back. Or, they can be installed throughout a building to give building owners the ability to run wiring between any two points that are linked by connected walls. And because crown molding is installed above doorframes, it is easy to get uninterrupted coverage of an entire floor." I am not going to lie, I think this is brilliant. I couldn't find a price but I see it being worth it if you have a serious amount of wires and cables to conceal.
UT Wire cord protector and concealer. This looks to be a great option for renters as it does not require permanent installation and you can also take it with you when you move. From the website "Our unique flexible material makes installation simple to do.Ÿ Easy to lie flat and ready to tape on the floor in seconds.Ÿ Three individual separate compartments for extra storage and easy identification of cords.Ÿ Remove cords from the 2 top loading compartments for any future adjustment needed.Ÿ Adjust the length of this cord cover to desire length using a pair of scissors.
Finally, you could also hide them in your walls using various wall plates at various locations in your house. If you feel up to this sort of project (Because you own or have really nice landlords) here is a great link about Doing It Yourself.
Regarding outdoor wires, I am sorry, short of burying them in PVC pipe I haven't any ideas.
A few goodies I have posted over the last little while include:


Wireless peripherals are not the be all end all solution although I sure wish they were and not everything can be wireless (Right?) so I hope these suggestions helped in some way.
Thanks for asking such a great question! Don't forget to stop by the Storage Geek blog for more great storage tips and fantastic DIY inspiration!

Thursday, May 12, 2011

Wednesday on Wednesday (or Thursday)

I must have done something right in a former life because this week has been AMAZING for weather. I have been outside almost all week (Hence the lack of online presence.) Today Wednesday asked if she get crafty, I thought what a great idea! I brought all the paints outside, set up her easel and let her get to it. What a great way to spend the morning, watching my little one create in the fresh air and sunshine!


The Wednesday on Wednesday feature helps me not only share with you the reader bits and pieces from Wednesday's growth and development, but also helps keep me blogging, no matter how much craft/word content comes with it. I have some ideas for blog posts coming soon and a long over due review of the spring issue of Nuno titled Rustle. I'm also knee deep in Storage Geek stuff and sewing up a storm. Hope you guys have had weather just as nice and days just as productive! ♥M