


Last year, when I was still living in Kelowna, BC Mr. Until Wednesday made me a workstation in the back room of our house. It was wonderful, a large benched work top with large shelves flanking each side all anchored to the wall. He even had the foresight to build it at bar height to keep Wednesday curious fingers away from things of both a delicate and dangerous nature. I eventually ended up sharing the room with our fabulous pantry and Wednesday's toy overflow. I also eventually added a mini t.v. and dvd player for myself at night or Wednesday during the day. (I really do miss those days when she would watch A Wiggly Wiggly World over and over and over.)
But I digress, my point is I had sufficient space to take out my scrapbooking supplies and make this garland. It is super simple and a total stash buster craft. And if you have little ones older than mine was at the time (1.5 years)they can help you or even make their own. I had initially made this garland thinking I could add a couple hearts each year, but I made my hearts too big too begin with and so my garland was huge, I even shortened the string in between the hearts but still the garland stretched out pretty far. So I shrunk the pattern for you from the six inches that I used to four and a half inches.
Materials:
Photos of loved ones you are okay with cutting and pasting. (I printed black and whites out for just this purpose)
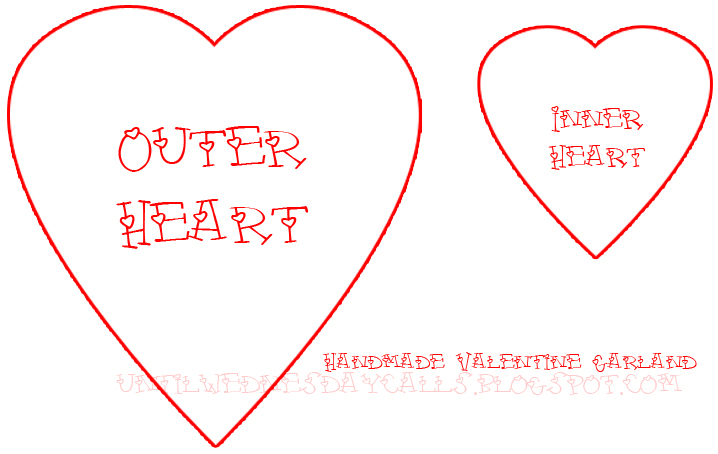
Heart Pattern found here. Or your own sizes, my inner heart is half the size of the outer.
Valentinish paper (I used paper that I really didn't like by itself but as the backdrop for these it worked well. Also, you can use small pieces to lighten the load on your scrap piles.)
Embellishments. I used so many different kinds I couldn't list but I kept gluing to a minimum with a plethora of brads, flowers, ribbons and staples.
Hole Punch or stapler (For stringing hearts together)
String I used this really neat stuff I bought at Value Village, you don't even need one long piece as you can tie each heart to another.

Construction Instructions
I cut out sixteen hearts, but you can cut out as little or as many as you want from the background paper using the outer heart template. I used the inner heart template to cut out my photos.
Glue a photo to each heart.
Embellish as you please.
Tie the string to the hearts, I used one long string that threaded the hearts together but you could use different coloured scrap pieces to tie one to another. Just remember to incorporate the length between hearts into the finished garland length. (I forgot and had to re-do this step).
String up in a high traffic area so loved ones can see the great pictures of themselves, and your handiwork.

Here is a link to the flickr set.
I do so love Wednesday's baby pictures. This is such a great craft. I can't wait to add pictures from this year. So what if the garland is already a bazillion feet long, I'll find somewhere to hang it proper.
Link Events:


