Monday, February 1, 2010

How To : Slipcover the Mailbox Part 2 of 2

Valentine Mailbox Slipcover

I loved my mailbox, loved it! But I detested my paint job. For serious, it didn’t come out at all the way I pictured it in my head. Partly due to my lack of practice in decorative painting, partly due to my pickiness and partly due to my hating it.
So, I thought of ways to cover it with fabric. At first I was going to Modge Podge the heck out of it. But again, I have no experience with that and with the painting fiasco still fresh in my head I decided to slipcover it. Does that make me weird? Well if this is wrong I don’t want to be right! *ahem* On to the craft . *Author's Note* After writing this tutorial I realized, the entire slipcover could have been made by hot gluing the seams instead of sewing them, seeing how it is not like it has to stand up to washings or anything. So go ahead, glue with all your might!

Materials

Fabric maybe a half yard? I used a vintage sheet I had been saving for a special occasion.
Hair elastic for closure
Something to hook it on like a push pin
Ribbon
Felt
Buttons
Ric Rac
Hot Glue & Glue gun

Cut your fabric like in this diagram shown. I would take this opportunity to print it out. Even though it is not a pattern (or even to scale) it will help you when reading the directions below and keep you from having to scroll up whenever I reference it. Sorry for the lack of pattern but I don’t know how to make them printable on more than one page, I should look that up. You’ll notice it looks just like the cardboard pattern but with the door attached. It essentially is. I traced around different parts of my mailbox and added a half inch for seam allowances. This is the basis of the pocket for the door flap to go into. To do that take door flap piece D and put it right sides together with door piece A. Pin together. Don’t forget to add the hair elastic (or ribbon or whatever it is you are using for a closure) in with the pins.

Slipcover Steps Collage 1
You want to sew this and turn it out first. Make sure it fits. Once that is done you can go onto the actual box cover.

Slipcover Steps Collage 2
With right sides together, pin B to E just like in the bottom left photo. This will make your arch and give your slipcover it's mailbox shape.
Sew. Take out pins and turn right side right and insert mailbox to make sure it fits properly.
Now, flip inside out again and pin C to E like in the top left photo.

Slipcover Steps Collage 3

Once you have made sure the cover fits the mailbox you are going to pull our your handy dandy glue gun! Ignore those pins in the bottom left corner. I forgot to add flap G (in the diagram)and had to sew one on to come down over the edge and into the mailbox. It was no big deal but just now the picture made me realize I could save you the step. Now you just glue down the trim to the inside of the mailbox like in the upper right hand corner. When that is fastened, add a ribbon (I used trim from the sheet)to cover the seam inside the arch. Now, glue the flap from the door pocket to the inside base of the mailbox. This was a bit tricky with the whole HOT glue thing, but I got away with only a few battle scars, I am sure you can do way better. Seriously, I haven't picked up a glue gun in years.

Slipcover Steps Collage 4
We are at the home stretch. At the front of the mailbox, you need to add a 'catch' for your elastic closure.
I used this nifty little tack we had laying around from Christmas time. After that it is embellishment time which is completely personal.

Valentine Mailbox Slipcover
After that you can make your 'flippy thingy' our of felt and stuffing. Simply trace, stitch, stuff and close. I added some great buttons and red thread but you needn't.

Slipcover Details
Now, the uber fun stuff. Embellishing! First I glued some green ric rack down as the stems of the flowers. Then I used some felt circles folded into quarters and glued in the middle for flowers. I covered the base of the felt with some groovy green buttons and snipped some green felt like leaves. Loved it, like for serious me and my mailbox are BFFs. To jazz up the rest I added two stripes of red ric rac (BTW I won the ric rac bunches off a woman on Ebay selling off her vintage stash, the plastic near degraded when I opened the package lol.)one stripe has two more buttons that had these great wide holes. And then I hot glued the 'flipper thingy' in place.

Valentine Mailbox SlipcoverValentine Mailbox Slipcover

Ta-Daaa! You are now ready to receive some oh so sweet Valentines!

Click the photo to be taken to the papier mache construction instructions.

Valentine Papier Mache Mailbox

*Second Author's Note* I realize this how-to doesn't read very smoothly, I tried to keep it simple but I am still learning how to write an effective how to, and as my projects get more complicated, so shall my tutes I guess. I appreciate any and all feedback. And even if I confused the heck out of yas, I hope I mayhaps inspired you even a wee bit?!

Friday, January 29, 2010

Junk Mail to Mail Box Papier Mache Valentine Fun!

Paper and scissors and glue oh my! Paper and scissors and glue oh my! Paper and scissors and glue oh my!

Valentine Papier Mache Mailbox

Whew, almost got carried away there! Truth is, this project nearly carried me away. I have spent all week on it on and off from conception, to mock up to execution to re-execution. And through it all, I took photos so you could learn from my mistakes! :) Well, actually I didn't make too many mistakes, but I did absolutely detest the paint job. But, that is another post for another time. (Later today thanks to my internet connection going down over the weekend) Right now we are just going to play with glue and torn junk mail and a wee bit o' the corrugated cardboard.

At first I wasn't sure if I should make it a photo tutorial, seeing how I was call on skills from what, like third grade? But I thought hey, instead of leaving ya'll to look up paste recipes and what not, I would just share with you what I learned with some photos. Plus, if you already know how to do this you can just skip this post, or go straight to my flickr photoset detailing the process.
Because of the simple nature of the process and the amount of photos, I will try to condense them so you can browse without spraining your scrolling finger. I just nice like that ya know.

First off, you need a good papier mache paste mix. I made the one from Amanda Blake Soule's Handmade Home. While it cools, you can cut the cardboard and shape your mailbox.

I didn't supply you with a pattern this time because it really is to your tastes. You could make a bunch of little tiny ones or a giant family one etc. This one finished at almost 5" wide, 8.5" deep and 7.5" tall. HINT: I used a cd to start with. The arch from it decided the proportions for the rest of my mailbox.

Materials

Papier mache paste (If you are making your own this is a good time to make it, so that it can cool down while you prepare your other materials.)
Corrugated cardboard
Paper ripped into strips and chunks (I read that newspaper is good for this but I had none so I just ripped up a bunch of security envelopes and junk mail I had in the recycling box)
Coloured paper (So you needn't prime and paint the inside)
Foam or paint brushes (I really like the foam brushes for this sort of thing)
Utility knife (scissors work too but a utility knife/box cutter works really well)

Construction Instructions


We are going to layout our mailbox pattern and cut it out. I found it was easiest to cut it with the back piece attached. It is a pretty straight forward design. Cut out the door flap (to be exactly the same as the back) separately.

score lines
Score the cardboard where indicated in the picture. Here is a larger version in case the writing is too small.

Steps Collage 1 for Valentine Mailbox
Fold at score lines and tape in place. Use lots of tape if you need to. I used low tack painters tape so I needed to.
Now, curl the arch into itself so that the lines in the cardboard have now been bent. This will help you shape your arch as you tape it to the back piece. Continue in this fashion until you have yourself a mailbox! Tape as much as you think you need to because you will be going over it with glue and paper soon anyways.

Steps Collage 2 for Valentine Mailbox
Now, in all honesty I have not done this, probably since grade three? Grade four tops. But, somehow it stuck with me. Pretty hard to forget how to glue shredded paper to more shredded paper. Anyhoo! In Amanda Blake Soule’s book Handmade Home she says she likes to put the paste to the paper and then to the bowl. I say that is asking for way more patience than I myself have. Slather it on I say! If you do this in small sections you can stick the paper to the box and just slather more paste on top. Do this for approximately four layers. Give or take a layer. I used thicker paper so I probably could have gotten away with as little as two layers, but it was fun I tell you! F-U-N! To avoid painting the inside I used coloured scrapbook paper so that it would appear to be finished. It was pink, and it worked. You could also do this to the outside too and not have to paint it. In hindsight, I probably should have but I love the results from the slipcover (next post).

Steps Collage 3 for Valentine Mailbox
Continue doing this to the mailbox door and flippy thingy. (Although, I made a different one in the next set of instructions.)

Steps Collage41 for Valentine Mailbox

Let dry. I set mine in front of a fan on low and it was ready to prime within a couple of hours. Depending on how gloopy your layers and if you use a fan, you might have to wait a day or even two. But once dry you can prime it. I think I did two coats. Maybe even three because again, it was fun! The next day, I taped off some stripes and painted. Then I came back and painted it again. Then I came back and painted more. I hated it all though. Like Men on Films hated it. But you can probably paint way better than I can. *glares* So, instead I made a slip cover and decorated it with fabric and buttons.

In short, if you love your painted mailbox, you are nearly done. You just have to attach the door and the flippy thingy. If I hadn’t did what I did in the next post, my plan was to paint the flippy thingy and attach it using hot glue. (I wanted to make it movable but some of my craft supplies are still in storage.) For the door I was going to Modge Podge a piece of fabric to both the door and floor of the inside mailbox to act like a fabric hinge.

Click on the pictures of the finished (really finished) product to take you to part two of the tutorial. It was fun and this time turned out even better than in my head.Here is a link to the photoset with finished product and detail shots at flickr.
Slip cover embellishmentsSlip cover embellishments


monogram

Wednesday, January 27, 2010

Wednesday on Wednesday


My Sleeping Beauty., originally uploaded by Cara.Mia.

I thought since most of my blogging is done whilst my angel sleeps, I would post a photo of her sleeping. This is from last week. And on that note, I think I am going to go to bed and cuddle with her until I fall asleep.

Monday, January 25, 2010

Recipe : Mini Goat Cheese & Onion Quiches

Mini Goat Cheese Quiches

Look pretty darn good don't they? They were! I have to say, I was really proud of myself when these were done because not only were they my first quiches of any kind, but it was my own recipe inspired by what was in our fridge at the time. I had recently bought the goat cheese after reading Eating Animals because it said on the label it was vegetarian cheese, meaning no stomach lining was used to make it. I have had goat cheese before but this stuff was wonderful. We put it in everything for about a week. I wish I could tell you the brand but I have since thrown away the package. If you haven't tried it though, go, do that, right now, I mean it.

Now, if you have never made quiches before, they only sound fancy. I think the biggest pain in the but is the making of the pie dough, and if you already have a recipe you love like I do it is no sweat. In the interest of full disclosure, these were made with defrosted frozen pie dough leftovers from Christmas. Which helped because there are a few steps to these. All are super easy and super tasty though.

Ingredients


Enough pie dough for a double crust pie You can use the guaranteed Tenderflake recipe here or your own.

2 large yellow onions sliced super thin
2 tbsp butter
2 tsp sugar

2 eggs
1/2 cup cream
salt & pepper

1/2 cup fresh goat cheese (a nice feta would probably work too if you have to substitute)
Fresh cilantro (or herb of your choice)

Modis Operandi


For the quiche cups:


-Divide dough in half and roll into balls.
-Roll balls out as thin as you can. (About 1/8-1/4")
-Using a drinking glass or circular dough cutter cut approx 2.5" circles from the rolled dough and place over cups of a mini muffin tin.
-Lightly press sides into cavity.
-Prick with fork on bottom.
-Bake @ 425 until edges are golden brown, remove from oven but leave oven on.

While quiche cups are baking:


-Melt butter in pan.
-Stir in sugar until dissolved.
-Add onions and stir until coated.
-Cook stirring occasionally until onions are a nice dark brown and even a little crispy in places.
-Remove from heat.

After you have removed quiches from the oven and onions from heat:

-Mix together eggs, cream and salt & pepper.

Assembling the quiche:


-Remove dough cups to a baking sheet.
-Cover the bottom of each cup with a couple caramelized onions (depending on how small they cooked down too).
-Add 2 tsp of egg mixture (don't worry if it leaks out the bottom, you can always go back and add more before the next step)
-Add a tsp of goat cheese.
-Top with one or two cilantro leaves.
-Pop back in the oven for about ten minutes. This is just to cook the egg so keep an eye on it.

Shampoo, rinse and repeat for any remaining batches. Two pie dough recipes did almost two full (24) mini muffin tins. You may get more or less depending on how thick your dough is and how heavily you fill your cups with ingredients.

The beauty of these is they taste good the day you make them, the next day warmed up in the oven and even on the third day warmed up in the microwave.

Bon Apetit!~

Sunday, January 24, 2010

I Hear Ruffles Are In Right Now...

With Valentine's Day approaching, I have been trying to think of festive things to do and make. Aside from the give cookie making and decorating and card making my mind has come up with a couple things. Not the first, but the first to be done was this skirt. So simple and yet so cute! With appliqued hearts and twelve feet of ruffle I transformed two vintage sheets and a bed skirt into an adorable skirt for Wednesday.

Ruffel Skirt

I have been watching all of these gorgeous handmade ruffle items exploding everywhere and the other day it occurred to me that in the jumble of fancy feet for my machine was bound to be a gathering foot. I was right, I went looking and found it. It was kind tricky though because it is the slightest of curves that make it seem different than a normal presser foot. But I found it, used it, fell in love with it and now I am going to show you how to use it! Another bonus, this is yet another stash buster craft. having just pulling some vintage sheets out of my collection to play with.

Because I had never attempted this sort of thing before it didn't occur to me until after to make another tutorial so my pictures might seem a little too few or of weird steps int he process. Feel free to ask more questions.

Materials

At least two different fabrics, more if desired.
Skirt piece 36"x12"
Ruffle pieces totaling 12' (144") ruffled (quick tute for that to follow)
fabric scraps for hearts
3/4" elastic measured and cut to fit child's waist

Construction Instructions

First off, how to make 12' of ruffle using a gathering foot.

Cut 2" strips

1.To achieve the look of the torn ruffle, I ripped an old bed sheet in 2" strips. I ripped half the bed sheet. You may need more if your ruffles are fuller and more condensed.
2. Sew pieces together end to end for one really really long strip of fabric.

Gathering Foot
This is a gathering foot. It is my new favourite toy. I mean tool! All you do is attach the foot, put one layer underneath instead of the usual two and 'sew'. Sounds too good to be true right? Not so. Adjust your tension accordingly. The looser the tension, the looser your ruffles, the tighter your tension, the fuller the gather.
Pressure Regulator
I did this on the tightest tension with the presser regulator 3/4 of the way down to achieve the hand-gathered look, but if you press it down fully you get a perfect, professional looking ruffle.
Two ruffles
Don't forget, the fuller the ruffle the more material you will need to achieve 12'.

After you have your twelve feet of ruffle, you are ready to move on to skirt construction.

Measure & Cut
1. If you are using a bed sheet, measure and cute your fabric to 36"x12" along a hemmed edge lengthwise. 36"x13" if you are using fabric yardage.
2. If you have to hem the bottom do so now.
3. Pin ruffle to the skirt starting from the bottom up one row at a time. (Like shingles on a roof.)
4. Cut ruffle at the edge of skirt base so that you do not have 9' of ruffle trailing behind you at the sewing machine.

Ruffel Skirt
5. Sew the first row ruffle along the stitching in the ruffle, at about 1/2" above the bottom of the skirt.
Ruffel Skirt
6. Continue adding each row of ruffle until they have a nice full layered look like this.

Ruffel Skirt
7. Once all of the layers have been attached. Cut out your appliques. (I used two hand drawn hearts the largest being 3.5" at the widest part.) Sew them on to the skirt. I used a quick straight stitch. After they were all attached I went back and tried REALLY hard to add some red punch in the form of zig zag stitches but my skills are not yet there and it just looked like poop. I ended up wasting an hour sewing and cutting out thread it I think four times. I hope you have better luck. I still may add it in the form of hand sewn embroidery floss though, I haven't decided.

Side seam.
8. Fold fabric in half end to end. Pin and then sew down the side, including the ruffles at the bottom.

Elastic casing
9. Fold down fabric at the top 1.5" to create a casing for the elastic. Pin if you need to. Sew approximately one inch from top leaving about a one inch hole at the end for elastic insertion.

10. Cut elastic to desired waist size. For Wednesday I cut mine to 13" and that was perfect.

11. To feed elastic through casing, I like to attach a large safety pin to one and feed it through. The pin gives a great handle through the fabric. I also like to attach the other end right to the skirt so that the tail does does end up inside the casing to be fished back out.

12. After elastic is fed through sew both ends together and sew up seam with elastic inside.

And VOILA~! You have yourself a gorgeous ruffled skirt. Total time from beginning to end? Maybe three hours tops. And that includes toddlers, coffees and ruffle making.

Ruffel Skirt

First thing in the morning, complete with bed head and stained t-shirt she models for me, happy to walk all over my fabric on the floor from the night before. But later when I did her hair, got the sunniest room ready with a white back drop would she even go near the room let alone do a photo shoot for me? Not a chance! maybe for Valentine's day you'll get to see her, maybe I'll even have a coordinating shirt done. Hah!

As always, there are larger pictures in the set for closer inspection at my flickr.


Linking to:

Strut Your Stuff valentines @ Somewhat Simple
Make Your Monday @ Twice Remembered
Made By You @ Skip To My Lou
Get your Craft On @ Today's Creative Blog
Make it and Wear It @ The Train To Crazy
Hand Me Down Rehab @ Helping Little Hands

Wednesday, January 20, 2010

Wednesday on Wednesday

So cute!

She is the sunshine of my love.

Monday, January 18, 2010

How To - Handmade Photo Valentine Garland

Happy Monday ladies and gents. With Valentine's day coming up I was wondering what sort of crafty bit of awesome I may be able tor broadcast from my corner of the blogosphere when I remembered this garland I made last year.

A Better Garland Collage

Last year, when I was still living in Kelowna, BC Mr. Until Wednesday made me a workstation in the back room of our house. It was wonderful, a large benched work top with large shelves flanking each side all anchored to the wall. He even had the foresight to build it at bar height to keep Wednesday curious fingers away from things of both a delicate and dangerous nature. I eventually ended up sharing the room with our fabulous pantry and Wednesday's toy overflow. I also eventually added a mini t.v. and dvd player for myself at night or Wednesday during the day. (I really do miss those days when she would watch A Wiggly Wiggly World over and over and over.)

But I digress, my point is I had sufficient space to take out my scrapbooking supplies and make this garland. It is super simple and a total stash buster craft. And if you have little ones older than mine was at the time (1.5 years)they can help you or even make their own. I had initially made this garland thinking I could add a couple hearts each year, but I made my hearts too big too begin with and so my garland was huge, I even shortened the string in between the hearts but still the garland stretched out pretty far. So I shrunk the pattern for you from the six inches that I used to four and a half inches.

Materials:
Photos of loved ones you are okay with cutting and pasting. (I printed black and whites out for just this purpose)
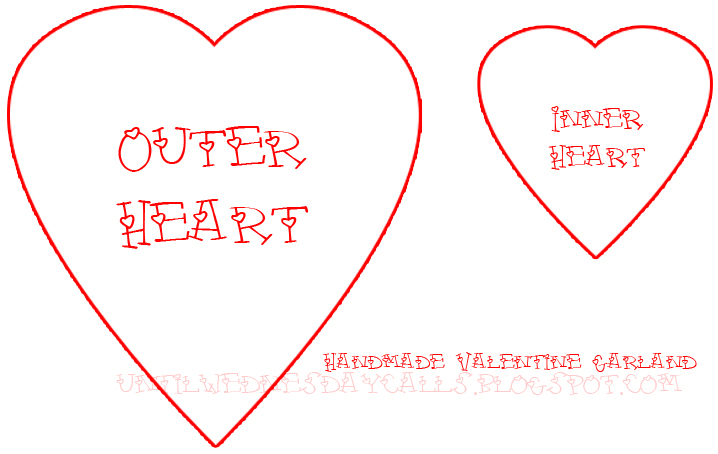
Heart Pattern found here. Or your own sizes, my inner heart is half the size of the outer.
Valentinish paper (I used paper that I really didn't like by itself but as the backdrop for these it worked well. Also, you can use small pieces to lighten the load on your scrap piles.)
Embellishments. I used so many different kinds I couldn't list but I kept gluing to a minimum with a plethora of brads, flowers, ribbons and staples.
Hole Punch or stapler (For stringing hearts together)
String I used this really neat stuff I bought at Value Village, you don't even need one long piece as you can tie each heart to another.

Homemade Valentine Garland

Construction Instructions

I cut out sixteen hearts, but you can cut out as little or as many as you want from the background paper using the outer heart template. I used the inner heart template to cut out my photos.
Glue a photo to each heart.
Embellish as you please.
Tie the string to the hearts, I used one long string that threaded the hearts together but you could use different coloured scrap pieces to tie one to another. Just remember to incorporate the length between hearts into the finished garland length. (I forgot and had to re-do this step).
String up in a high traffic area so loved ones can see the great pictures of themselves, and your handiwork.

Homemade Valentine Garland
Here is a link to the flickr set.

I do so love Wednesday's baby pictures. This is such a great craft. I can't wait to add pictures from this year. So what if the garland is already a bazillion feet long, I'll find somewhere to hang it proper.

Link Events:

monogram

Saturday, January 16, 2010

Layered Sweater Refashion Tutorial

On my daily blog reading list this week I came across two simple yet brilliant ways to upcycle button up shirt sleeves. Which, believe it or not I have a plethora of thanks to the hubster. The first clever re-use came by way of Lisa of 5 Orange Potatoes and her gentleman’s sleeve pine sachet. It is a wonderful way to use both the wonderful smelling needles from her yule tree and men's shirt sleeves. Simply fabulous. I know. The very next day Kojodesigns posted at Adventures in Dress Making a tutorial for a recycled shirt sleeve wine bag tutorial. Again I was amazed at the simplicity but utmost clever re-use of a shirtsleeve. The two posts had me to wondering, was there something I could come up with that used my many shirtsleeves, even half as cleverly? I though of one thing, adding the cuffs to a sweater for a layered look. Then I thought of a blouse I have that I couldn't wear due to fit but a friend had given me and I really did like it. I thought; "Hey, why not cut off all the pieces and sew them the sweater for a complete layered look?". That is exactly what I did, and I even took pictures!

Refashion Collage

I am pretty sure (certain) it took me longer to edit the pictures and make this blog post than it took me to deconstruct and reconstruct the sweater with Wednesday calling at me every few minutes. You have to forgive the poor lighting, the sweater and the blouse were dark and the day was overcast but I tried to sharpen the pictures where I could.

This worked out well for me and I will most likely do this again in the future when I come across another sweater (I have two blouses dying to be deconstructed). I can never seem to get the layered look right, it always comes out frumpy and bumpy. So I thought I would try to cut out the frump and bump and this is what I came up with.

Faux Layered Sweater Tutorial

Materials:

1 sweater (this one is 85% merino wool, but I don't think it mattered as much as it being a smaller, closer knit.
1 blouse, or just the cuffs, collar and bottom of a blouse.
Pins and matching thread

Construction Instructions

Faux Layered Sweater Refashioning
Choose your blouse and your sweater. I love love this sweater I bought at a charity shop for $1.50 but it would ride up just an inch too far and the blouse is a hand me down from a friend and so cute but it was a couple inches to short and the I didn't like that I could not button the collar. Sew perfect yes?

Faux Layered Sweater Refashioning
Lay your sweater on your blouse so you can get an idea of how far you want your cuffs, collar and bottom to stick out.
Faux Layered Sweater Refashioning
I cut the collar off first, to do this you just cut around the base of the neck so that the collar fits inside the collar of the sweater. It helps if there is already a crease in the collar to rest against the sweater so you can pin it in place where it would naturally sit.

Faux Layered Sweater Refashioning
Now cut the pieces about one inch from where they will begin to stick out from under the sweater.

Faux Layered Sweater Refashioning
I pinned it in front first so that I could line up the sides evenly with the sweater collar.

Faux Layered Sweater Refashioning
Once you have the collar where you want it, lift it up and pin away. (I like lots of pins but that could just be the novice sewer in me.)

I forgot to take pictures of the bottom and cuffs pinned, but for that I just fit the blouse pieces inside the sweater and pinned. I wanted to do all of my sewing from the outside so that I could run along the cuff lines to hide my stitches. Like this:

Faux Layered Sweater Refashioning
I did get a pucker, but that is the only one, I forgot to pull instead of push. It turned out pretty good though yes? Anyhoo, this picture was to show you that there is a sort of seam where the sweater collar meets the sweater? Sew along those lines and your stitches will be near invisible.

Faux Layered Sweater Refashioning
See? Near invisible stitching. Also, it helped that I made some matching thread kicking around, seriously not even sure where it came from but worked out awesome.

Faux Layered Sweater Refashioning
This was the only seam you could 'see'. It could be that I cam too picky, but I just fold the cuff back to show more blouse.

Faux Layered Sweater Refashioning
Voila!~ The finished product. Not bad for my first try yes? It is not perfect, but I have to say with the exception of one pucker it is nearly so. I can't decide if I like how it sits at my waist though.

Total project cost: $1.50 for the sweater I bought months ago. Pretty good eh?

I have no pictures of myself wearing it due to the gloomy days. As soon as we have some sunshine I will grab a pic of me wearing it to show as a follow up.

This will also be posted to Wardrobe Refashion after new pledges are accepted in February. (I made the pledge, but cannot officially join the fun until then.)I am currently enamored with this site/blog/concept and have been trying to think of ways to join the fun. This is my first attempt and I think it went well. I have few other ideas I will be sharing over the next little while that have to do with family cloth, mama cloth and cloth diapers. So stay tuned!~