Ahh, blogger how I have missed thee! But I am back now. And with lemony goodness from above! T'was my youngest brother's birthday on Tuesday so we had a dinner for him yesterday. The siblings were supposed to come down from the city but the weather did not cooperate so we had a lot of Leftover Lasagna (to be shared with you next week) and leftover Lemon Joy cake. So I managed to snag a couple photos to share with the recipe(s).
The cake was inspired by the Lemon Meringue Cupcakes I made on Christmas day from the Martha Stewart Cupcakes Book. Those were incredible. So tasty, but messy (My icing kept sliding off the lemon curd) but when Matt asked for a non-chocolate cake, I thought this was as far from chocolate as we could get.
The cake is a combination of three different recipes in the Joy of Cooking cookbook. The first is the Lemon Chiffon Cake (pg. 710). I doubled the lemon zest amount and substituted a half cup of freshly squeezed lemon juice for a half cup water. If you have never made a chiffon cake I urge you too. So light, so airy so wonderfully moist. I made it the day before and left it in the pan with plastic wrap to seal it and it was still super fresh when I pulled it out to fill.
The filling is a simple lemon curd recipe (pg. 687) made mostly of cornstarch, water and a bit of lemon juice and zest. I may have doubled the zest called for in this recipe as well, but maybe not. Super simple though. To fill the cake, I slice of a layer off the top, cut a channel with a serrated knife, pulled out the spare cake and filled with curd. Replacing the top piece was easier than getting it off in one piece and once done, you would never have known I hollowed it out.
The icing is Seven Minute Icing (pg. 790). Let me tell you, Joy of Cooking's recipe is super simple compared to the recipe in Martha Stewart's Cupcakes book. I managed to screw that up on Christmas day, but this one was easy peezy lemon squeezy. It is super sticky, and hardens super fast though so you need to work quick on a light and delicate cake like chiffon. I found the trick was to dollop generously, then spread with a wet spatula and 'slice' the icing off the spatula with a butter knife. After making the cake I realized a video tutorial would have been helpful. Next time, I promise.
The reason I used Seven Minute Icing was so I could brown it with my kitchen torch like meringue. The cake had so many lemon elements I thought a meringue like topping was fitting. It looked wonderful. It tasted wonderful too. It was rich though. The chiffon cake was the perfect base for the lemon curd and super sweet icing. You definitely wouldn't have wanted a sweet buttermilk vanilla cake under that.
I think I am happy with the new look. Kind of wintery with a splash of fun in the banner. Isn't Wednesday just too freakin' cute?! And can you believe it, fifty posts~! Just like the little engine that could, I am. Anyhoo, I have been easing back into the internet and will have a post for MMmm good Monday. A lemony good post! I hope everyone has a happy weekend!
I am currently taking a hiatus from the web. I do miss the blogging back and forth with other mamas but it has been good for the family relationship. After the holidays I will be back with lots of fun posts, a more seasonal look and comments on other blogs.
Until then, I hope your holidays are all safe and joyous!
This edition of Mmmmm Good Monday is construction instructions for an army tank birthday cake like this one!
There are lots of images of army tank cakes to be Googled. There are even some tutorials out there, but I found that they were all just smidgen vague for my liking. So, forgive me if I break it down too much I am not making any assumptions about your intelligence, it is more a reflection of mine! :)
Note*** I made this from a carrot cake bundt recipe. I cannot see why a regular double cake recipe would not suffice.
Materials: For tank body: Cake batter, your choice. 9x13" Cake pan (I used a glass lasagna pan) 4" Ramekin or oven proof dish with straight sides.
For accoutrements Licorice cigar (cannon) You could always use a tube shaped biscotti) Licorice pieces halved (tracks) Circular sweets, I used chocolate covered mint patties (wheels) Green plastic army guy(s)
Icing: Your favourite icing recipe. (I used cream cheese because it was a carrot cake.) Light green or yellow and light blue colour pastes to make a bright light green. Black (or purple) icing colour paste.
Construction Instructions
Bake cake recipe according to instructions, but watch times because of the rammekin dish. Cut and assemble as pictured below.
Here is a picture of mine pre-icing. Mind the wooden skewer, I broke a corner off whilst removing the cake from the pan.
After the cake has cooled and you have cut and assembled it to something at least resembling the one pictured it is time to ice! First mix your green. Mine looked this at first (It was actually left over from those every cupcakes). Once you are happy with the green, add a little bit of dark purple (I used black) food colouring paste at a time. A little goes a long way and you want your icing to be army green, not grey (I assume.). You don't have to mix it all the way, it will blend itself as you apply it to the cake.
Spread it as evenly as possible. Leave the top of the turret until last. Cut a little hole out and insert a toy army man. Ice around him.I would have liked to smooth mine more but I didn't have the proper tool and really, I just got excited at how awesome the cake looked.
After you are satisfied with your icing job you can apply the wheels, tracks and cannon. I would take care to either leave the cannon as long as you can or insert it almost half way. It saves it from sagging down to the cake. (The cigars are a bit heavy.)
Last but not least, I have made up some cake flags. Cut out and glue together with toothpicks in between. These are great. This way you don't have to find somewhere to write on the tank. (But feel free as it is YOUR cake.)
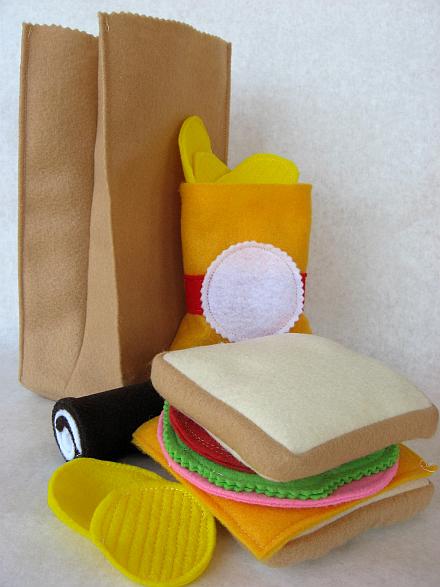
The pattern I recently won at Today's Creative Blog by Skip To My Lou. It sat idle for less than twenty four hours! It took a couple days to do because I had to wait until Wednesday was sleeping and she recently fell ill with a cough but I finished it! And here is the finished product!
I actually had all the colours of felt to make this little project. (Having all the materials is so rare for me!) Between the thrifted felt remnants, Eco Spun store bought felt and the wool felt remnant oh and the corn batting this was a very eco friendly project. I could say it was a use what you got type project too. But in all honesty I am most happy about having a present made for Wednesday. It seems I keep adding to my list of homemade gifts for her and this was the first one I could check off. Just the sort of motivation I need to get me further in gear. Truth be told I am scared to look up how many weeks are left before C-Day! But like the Little Engine that Could, so can I!
I am also officially addicted to making felt food. It was so easy, so cute and thanks to my super duper sewing machine I don't have to do a lot by hand, which is nice because my hand stitching skills leave a lot to be desired. But I am okay with that. To help me on my way I have been googling free felt food patterns and have come across some most ingenious and absolutely adorable blog posts. Here is a sample of my favourites:
One Inch World has a few great tutes, I particularly love the lollipops and bow tie pasta, both for their sheer cuteness and crazy simplicity! This is also a wonderfully child friendly crafty blog you should spend some time surfing!
Here is the pattern for a super simple peelable banana from Deviant Art user starxxlight who also has the most adorable marshmallow plushie on her homepage.
And last but not least (and definitely not the last of links I have bookmarked) here is a quick tute for some felt sushi by http://hoogliart.wordpress.com/.
The list just keeps going but these were some of my favourites and 'fer sure gonna do's' and I thought I would share. There are so many more inspiration sites to choose from on Flickr and Etsy. And really, a peek in your own fridge and pantry just might be the inspiration you need!
That is correct folks, I won my first blog giveaway this weekend. It is so cute it almost hurts too! It is a Skip to my Lou pattern via Todays Creative Blog. So yes, this pattern which can be purchased for 1.75 USD or you can place her button code on your blog and you will receive the pattern for free. That is wonderful, I had no idea until right now! Details and tutorial are here. It is so cute and I think I might even have all of the colours in my stash! So this week, add it to the must do before Christmas pile!
This is Wednesday in her Little Red Riding Hood costume I made her! Is she not the most adorable thing you EVER DID SEE?! And she wore it! Twice! Love it.
The costume was inspired by this one at Martha Stewart.com I thought it would be a great idea for Wednesday because she really does not enjoy bulky costumes, things on her head or being a showpiece. Kind makes Halloween tricky non? (No pun intended) so I thought if I can get her to wear the cape (even by itself) then everyone will know what she is and we can both be happy. It worked, I had a blast making it and watching Wednesday trick or treat in it! Even with a red hooded sweater cloak on without the cloak people knew. She stayed super warm though with the coat and cloak and the layers on her legs. If a really cold wind hadn`t come up when it did we would have let her keep going for the fun of it.
This was her first year trick or treating and we were lucky enough to have a little friend for her to go around with. Her play date friend Sydney was a lion and man was she cute! They caught on to the process after the second house and then it was us parents who had to keep them from going to houses that were not giving out candy. Wednesday used a yellow basket for her treats but it emptied quickly when being swung about so we had to keep emptying it for her. She didn`t mind, she though getting candy was great but the whole process and being out with the big kids and the moon made her very happy. Daddy and I managed to get a few pics in but the camera was not cooperating. *sigh* Our little girl went trick or treating. She is growing so fast!
Details on the costume construction:
I started with the hooded cape. My mom had originally bought me a simplicity pattern that used a single yard of six foot wide felt but I did not have a six foot wide yard of felt. So, I used this tutorial at blueprints to make the cape. (Sort of, I cut it differently, made it from felt and tweaked it more) but she was a big help for the basic idea. I did use the Simplicity pattern for the hood though. Because the pattern did not have a seam allowance due to it being intentionally cut from felt I cut the pieces from a red fleece sweatshirt and used the nice wide bottom hem as the front of the hood. I had to tweak the cape a bit to accommodate the hood and the big fat black button (from an old Mrs. Claus apron of my mom's) but Wednesday was super accommodating in the many "Wednesday, can you try this on a moment for Mommy?" So far cost of costume = zero dollars.
Next I made the bodice-ish-shirt-thing. I just so happen to have a white turtle neck kicking around that Wednesday never wore (I am not a big turtleneck fan). I found two very nice pieces of black felt and laid them on top of the shirt and with a white pencil crayon just kind of drew the curve for the arm and a vest front. I ran the pieces through the machine with a semi-decorative stitch around the edges and then basted the pieces to the shirt. I finished it off by giving it a faux lace up with red embroidery thread. The felt and floss were both thrifted pieces) So far cost of costume = zero dollars.
The next day I began the skirt. Which was so ridiculously simple that I might lose this week to the sewing machine for Wednesday's wardrobe. But I digress. The skirt came from an old corduroy skirt my mom had in her alterations pile for some five years. She thought of it when I said I needed some black fabric for the skirt and offered it up. I snatched it without hesitation. It is lovely, I may have to use it elsewhere soon. Anyhoo, the skirt is just two pieces of fabric sewn up the sides, a wide hem and an elastic fitted under the hem. Easy peasy lemon squeezy. Costume cost = zilch.
The 'fur lined boots' were a pair of fun fur topped striped baby leggings tucked into a great pair of black boots. The baby leg warmers I had on hand from last Christmas and the boots were another hand me down. Great touch though right? Costume total = nadda.
Last but not least I had to buy a pair of tights for her little thighs. I found a pair on clearance at Wal-Mart for three bucks. So, costume total? Three dollars + one and a half days effort. Not too shabby for my first time doing the Mama-come-Martha eh?
That night we carved the pumpkins. I asked Wednesday what she wanted and she said a monkey, so a monkey I gave her. For the bigger pumpkin I had wanted to carve something from a stencil but my poker took was not sharp enough for the intricate design so I let Wednesday draw on the pumpkin and then carved out her design. It actually looks kinda cool.
I roasted the pumpkin seeds by rinsing them, drying them in the oven a few moments and then I used this for a (lol) recipe:
Put seeds in a bigger bowl than you think you need.
Sprinkle with oil About two teaspoons per bigger pumpkin`s worth.
Sprinkle with about one teaspoon (per medium sized pumpkin) of sea salt. (Grind up bigger salt with a mortar and pestle or a rolling pin and sandwich bag. But sea salt does make the difference.
Mix well. Lay in a single layer on cookie sheets and bake at 375 until golden brown.
Try not to eat them all yourself. I said try. They are so very good!
When I took Wednesday shopping the other day she saw all the Halloween decorations and wanted "Spiders Mommy, spiders!" I couldn't find anything I wanted her to have (you know, that is not the kind of junk that falls apart in a day) so I promised to make her spider cookies. I bought some cookie cutters and Halloween coloured sprinkles for cookie fun. What a mistake, well in the beginning anyways. I tried out Martha's sugar cookie recipe because I had made it years ago and it worked perfectly for cut out cookies. For some reason though, I couldn't get it to work. I don't know if I didn't use enough butter or if I was too impatient when it came to the chilling but it didn't work out. So, I thought this one time I will buy a pre-made dough thinking of Pillsbury doughs. We went to three different grocery stores and no one carried it. I was getting really flustered. I went through my cookbooks and found a recipe in a book I trusted. I made the recipe exactly as it stated and chilled it overnight like a good girl. The next morning (Halloween)I pulled it out but it was so sticky as it warmed up. I thought "OMG this cannot be happening again!" but with a lot of flour I managed to get the cookies cut and almost three times the recipe yield. (Some were super thin). Thank goodness. I watched them like a hawk in the oven they turned out perfectly. I spent Wednesday's naptime decorating them with leftover cream cheese frosting and sprinkles. I had a lot of fun with the decorating. I had originally wanted Wednesday to help but I had managed to fluster myself so much trying to get the dough just right that I just made them up and let her have one after lunch. I put them into wax paper treat bags I made by sewing up the sides and middle of some folded wax paper. I stapled them shut and covered the staple with a pumpkin sticker. I had originally wanted to make them prettier but had no time for Halloween ribbon shopping. They still looked and tasted fantastic though. The cookie recipe? One of my new favourites for sure. Ron likes them plain and I can't wait to make a bunch for Christmas! This post is long enough, I will share the recipe at a later date most likely for an MMmm good Monday.
The sun started to come out so we used the available light to take some photos. Then over to a family member's house for even cuter photos!
We went trick or treating after much hub bub (It was almost like the world did not want us to go!) But we made it!
We let her trick or treat for about a half hour. And then we bundled her up under a wool blanket in her stroller and we went home. She was so pooped from the day she was in bed and asleep by eight o'clock. We ate some of her stash but we are not big on candy either. I'll let you know how long it lasts with everyone chowing down. Poor Wednesday, doesn't get any of it. The "Hide it and forget about it" method mentioned over at Unplug Your Kids works well!
I think, that is it! What a great three days! I will leave you with a slide show of the rest of the photos we took of the day. I hope your Halloweens were all happy, healthy and fun!
Pretty awesome yes? I really want to say these were fun to make but I had a deadline and things just seemed to keep going wrong! First, a batch of twelve Yellow Buttermilk Cupcakes burned thanks to the muffin tin I was using. The bakers Secret non stick tins cook really hot. I don't like it. But the recipe says it yielded 36 cupcakes and it actually yielded almost 48. This was especially helpful because in my haste I forgot to spray the mini muffin tin and was only able to save half of those as well. So much for being the cupcake fairy to a few friends.
But I got over it and moved on to the icing, a Swiss Meringue Butter Cream again a la Martha Stewart. Again a big fail. First it took a pound of butter which I didn't have on hand and had to wait until Wednesday was finished lunch before I could go and purchase. Then, I don't think I let the meringue qhip enough because after I added the butter and let that whip It really just tasted like sweetened whipped butter. And to top it off when I added my colouring it separated and made the icing look (but not feel) gritty instead of green. Grr!
But, I managed to whip up a cream cheese icing that turned a great shade of green and finally began to decorate. The time limit I had (we were going to a relative's for some pumpkin picking fun) meant I couldn't calm down and let my creative juices flow, or really use any icing for decorating but the pictures in Martha's Cupcake book were super easy and super healthy and I ended up copying most of them.
All in all they did turn out great (Both in looks and taste) and I did learn a few things so next time it should not take me four hours to make some cupcakes! They were enjoyed by those that ate them and that is what counts. Although Wednesday woke up asking for marshmallows and cupcakes for breakfast.
Author's note: I find it hard to bake fom Martha's book when it is not a special occasion because the recipes yield so many (on average I think 24) and I do not eat many sweets. I am more of a muffin kind of gal, fruits and nuts and such right? But Halloween is the perfect time to break out of that norm right? Right!
Mmmm good Monday already! For this edition I bring you Butter tart Mini Muffins! These are so good you will have to give them away to stop eating them. For realz. I have been on a buttertart binge (well not binge but my butt was paying the price) because the local tartery (Rachel's Tarts) makes the most delish deep butertart with a homemade super flakey crust. But at 160 calories a tart I coudn't keep up the habit. So when I was at one of our local farmers market and a woman had butter tart muffins I thought hey! this might be the answer. Alas, her muffins were just too much. Mostly too much sugar. But I thought hey, if I tone down the sugar and make them in a mini muffin tin we just might have something.
That was weeks and weeks ago. The muffins were baked on Friday. I ate little else for two days. Thank goodness they are gone! But ow I have another gift I can make for Christmas Presents. I found the recipe through a google search and it was perfect. You can find it here at Chatelaine.com. But, I like to give the recipe text for linkaphobes. Ingredients
1-1/2 cups ( 375 mL) raisins
3/4 cup ( 175 mL) granulated sugar
1/2 cup ( 125 mL) butter, cut into chunks
2 eggs, beaten
1/2 cup ( 125 mL) milk
1 tsp ( 5 mL) vanilla, rum or butterscotch flavouring
1-1/2 cups ( 375 mL) all-purpose flour
2 tsp ( 10 mL) baking powder
1 tsp ( 5 mL) baking soda
1 pinch of salt
1/2 cup ( 125 mL) walnuts, chopped
1/3 cup ( 75 mL) corn or maple syrup
1. Place raisins, sugar, butter, eggs, milk and vanilla in a large heavy-bottomed saucepan. Place over medium heat and cook, stirring frequently, until mixture is hot, slightly thickened and just beginning to bubble, from 4 to 5 minutes. Cool slightly, uncovered, in the refrigerator, while continuing with recipe. 2. Preheat oven to 375F (190C). Grease 12 muffin cups or coat with cooking spray. Stir flour with baking powder, baking soda and salt in a large mixing bowl. Make a well in centre and pour in warm raisin mixture, stirring just until combined. Stir in nuts until evenly mixed. 3. Spoon batter into muffin cups. Bake in centre of preheated 375F (190C) oven until golden and a cake tester inserted into centre of muffin comes out clean, from 15 to 17 minutes. Remove from oven and immediately pour about 1 teaspoon (5 mL) syrup over top of each muffin. Cool in cups for 10 minutes, then turn out onto a rack. Muffins are wonderful served warm. Store in a sealed bag at room temperature for up to 2 days or freeze.
* If you make mini muffins like I did, cook for 8 minutes and just drizzle a smidgeon of corn syrup on the top.
When I had my own laundry room and a clothesline I loved laundry. Seriously, it was my favourite chore. I think my love of laundry started with cloth diapering and just grew from there. I was always looking for greener methods to keep our clothes looking good and clean. I made my own scented waters for ironing, had baskets of things for stain removal and even started to enjoy ironing. And hanging clothes on the line? That was my favourite thing ever on a nice day, it was soothing. And it was contagious, our college kid boarder liked to hang his clothes on the line as well. So relaxing. But now that we are crammed into an apartment across the country from my old home I dread laundry day. No longer do I look forward to any of it particularly the trips on the elevator. It is so small here and everything is so crammed that I can't keep baskets of stain removal tools and jugs of distilled water for my iron. Evrything is condensed, even my clothesline. Now I have a collapsible rack and a couple clothespin rings that just don't work the same because of the amount of wind the balcony blocks. It takes up to two days to dry the heavier diapers and sweaters. Sometimes I just don't have that kind of time. I need my diapers now! (Well, not now so much as we are int he thick of potty learning, another post for another time.) As I look over at the mountain of laundry I cringe at the thought of sitting there folding it just to start again in a couple days time. I long for my laundry room and clothesline. But what can we do? We can do what we can. I still use ECOS laundry detergent which lasts for freakin' ever, smells good and works on both cloth diapers and clothing. I still abhor the use of fabric softener and dryer sheets. I used wool dryer balls that I made myself. I use baking soda and vinegar with my diapers. And I hang what I can out on the balcony.But it is just not the same. especially at $3.10 a load! Sigh. But, for those of you who are looking to make your laundry routines greener or just plain better smelling, I will share with you my favourite things.
ECOS laundry detergent. I buy it in a 6L container and it washes some 215 loads in a HE machine. Even in my old top loader it lasted a long time because it suds up really nice in hot water. I think I used to pay eighteen dollars for the jug but recently found it for fourteen. That works out to less than seven cents a load. I buy one jug every six months. That is thirty dollars a year. that is awesome for someone who does as much laundry as me. I have a carpenter hubby and a cloth diapered babe, I do a lot of laundry! Speaking of cloth diapers, some websites don't recommend it because of the soy fabric softener in it but it has never hinder the absorption of my diapers and I am going on a year and a half of washing with it.
In lou of fabric softener I use a combination of white vinegar and baking soda because with diapers they also help to combat bacteria and odour. I find when you hang things like denim and terry on a line you will always have a crunch regardless of how much commercial softener you use. I found ironing helped to soften cotton right up. that or toss your air dried clothes int he dryer for a couple-ten minutes. Softens them up in a jiffy with less than a tenth of the power used to dry.
To keep static to a minimum when using your dryer, dry synthetic fabrics separately. When I dry my diapers I get absolutely no static because the bulk of the items are cotton and/or hemp. The microfibre inserts and PUL do not seem to affect the static levels probably due to the sheer outweighing of the natural fibres. Dryer balls are also great because they keep the clothes moving for air flow therefor leaving your clothes int he dryer for less time. I made three in a half hour using this tutorial from Goodmama.
For stain removal I had a basket that had things like peroxide (for blood), rubbing alcohol (for ink) laundry soap in a dish soap dispenser for stains that required a lather, tooth brushes and embroidery hoops (to isolate the stain and keep fabric taught). This basket was a big help and it made it really easy to attack the stain as soon as it happened. (Unlike now where sometimes I forget and the item gets washed and dried and the stain is there forever.)I read a great book called Clean House by Alison Haynes. I highlighted green cleaning recipes, post it noted pages about organization and probably read it in two days. I also kept in in my laundry room for quick reference. I recommend it, and if not that one I recommend buying a book to keep on hand to help you take care of your things.
I read that to prolong the life of your iron (or at least the steam function) it is best to use distilled water. I bought a 4L jug while grocery shopping and left it in my laundry room so no one would use it. I think it cost me less than two dollars. I used it for both my iron and a bottle of laundry scented water that I kept in a spray bottle for ironing and linen refreshing. Here is the recipe originally posted at PatternReview.com
Linen Water
1/4 cup vodka (price does not matter as long as it is 80 proof, and rubbing alcohol works too) 10-20 drops essential oil* 2 cups distilled water **
Mix vodka and oil first...the vodka is an emulsifier...then add the water.
*your choice of scent, but it must be an "essential oil"...these can be purchased at a Health Food Store.
**must use distilled, chlorinated water will kill the essential oil scent
I put it in some Christian LaCroix designed water bottles that I bought for the design. Because my iron manufacturer specifically stated not use linen waters in my iron I put it in a spray bottle to use while ironing.
When the babe was sleeping and I had the time to just hang out in my laundry doing laundry things like ironing, I brought my laptop with me and caught up on Bones and Criminal Minds. Who doesn't want to watch David Boreanez while doing chores?
Speaking of chores, I must go do mine alas sans Mr. Boreanaz.
Welcome! My name is Melissa and I love to create. Mostly I collect ideas and every now and again I have some good ones of my own. I love my family, coffee and storage. (Usually in that order.)If you have never visited here before please, grab a coffee and poke around. If you have any questions I am super easy to reach by clicking on a link below!




 Posts
Posts


