Friday, November 11, 2011

How To: Turn a Bread Box into a Charging Station

This pretty little unnassuming number is one of my most recent accomplishments. It has been in the works since July or August. Yup. I think I received the breadbox from a friend in July, and it was sanded and painted in August. But I was two(ish) months finding just the right knobs, a grounded extension cord and then waiting for a drill to come back home. (Captain awesome has about seven hundred but you think I could have just one?!) Anyways, it was all worth it because looky what it does!
That's right! It is a handy dandy (and might I say beautiful) gadget charging station! On that shel is a Nintendo DS, my Blackberry and the battery charger for my brand new Olympus Pen camera. There is also room for Captain Awesome's Blackberry. We are not against Ipods, we are just not cool enough for them (But we are accepting donations and sponsorships.).
Look at that neat and tidy awesomeness. Seriously. See those cable ties? Reusable little numbers called Q-KNots from UT Wire. They are great! This really speaks to The Storage Geek in me you know?

Would you like to make your own? You would? Sweet. We can be Geeks together.

Gather ye materials:
Wooden bread box (Mine had one door in the front and a door on top for a shelf.)
Paint (I used Rustoleum Glass Black spray paint)
Knobs (if you are not using the ones it came with.)
Power bar and grounded extension cord if you, like me are not lucky enough to have an outlet right behind your planned charging station location.
Cable ties (again optional but really make take the project up a notch I think.)

Gather ye tools:
Palm sander (Or a sanding black)
Medium grit sandpaper
Drill
1/2" drill bit
1 1/2" hole cutting drill bit (I didn't have one but I wish I did)

Watch and learn:
Okay, this is not mine but it is as close as I could find to mine (I cannot for the life of me find the pictures i had of my bread box sanded before painting!). See the top knob? On mine it is fake. The top lid just lifts up, but I added a third knob to deter people from using the lid as a flat surface. I kept the fake knob because there was already a hole, and the sweet knobs I found came in a pack of three. But I digress!

Step 1: Remove knobs and sand breadbox, inside and out.
Step 2: Paint. I spray painted mine with two light to medium coats of Rustoleum's Glass Black. The second picture caught a lot of sun light but looks just as black as the outside.
 Step 3: Put your gadgets on the top shelf so you can get an idea of where you want your holes drilled.
**TIP** Attach your charging cords so you can see how far they stick out to the side. If I had done that, my first hole would have been as far to the left as possible.
Step 3: Drill holes.
Step 4: At the back of the bread box, make a hole large enough for your power chord plug to fit. This is where a 1 1/2" hole cutting bit comes in handy. I did not have one so I just used my 1/2" drill bit until I had a hole big (and ugly) enough. But nobody sees this hole, so don't worry your pretty little heads about it.
Step 5: Replace your knobs. Check out these GORGEOUS curio knobs from Tim Holtz's Idea-olgy line. I had literally been looking for two months for knobs JUST like these in thrift stores and Re-Stores. Even in new stores. Nada. Then I am walking through Michaels, minding my own business and in the clear acrylic stamp aisle they jump out at me. I nearly screamed at mom "I HAVE BEEN LOOKING FOR THESE FOR MONTHS!" I think she thought I was nuts. But yeah, knobs in the scrapbooking aisles? Go figure. I hope I am not committing blasphemy by using the curio knobs as actually cupboard knobs. ;)
Step 6: Add power bar and plug in your adapters.
Step 7: Cable tie your chords to keep them neat.
Step 8: Feed chords through holes you drilled and plug in your (probably way cooler than my) gadgets.
Step 9: Add more storage to it by gluing and/or screwing a pocket system to the upper door for more gadget holding space. Do the same to the front door for holding more wires or extra USB cables etc. Plug another power bar into your power bar for more outlets. BUT! If you do this, make sure your extension cord can handle the load. I used a heavy duty one meant for air conditioners that Captain Awesome found for me in Mart-Wal.
Step 10: Bask in the awesomeness that is you and your creation! Seriously, I already love this thing more than my dog. (Just kidding, Sweetie is irreplaceable...by inanimate objects.)

Hope you both enjoyed this how to and are maybe a little bit inspired to create your own? I would love to see your creations if you do!
Happy creating!


P.S. Seven More days to vote Until Wednesday calls into the Top 25 Canadian Mom blogs at Circle of Moms.

Wednesday, November 9, 2011

Wednesday on Wednesday

Wednesday rockin' her new winter gear from The Children's Place.  She is a little bit gorgeous right?! Seriously though, it was a bit o a relief to take care of all of her winter needs in one shot. Now I have a 'good suit' and a 'play suit'.  last year she had three and half snow suits and we used all three all winter. 
Are you ready for winter? Have any cool mittens and toque tutorials or links? 

PS There are five more days of voting left and you can vote every day! I need about a hundred votes to just crack the Top 25. Help a momma out? <3

Tuesday, November 8, 2011

How To: Manage Your Fabric Scraps

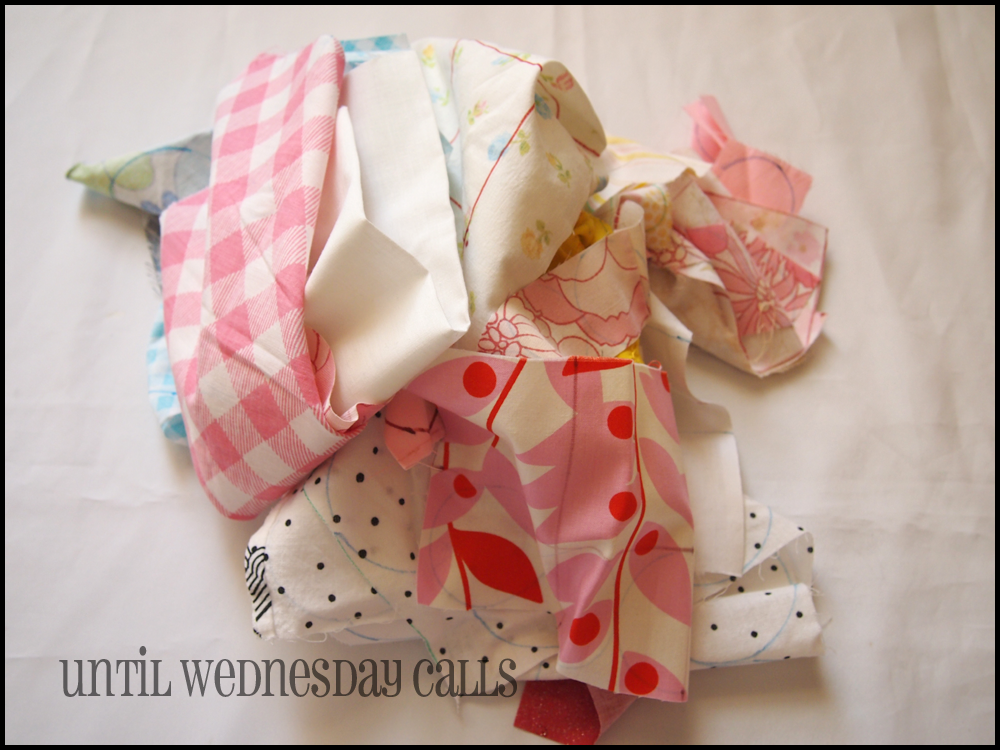
When you create timeless works of art as we all do, you also generate something else; scraps. Yup, I said it. That five letter word, scraps. Every crafter defines scraps differently. Myself, I define scraps as any pieces of fabric smaller than a fat quarter (It is not as generous as it sounds.). I have a couple systems for storage such as the jar of long wide scraps and those smaller than charm squares which are mostly used to adjust tension at the beginning of a project. The ones that are closer to a fat quarter than a charm square in size are folded and stacked in a small pile and kept at arms reach for small accessory projects. But what do I do with them when my jar is full and my stack is no longer easily accessed? Well, I start by looking a for a couple good scrap projects. Planning is vital. The above pile will be turned into two things.
You might know Sandi by her blog name Portabello Pixie. This book is a gem! I have yet to make anything from it but it is a constant source of inspiration. I will be making the Ruffled Head Scarf found in Sandi Henderson's Sewing Bits &Pieces. I cannot seem to ind a picture of it anywhere and the book pages are too shiny for my scanner. But it is a pretty little patchwork number.Which is to say, I will be cutting out 3"x3" pieces of fabric until I have enough for the head scarf construction.
And lots of these. That is to say lots of fabric flowers made with technique. Which I will be sharing this weekend! I was asked a couple times about how I made this pretty little brooch and I thought it high time I show everyone. So come back and check us out m'kay!

Now take your patterns and start tracing. I usually start with the biggest piece first and once I run out of space I go to my next size. Like this piece, first I traced my head scarf squares, then I traced some medium sized circles. I actually had three circle sizes I was tracing.
Keep tracing until all of your scraps are covered in circles and squares and petal and leaf shapes etc. And you have a lovely pile sitting on your work station.

Cut, cut and cut some more. I wish I had a pair of spring loaded Fiskars scissors for this job but having a razor sharp pair of Fiskars classic orange handled did me just fine. These are my piles about half way through. I doubled each of them at least. Now they are ready to be sewn patchwork style into a ahead scarf (Or two) and made into brilliant flowers for hair clips, brooches and all manners of accessories.
Alas, due to the nature of cutting so many circles, my scraps still had scraps. But I am okay with that. What I do with these is keep them in a zippered pillowcase and use it along with stuffing for felt pieces and pillows etc.

For me, scrap management boils down to storage until the scraps become a small stash and then planning what I will do with them.  Sometimes, I do all these steps as the scarp comes across my table. But usually, like yesterday it is a say long affair. Now, hopefully the weather cooperates with me tomorrow and there is ample lighting for tutorial photos. *fingers crossed*

What do you do with your scraps?

Saturday, November 5, 2011

Summer Canning, Had me a Blast...

This summer's weather was, intermittent to be kind. Crappy, soul sucking and/or cold and rainy to be truthful. I didn't have the largest garden, but I loved it and tended to it and babied it like it was my a child. I dreamed of yields that would need their own zip codes or a storage locker at the very least. I envisioned so many tomatoes that I would never have to buy another can of tomatoes again. Ever. I mean c'mon, look at the plantation patch that was my passion this summer.

Towards the end of the season I knew the dozen Roma plants we had were not going to yeild any ripened tomatoes without some serious help. So we butted up some restore windows against the stakes I used for the plants. And crossed our fingers. I opened them up on days where the rain was heavy enough to give them a heavy watering. Other than that though, they stayed like this and it did work. I was able to get a bushel and a half before the first frost. I only wish I had done it sooner.
Alas, such was not the case for the thirteen rogue vine tomato plants that popped up from fallen tomato plants last year. Instead I ended up with more green tomatoes than I knew what to do with, barely enough red tomatoes to warrant the fossil energies it takes for a canning session. I did have a couple dates with the canning pot and here is some of the bounty.

A few samples of my efforts in canning.
Green tomato refrigerator pickles made using Meathead's AH-MAY-ZING deli pickle recipe found here. I made eighteen jars for thanksgiving and I am already down to three. I think I'll be making these next year for Christmas gifts.
Plum tomatoes raw packed and hot water processed.
In the back is pickled beets made using the Bernardin/Ball recipe. Although I do not eat them, everyone I gave a jar to, or shared some with loved them. Swore they were the perfect blend of crunchy and sweet.
 A neighbor brought me a basketful of jalepeno peppers for my dilled green tomatoes and instead of watching the leftovers wilt in the crisper I decided to pack them in olive oil and hot water process.
Strawberry rhubarb pie pillingmade with Bernardin recipe. I used two jars and added 1/4 cup cornstarch to filling before baking in a deep dish pie and it turned out wonderful.
The bruschetta mix was made with Bernardin's recipe as well but I'll be honest, i don't like it. It is way to vinegar-ry for my liking. I am thinking of draining all my remaining jars, adding fresh tomatoes and re-processing. I'll let you know how it turns out.

All in all it was an amazing experience, first growing the food and then preserving it. Most definitely eating it and loving how it turned out.next year, I'll start my mini hothouses earlier so I yield more tomatoes. I'll be growing my own dill as well. I have a list and I will be sticking to it!

What do you love to preserve? Did you do any canning this year? I was nearly addicted, is it the same for you?

And now, I must run. But I leave you with Grease's Summer Nights because that has been in my head since I started this post.


Wednesday, November 2, 2011

Wednesday on Wednesday

I trust your Halloweens were all wonderful! Candy filled and TP free I hope! Here it was amazing. The weather was wonderful. The costume came together and the friends were friendly!
My little Musketeer. 
Mid-way through a shopping trip to Wal-mart in the beginning of October just as they were putting out the Halloween costumes Wednesday found the above pictured mask and sword and was inspired to be a Barbie Musketeer. What is a Barbie Musketeer you ask?
A Barbie Musketeer is Corin from the movie Barbie & The Three Musketeers. She's a country girl who moves to the big city to prove that girls can indeed be musketeers. In other words, she kicks butt and takes names. It is a great girl movie. (We are big fans of the Barbie movie franchise around here though.)

Wednesday's costume came together quite easily. It was the winterizing that took any effort really. I made a cape and pettiskirt out of pale pink polar fleece. Found a  matching sweater in her closet the day of, and those adorable pink Ugg-ish boots are hand me downs that she reuses to grow out of. For her hat, I added feather that were originally on the mask tot he side and added a pin I found on a thrifting trip months and months ago. Oh and the bulk under the bargain store princess dress? That was the tu-tu I made for her two year photos. Done like dinner. Seriously, so simple and yet I think this is easily my favourite costume yet.

On guarde!

Saturday, October 29, 2011

Free Printable : Halloween Cupcake Toppers

Halloween is coming! And around here that means festive treats. This year I made my famous pumpkin bread recipe into twenty four cupcakes and topped it with my famous cream cheese icing (updated). To add a little holiday fun I made up some cupcake toppers and thought you might like to use them too. 

This is what the sheet looks like. Just enough for a dozen fabulous cupcakes. Just cut, glue together with a toothpick inserted between two circles and bada bing you're fabulous. Download from Google Docs here. As I am still new to this printable business, please do not hesitate to ask me for help or let me know that something is amiss and you cannot get it to work!

A note about the images used: The top two rows of images were found over at The Graphics Fairy. (You might remember a few from my Vintage Garland of Halloween past.)
The next two rows were made with vector images from AllSilhouettes.com
The last wto rows were made using the Monsterfreak font from Urbanfonts.com

Happy Halloween!!

Oh and one more thing?! Recently I was nominated for Circle of Moms Top 25 Canadian Mom Blogs. Could you be so kind as to hop on over and vote for me? You can vote once a day so if you could do that too I would be eternally grateful. Thanks!

Thursday, October 27, 2011

How To : Candy Corn Patchwork Pillow

Autumn is upon us and I am loving it! Today I spent the entire day outside cleaning and organizing my front yard and deck and porch waiting for our outdoor Thanksgiving dinner on Sunday. But, before the weather turned amazing I did some serious sewing. One of the things I made was this pillow, from the scraps of the other projects I did believe it or not.


Cute right?! I know! And it was honest to goodness a scrap project. I love those!
If you want to be cool like m and make one for yourself I took pictures in the hopes I would get my bum in gear and make a tutorial. And look! A tutorial! You will have to forgive the first few steps do not have pictures, but it was an 'a ha' moment I had just after I began. I figured we have all cut out pieces and sewn right sides together enough right? If not, please do not hesitate to ask me any questions you may have regarding the project.

Gather ye materials
Fabric scraps (2) orange
(2) Yellow
(2) White
Pattern (See step 6.5)
Stuffing

Modus Operandi

Step 1. With right sides together sew a white piece to an orange piece.
Step 2. With right sides facing together, sew an orange piece to a yellow piece.
Step 3. Repeat steps 1 & 2
Step 4. Iron seams flat.

Step 5. Top stitch seams. (I like to do this from the bottom but it is your preference.)

Step 6. With right sides together, lay flat on table.
Step 6.5. This is when you will make your pattern. Which is just a triangle made as tall as your scraps will allow  and rounded corners.

Step 7.  Trace your pattern, pin fabric together and sew on top of markings. 


Step 8. Cut out leaving 1/2" allowance notching corners as you go.

Step 9. Turn and press.

Step 10. Fill and close up. I am not known for my ladder stitching so I chose to use some fabric glue and a couple clothes pins. Again this is one of those steps that is up to you.


I think this project would have the biggest impact if multiple pillows were made. Maybe next year I'll add a few more so that my little pillow is not so lonely. For now though it is an adorable bit of seasonal decor that will be welcome in the house until Christmas decorations start popping up.

Wednesday, October 12, 2011

Wednesday on Wednesday

I hope both your weather and your holiday (For my Canadian readers) weekend have been amazing where you are as they have been here. Temperatures in the high twenties have been keeping me from blogging. After an amazing dinner with family and friends on Sunday, we went on day trip to check out the fall foliage. Living in South eastern Ontario is really quite a treat this time of year. Cheers.

Wednesday, October 5, 2011