Hey folks! Sorry I have been MIA lately, but as you can see we have been gearing up for Wednesday's FIFTH birthday party! So excited! As soon as that craziness has subsided I will be back to regular posting! Until then, I hope you are staying cool in this almost unbearable heat! ♥ ♥ ♥
Showing posts with label digital scrapbooking. Show all posts
Wednesday, July 18, 2012
Sunday, December 18, 2011
Scrapbooking Sunday : A New Link Party!

Recently I have discovered that I love digital scrapbooking. I know, duh right? But as much as I have been playing with elements o digital scrapbooking with things like Wednesday's birthday invitations and blog headers and buttons I have never really scrapbooked with it. As in make photo layouts. Well, I have begun to scarp every morning with my coffee. It seems to be my best time creatively as I am freshly alert with my coffee and my head is not yet clouded with elements of the day.
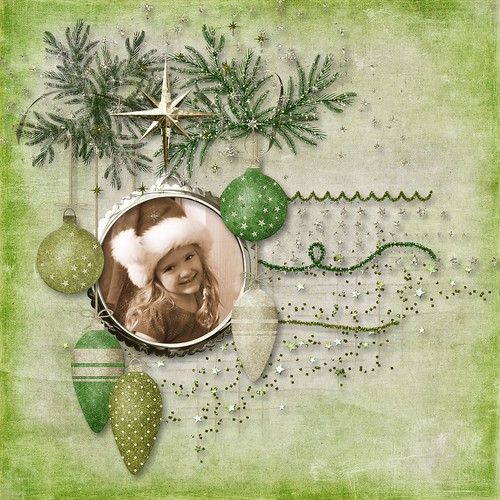
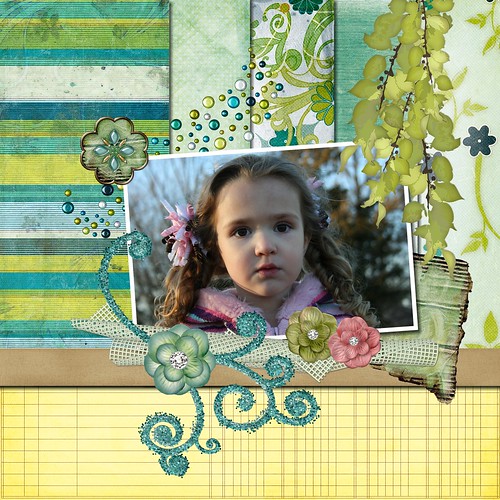
It started less than two weeks ago with a Christmas card. Then it was the first snowfall layout you saw a couple Wednesday on Wednesdays ago. I have since created a half dozen photo layouts and I am just itching to show them to you.
I already have a couple favourites but really, I am just pleased as punch with my progress. I thought maybe I would start a link party. Scrapbooking Sundays or digital, paper and card making.
I am hoping that with enough momentum and success that maybe we can have some sponsored challenges in the new year!

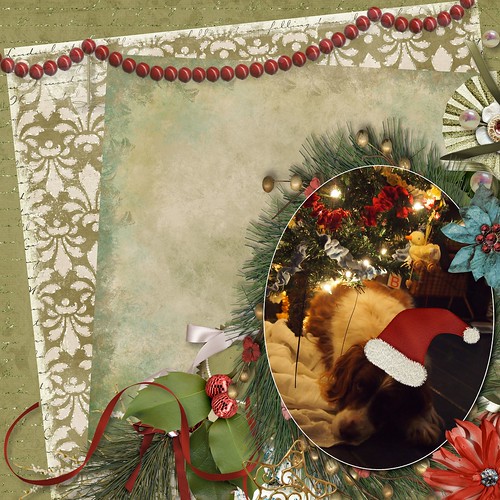
My New Favourite.

Today's creation.

Our Springer named Sweety under the tree.
I have to partially thank Mymemories for the new found addiction. At first when they gave me a copy for review and giveaway I was thinking "OK, I have Photoshop so why would I use it? But whatever, I'll give a copy away." Well, after the initial getting used to a program that was not Photoshop I was sold. It really is a stellar program and for $30.00 (with coupon code on my sidebar) you cannot go wrong. Honest. And before you think I am just trying to sell you something that I get for free let me tell you that I have bought more than my share of digital design packs. BUT here is the best part, after your initial purchase, you not only get credits for ten dollars worth of design packs but there are five pages worth of free kits. The kit I used to make last week's Wednesday on Wednesday was totally free. The elements I used for my last two pages were all free, sourced from around the web over the last two years. Just some food for thought. I do still use Photoshop for things, but I use Mymemories every morning for layouts.
And now it is your turn! What have you been working on? Do you love digital scrapbooking? Are you more traditional with paper and glue? Do you make cards? Or design blog headers and buttons? Show me! Show us! Just link us to your blog POST or Flickr Photo(set) and each week I will Share the two links with the most clicks.
Wednesday, December 14, 2011
Wednesday on Wednesday

This is Wednesday holding Rosie. Rosie is from my childhood, my dad gave her to me when I was two. Although she is a little rough around the edges she has a lot o her left to love. It warms me inside to see her loving the teddy bear I loved enough to pack and move with me a multitude of times.
**Digital scrapbooking page was made in less than ten minutes with MyMemories software and the Moments FREE kit by Indigo Designs.
**MyMemories digital scrapbooking elements (free and for purchase) can be downloaded in PNG format for use in other programs.
Labels:
digital scrapbooking,
wednesday pics
Tuesday, November 22, 2011
GIVEAWAY!! My Memories Digital Scrapbooking Software

Have you heard the latest word in digital scrapbooking software? MyMemories. Well technically that is two words, but it is still the latest and greatest. especially this week because they released a new version just yesterday! And you lucky folks are getting a chance to win a copy today! (Winner to be announced one week from today!)
First, what is My memories software? Well, it is a ridiculously inexpensive way to digitally scrapbook your past, present and future photographs without spending a grand. It has gotten great reviews all over the web including scrapbook.com which was my go to web site when I was strictly a paper scrapbooker. I use Photoshop (A super old release that makes me want to cry when I use it.) for everything from photo editing to blog headers and lately even free printables for the blog. But when I was approached to test out MyMemories and give away a copy I was totally jazzed.
Although I was gifted the software I have purchased a couple digital kits. This Thanksgiving one in particular ad another gorgeous Christmas one I can't wait to use to make our Christmas cards.
I spent two weeks playing around with the software and I managed to create the Thanksgiving cupcake toppers I posted last week and the Thanksgiving finger puppets I posted this morning. I know, where is the scrapbooking? Well, how about these quick pages I downloaded (For free!)and popped a picture in. Took ten minutes including the downloading time. That is another thing, My Memories has lots of digital freebies, like five (web)pages worth. There are always sales on the kits that are or purchase AND you can download the files in Mymemories format and PNG format or use in other software applications.
But wait! There's more! I you would like to find out more about My Memories software you can always check out their Facebook page where there are always contests and giveaways going on. In fact right now, there is an Ipad waiting to be given away when they reach 10K likes.
Do you think you could get down with a copy of the software? Awesome! Now, all you have to do is hop on over to MyMemories and browse their gorgeous digital scrapbooking kits and come back and tell me which ones are your favourite.
There are so many additional ways you can enter or this giveaway!
You get one entry for:
Being an Until Wednesday Calls follower (Comment telling me you are a follower.)
Creating a blog post spreading the word.(Comment with a link to your post.)
Tweeting this blog post (Comment with the link.)
Following me on Twitter (Comment with your username.)
Following the MyMemories blog (Comment to let us know.)
Like the Mymemories page on facebook (Comment to let us know.)
**PLEASE LEAVE EACH ENTRY AS A SEPARATE COMMENT**
Bonne chance mes amis!
Free Printable : Thanksgiving Finger Puppets
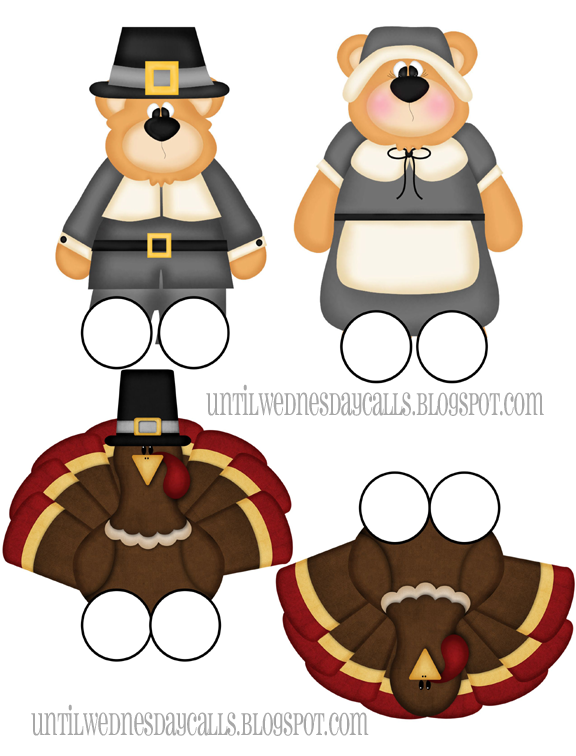
Hey folks! I am working on the giveaway post as I type this so this is going to be another quickie freebie! Like I said last week when I posted the Thanksgiving cupcake toppers I have been creating things in MyMemories software. This week I tried my hand at finger puppets and I think they turned out fabulous!
I thought I would squeeze in more goodie before Americans celebrate their Thanksgiving. They print out with holes that can be cut smaller for little fingers or bigger for bigger kids. I was able to get most of my fingers in the holes. I might recommend covering the holes in clear tape before cutting though.
Click here for the Google.Doc download.
Please do not share the file but PLEASE DO share the link to here for others to enjoy.
Comeback this afternoon for a chance to win a copy of the MyMemories software I used to create these fun little guys!
***Pilgrim bears are from Cindi Gilmour's Pilgrim Bears DigiDoodles clip art kit.
***Turkeys are from MyMemories Let's Talk Turkey Digital Scrapbooking kit designed by Just So Scrappy.
I thought I would squeeze in more goodie before Americans celebrate their Thanksgiving. They print out with holes that can be cut smaller for little fingers or bigger for bigger kids. I was able to get most of my fingers in the holes. I might recommend covering the holes in clear tape before cutting though.
Click here for the Google.Doc download.
Please do not share the file but PLEASE DO share the link to here for others to enjoy.
Comeback this afternoon for a chance to win a copy of the MyMemories software I used to create these fun little guys!
***Pilgrim bears are from Cindi Gilmour's Pilgrim Bears DigiDoodles clip art kit.
***Turkeys are from MyMemories Let's Talk Turkey Digital Scrapbooking kit designed by Just So Scrappy.
Friday, November 18, 2011
Free Printable : Thanksgiving Cupcake Toppers/Food Picks
Hey there folks! I have a quick little goodie for you today! I have a great giveaway coming this weekend (Starting Sunday night!) and this printable ties in with it. For now my American readers can bask in the cuteness that these topper will bring to their food next week.
I made these little numbers with my new copy of MyMemories digital scrapbooking software. Aren't they adorable? I wish I had time to whip up a batch of muffins to pop these in but I am rearranging my house. (Serious undertaking!) So you will just have to use your imagination (and printer).
Click here for the Google.doc download.
Printable sheet made using graphics from MyMemories suite 2 and Let's Talk Turkey digital design pack.
Come back on Sunday to enter the giveaway for your very own copy of MyMemories scrapbooking software! I am so excited about this you don't even know!
I made these little numbers with my new copy of MyMemories digital scrapbooking software. Aren't they adorable? I wish I had time to whip up a batch of muffins to pop these in but I am rearranging my house. (Serious undertaking!) So you will just have to use your imagination (and printer).
Click here for the Google.doc download.
Printable sheet made using graphics from MyMemories suite 2 and Let's Talk Turkey digital design pack.
Come back on Sunday to enter the giveaway for your very own copy of MyMemories scrapbooking software! I am so excited about this you don't even know!
Labels:
digital scrapbooking,
gettin' crafty,
printables,
thanksgiving
Wednesday, June 29, 2011
Wednesday on Wednesday
Labels:
digital scrapbooking,
my crafty weekend,
wednesday
Tuesday, August 3, 2010
How To : Alice in Wonderland Finger Puppets
What is this? A tutorial? I don't believe it either! I know it has been awhile, and I super appreciate everybody's patience with my blogging self! To celebrate, I have a super fun tutorial to share. I made these as favours in Wednesday's party favour bags. They are super easy and they look super awesome, you'll want to make a bajiliion!

I made these to fit on wee little fingers but they are big enough so that Mommy can play too.
You don't need much to make these but you do need Iron On Transfer sheets. I used Avery brand, I bought six for twelve dollars CDN at a local department store. You can probably get better deals on line (I'm thinking Dharma Trading Co.) but I didn't think of that soon enough. You can fit a lot of puppets on one page though, I think I fit thirty two on one page.
Materials:
Iron On Transfer Sheets
Light material (I used White broadcloth)
Pinking shears (optional)
Fray Check (optional)
I love the simple kind of lists yes? Two materials is a great start!
Construction Instructions
Okay, first things first. You need to find the images for your puppets. I used images from the Alice collection from Tainted Sweets at mygraphico.com . It cost seven dollars. You don't get a lot of images for that price, but you do get the images in PNG and JPEG formats. And, c'mon how cute are these images?!
When you have chosen your images, you need to re-size them. I found by making sure the height was no more than 1.75", it kept the width in check. You might have to play around a bit though depending on your images.
Once you have them re-sized to the correct height and width you have to arrange them in a document so that they print on one sheet only of your iron on transfer paper.
You can arrange the images super close together, almost touching each other because you are going to trim them within millimeters of the image for ironing.
Once you have your images printed and cut out you can move on to puppet construction.
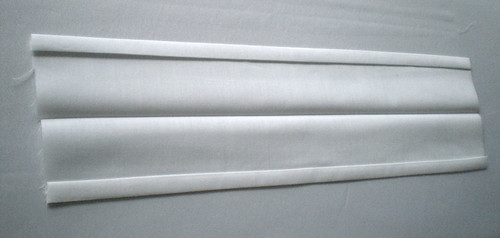

Arrange your images on your fabric so that you know you will have sufficient seam space between each one.


Sew between each image along the edge of each image. If you cannot see your image through your fabric like I could, mark with a ruler where you need to sew. Sew down each side of the image, giving yourself enough room to trim each puppet to 1/4".


I made these to fit on wee little fingers but they are big enough so that Mommy can play too.
You don't need much to make these but you do need Iron On Transfer sheets. I used Avery brand, I bought six for twelve dollars CDN at a local department store. You can probably get better deals on line (I'm thinking Dharma Trading Co.) but I didn't think of that soon enough. You can fit a lot of puppets on one page though, I think I fit thirty two on one page.
Materials:
Iron On Transfer Sheets
Light material (I used White broadcloth)
Pinking shears (optional)
Fray Check (optional)
I love the simple kind of lists yes? Two materials is a great start!
Construction Instructions
Okay, first things first. You need to find the images for your puppets. I used images from the Alice collection from Tainted Sweets at mygraphico.com . It cost seven dollars. You don't get a lot of images for that price, but you do get the images in PNG and JPEG formats. And, c'mon how cute are these images?!
When you have chosen your images, you need to re-size them. I found by making sure the height was no more than 1.75", it kept the width in check. You might have to play around a bit though depending on your images.
Once you have them re-sized to the correct height and width you have to arrange them in a document so that they print on one sheet only of your iron on transfer paper.
You can arrange the images super close together, almost touching each other because you are going to trim them within millimeters of the image for ironing.
Once you have your images printed and cut out you can move on to puppet construction.

Once you have your images, you'll need to cut your fabric so each puppet has enough to roll a hem and have a half inch in between puppets. I found for four puppets a 6"x 7" sufficient.
Roll up the top and bottom and press into a 1/2" hem. Then fold in half and press again.


Now turn the images over, making your they are wrong side up.
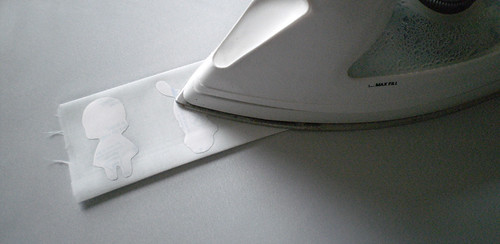
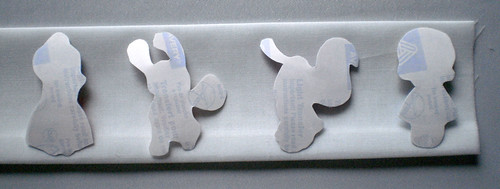
Press according to package directions. High heat NO STEAM and swirling motions with iron for thirty seconds did the trick for me with the Avery paper.
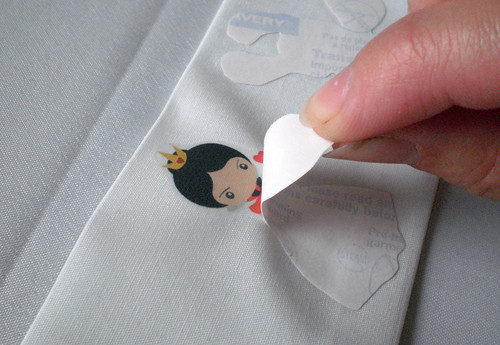
When images are cool to the touch, carefully remove backing. If you do it slow enough, you can watch for any pieces that didn't bond and try pressing it again.

Once you have removed the backing there is no turning back. They look awesome though so we'll move on to the next step.
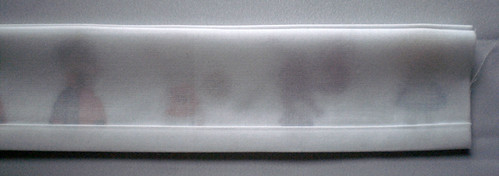
Turn the fabric so that wrong sides are facing out and press.
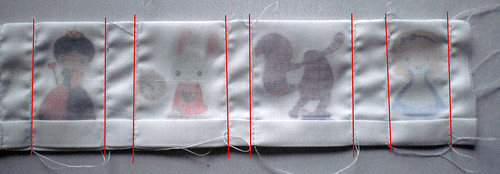

Trim (with pinking shears if you have them) and Fray Check (if you have it). Let dry.

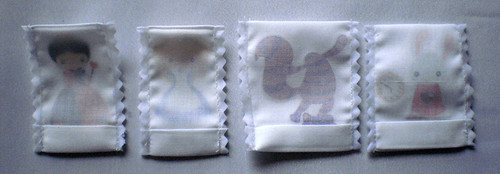
Gently turn them out, a chopstick works well for this. Press lightly from the back. The puppet will be a bit wrinkly but it smooths out soon enough.
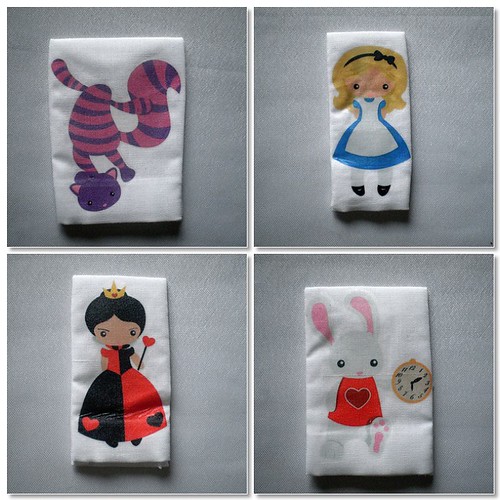
Ta-daaaaaaa! You have your very own Alic in Wonderland puppets.
A few notes from the author:
***To avoid turning your puppets after you have ironed on the transfers, you can opt to iron on images after the puppets have been sewn, trimmed and turned. I just found this way meant I didn't have to do any measuring or marking.
***If you are having trouble resizing and fitting your images to fit in a 8x11" document let me know and I will write a tutorial for that.
***If you would like to make 32 puppets from the exact same images that I have, I have my puppet layout sheet saved as a JPEG format, which I think I can share with you without violating Tainted Sweet's TOU. (The images cannot be re-sized any larger than they are and will be your pain in the butt to try and separate if you so try to do that, which I cannot and will not be held responsible for.) Contact me with your email address and I will send it off.
There ya have it folks. I think these took me an hour from start to finish. I hope you enjoy them! I will be linking to a few fabulous parties this afternoon, one of course being My Crafty Weekend which will be proudly returning this afternoon after I have finished a few things around the house here.
Labels:
alice,
digital scrapbooking,
fun,
handmade holidays,
sewing,
toys
Friday, March 26, 2010
My Creative Space - A New Blog Look
I have a new obsession. (I know, like I need another one of those.)But, I felt it was necessary to learn. Digital scrapbooking. I love it. I mean LOVE it. I do not love it more than traditional scrapbooking, I am too, tactile to give that up. But, for things like blog design, holiday cards, business graphics etc. This is brilliant. It took me two days to get to where you see the header and buttons are now. I am sure I will be tweaking them in the coming weeks but for now I am pretty darn happy with what I come up with on my first try.
I managed to find a ridiculous amount of freebies with some googling. Not all of them are Shabby princess either, but all of them are awesome! My favourite elements (In case you can't tell)are the torn bits of paper and the aged pieces. There are some really pretty feminine elements I like too but for now, I can't get enough of the fake masking tape and staples!
I can't direct you to any good tutorials yet because I just downloaded a but load of files and then began to resize and layer them in Photoshop CS2 until I figured out what I liked and what I was doing. It is itimidating, I hemmed and hawed and asked for help on Twitter before even trying to download anything. It was just so overwhelming. But, I plan on doing some fun stuff with the blog soon and I really wanted some cool looking buttons. I haven't made those yet, but maybe this weekend when I have my Easter sewing done (Ack! One more week!)
What I can do is leave you the two links I used for the most plentiful freebie downloads. There is the ever famous Shabby Princess freebies. I say ever famous because as far as I know their freebies are synonymous with getting started in DS. Also, they are great for us beginners as absolutely no cutting and pasting are required for the elements. (I mean each element and alphabet piece is it's own individual file.) The other site I got MAD freebies from was from ComputerScrapbook.com I must have received hundreds of dollars worth of free downloads, (with a lot of patience) just for signing up for their newsletter (which tells you about more freebies!) I did find a couple more sites but they didn't really have what I was looking for, but you might for serious though, just google free digital scrapbooking elements and you're golden.
And now, I must go and join the physical world and do my dishes, fold my laundry, play with my babe. Check out some other Creative Spacers @ Kirty's when you have a moment for the digital world. I hope you have a fantastic weekend!
Labels:
digital scrapbooking,
my creative space
Subscribe to:
Posts (Atom)