
I am currently taking a hiatus from the web. I do miss the blogging back and forth with other mamas but it has been good for the family relationship. After the holidays I will be back with lots of fun posts, a more seasonal look and comments on other blogs.
Until then, I hope your holidays are all safe and joyous!
Monday, December 14, 2009
Monday, November 16, 2009
Army Tank Birthday Cake Tutorial
This edition of Mmmmm Good Monday is construction instructions for an army tank birthday cake like this one!

There are lots of images of army tank cakes to be Googled. There are even some tutorials out there, but I found that they were all just smidgen vague for my liking. So, forgive me if I break it down too much I am not making any assumptions about your intelligence, it is more a reflection of mine! :)
Note*** I made this from a carrot cake bundt recipe. I cannot see why a regular double cake recipe would not suffice.
Materials:
For tank body:
Cake batter, your choice.
9x13" Cake pan (I used a glass lasagna pan)
4" Ramekin or oven proof dish with straight sides.
For accoutrements
Licorice cigar (cannon) You could always use a tube shaped biscotti)
Licorice pieces halved (tracks)
Circular sweets, I used chocolate covered mint patties (wheels)
Green plastic army guy(s)
Icing:
Your favourite icing recipe. (I used cream cheese because it was a carrot cake.)
Light green or yellow and light blue colour pastes to make a bright light green.
Black (or purple) icing colour paste.
Construction Instructions
Bake cake recipe according to instructions, but watch times because of the rammekin dish. Cut and assemble as pictured below.
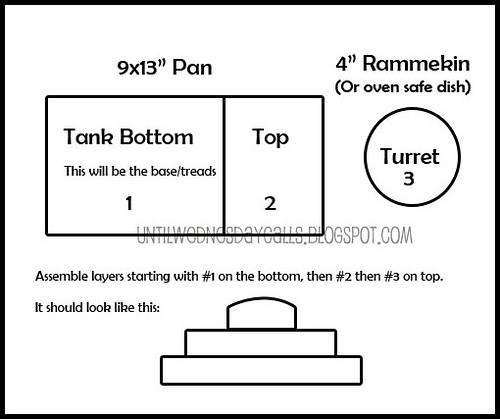
Here is a picture of mine pre-icing. Mind the wooden skewer, I broke a corner off whilst removing the cake from the pan.
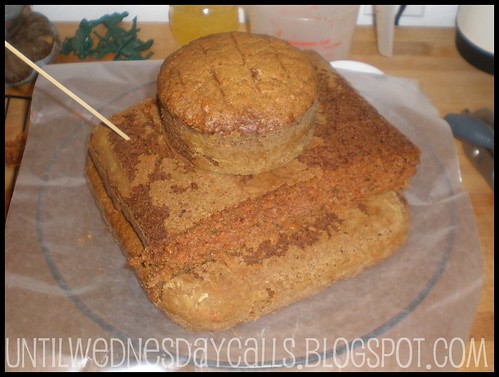
After the cake has cooled and you have cut and assembled it to something at least resembling the one pictured it is time to ice! First mix your green. Mine looked this at first (It was actually left over from those every cupcakes). Once you are happy with the green, add a little bit of dark purple (I used black) food colouring paste at a time. A little goes a long way and you want your icing to be army green, not grey (I assume.). You don't have to mix it all the way, it will blend itself as you apply it to the cake.
Spread it as evenly as possible. Leave the top of the turret until last. Cut a little hole out and insert a toy army man. Ice around him.I would have liked to smooth mine more but I didn't have the proper tool and really, I just got excited at how awesome the cake looked.
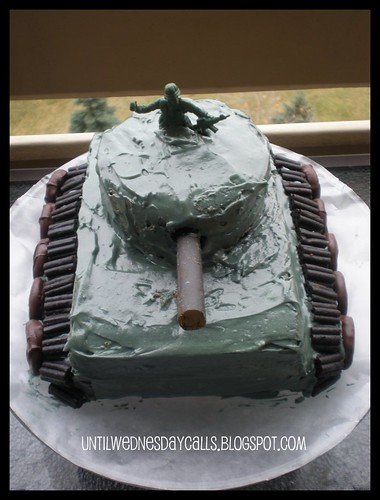
After you are satisfied with your icing job you can apply the wheels, tracks and cannon. I would take care to either leave the cannon as long as you can or insert it almost half way. It saves it from sagging down to the cake. (The cigars are a bit heavy.)
Last but not least, I have made up some cake flags. Cut out and glue together with toothpicks in between. These are great. This way you don't have to find somewhere to write on the tank. (But feel free as it is YOUR cake.)

Happy Baking!
There are lots of images of army tank cakes to be Googled. There are even some tutorials out there, but I found that they were all just smidgen vague for my liking. So, forgive me if I break it down too much I am not making any assumptions about your intelligence, it is more a reflection of mine! :)
Note*** I made this from a carrot cake bundt recipe. I cannot see why a regular double cake recipe would not suffice.
Materials:
For tank body:
Cake batter, your choice.
9x13" Cake pan (I used a glass lasagna pan)
4" Ramekin or oven proof dish with straight sides.
For accoutrements
Licorice cigar (cannon) You could always use a tube shaped biscotti)
Licorice pieces halved (tracks)
Circular sweets, I used chocolate covered mint patties (wheels)
Green plastic army guy(s)
Icing:
Your favourite icing recipe. (I used cream cheese because it was a carrot cake.)
Light green or yellow and light blue colour pastes to make a bright light green.
Black (or purple) icing colour paste.
Construction Instructions
Bake cake recipe according to instructions, but watch times because of the rammekin dish. Cut and assemble as pictured below.
Here is a picture of mine pre-icing. Mind the wooden skewer, I broke a corner off whilst removing the cake from the pan.
After the cake has cooled and you have cut and assembled it to something at least resembling the one pictured it is time to ice! First mix your green. Mine looked this at first (It was actually left over from those every cupcakes). Once you are happy with the green, add a little bit of dark purple (I used black) food colouring paste at a time. A little goes a long way and you want your icing to be army green, not grey (I assume.). You don't have to mix it all the way, it will blend itself as you apply it to the cake.
Spread it as evenly as possible. Leave the top of the turret until last. Cut a little hole out and insert a toy army man. Ice around him.I would have liked to smooth mine more but I didn't have the proper tool and really, I just got excited at how awesome the cake looked.
After you are satisfied with your icing job you can apply the wheels, tracks and cannon. I would take care to either leave the cannon as long as you can or insert it almost half way. It saves it from sagging down to the cake. (The cigars are a bit heavy.)
Last but not least, I have made up some cake flags. Cut out and glue together with toothpicks in between. These are great. This way you don't have to find somewhere to write on the tank. (But feel free as it is YOUR cake.)
Happy Baking!
Thursday, November 12, 2009
I Just Couldn't leave it alone!
The pattern I recently won at Today's Creative Blog by Skip To My Lou. It sat idle for less than twenty four hours! It took a couple days to do because I had to wait until Wednesday was sleeping and she recently fell ill with a cough but I finished it! And here is the finished product!
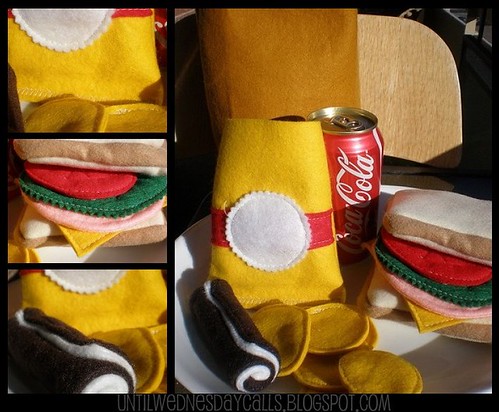
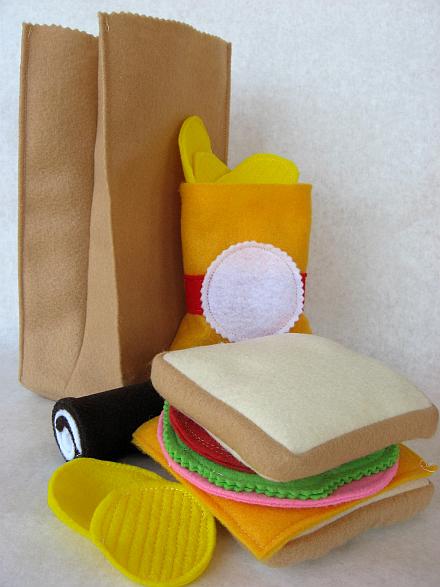
I actually had all the colours of felt to make this little project. (Having all the materials is so rare for me!) Between the thrifted felt remnants, Eco Spun store bought felt and the wool felt remnant oh and the corn batting this was a very eco friendly project. I could say it was a use what you got type project too. But in all honesty I am most happy about having a present made for Wednesday. It seems I keep adding to my list of homemade gifts for her and this was the first one I could check off. Just the sort of motivation I need to get me further in gear. Truth be told I am scared to look up how many weeks are left before C-Day! But like the Little Engine that Could, so can I!
I am also officially addicted to making felt food. It was so easy, so cute and thanks to my super duper sewing machine I don't have to do a lot by hand, which is nice because my hand stitching skills leave a lot to be desired. But I am okay with that. To help me on my way I have been googling free felt food patterns and have come across some most ingenious and absolutely adorable blog posts. Here is a sample of my favourites:
One Inch World has a few great tutes, I particularly love the lollipops and bow tie pasta, both for their sheer cuteness and crazy simplicity! This is also a wonderfully child friendly crafty blog you should spend some time surfing!
Here is the pattern for a super simple peelable banana from Deviant Art user starxxlight who also has the most adorable marshmallow plushie on her homepage.
This is a tutorial for felt corn stalks that I can't wait to make the cobs from by Cupkateer.
I found this soft serve waffle cone and it instantly made me hungry by Flickr user Hannah Hoosier.
And last but not least (and definitely not the last of links I have bookmarked) here is a quick tute for some felt sushi by http://hoogliart.wordpress.com/.
The list just keeps going but these were some of my favourites and 'fer sure gonna do's' and I thought I would share. There are so many more inspiration sites to choose from on Flickr and Etsy. And really, a peek in your own fridge and pantry just might be the inspiration you need!
Happy crafting!~
Monday, November 9, 2009
Holy Moly I won!
That is correct folks, I won my first blog giveaway this weekend. It is so cute it almost hurts too! It is a Skip to my Lou pattern via Todays Creative Blog. So yes, this pattern which can be purchased for 1.75 USD or you can place her button code on your blog and you will receive the pattern for free. That is wonderful, I had no idea until right now! Details and tutorial are here. It is so cute and I think I might even have all of the colours in my stash! So this week, add it to the must do before Christmas pile!
Photo is from Skip to my Lou website.
Sunday, November 1, 2009
Halloween Hijinx!
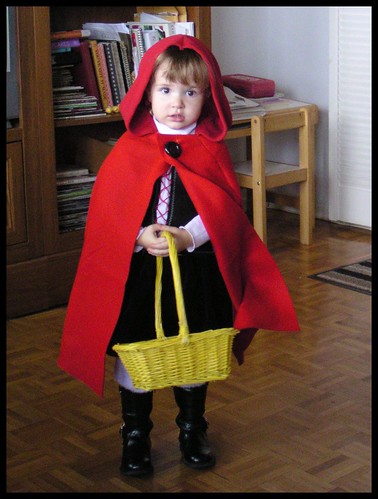
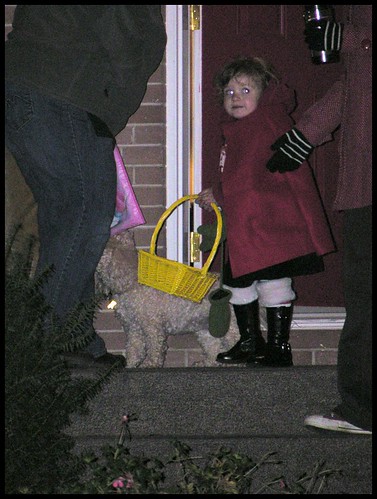
This is Wednesday in her Little Red Riding Hood costume I made her! Is she not the most adorable thing you EVER DID SEE?! And she wore it! Twice! Love it.
The costume was inspired by this one at Martha Stewart.com I thought it would be a great idea for Wednesday because she really does not enjoy bulky costumes, things on her head or being a showpiece. Kind makes Halloween tricky non? (No pun intended) so I thought if I can get her to wear the cape (even by itself) then everyone will know what she is and we can both be happy. It worked, I had a blast making it and watching Wednesday trick or treat in it! Even with a red hooded sweater cloak on without the cloak people knew. She stayed super warm though with the coat and cloak and the layers on her legs. If a really cold wind hadn`t come up when it did we would have let her keep going for the fun of it.
This was her first year trick or treating and we were lucky enough to have a little friend for her to go around with. Her play date friend Sydney was a lion and man was she cute! They caught on to the process after the second house and then it was us parents who had to keep them from going to houses that were not giving out candy. Wednesday used a yellow basket for her treats but it emptied quickly when being swung about so we had to keep emptying it for her. She didn`t mind, she though getting candy was great but the whole process and being out with the big kids and the moon made her very happy. Daddy and I managed to get a few pics in but the camera was not cooperating. *sigh* Our little girl went trick or treating. She is growing so fast!
Details on the costume construction:
I started with the hooded cape. My mom had originally bought me a simplicity pattern that used a single yard of six foot wide felt but I did not have a six foot wide yard of felt. So, I used this tutorial at blueprints to make the cape. (Sort of, I cut it differently, made it from felt and tweaked it more) but she was a big help for the basic idea. I did use the Simplicity pattern for the hood though. Because the pattern did not have a seam allowance due to it being intentionally cut from felt I cut the pieces from a red fleece sweatshirt and used the nice wide bottom hem as the front of the hood. I had to tweak the cape a bit to accommodate the hood and the big fat black button (from an old Mrs. Claus apron of my mom's) but Wednesday was super accommodating in the many "Wednesday, can you try this on a moment for Mommy?" So far cost of costume = zero dollars.
Next I made the bodice-ish-shirt-thing. I just so happen to have a white turtle neck kicking around that Wednesday never wore (I am not a big turtleneck fan). I found two very nice pieces of black felt and laid them on top of the shirt and with a white pencil crayon just kind of drew the curve for the arm and a vest front. I ran the pieces through the machine with a semi-decorative stitch around the edges and then basted the pieces to the shirt. I finished it off by giving it a faux lace up with red embroidery thread. The felt and floss were both thrifted pieces) So far cost of costume = zero dollars.
The next day I began the skirt. Which was so ridiculously simple that I might lose this week to the sewing machine for Wednesday's wardrobe. But I digress. The skirt came from an old corduroy skirt my mom had in her alterations pile for some five years. She thought of it when I said I needed some black fabric for the skirt and offered it up. I snatched it without hesitation. It is lovely, I may have to use it elsewhere soon. Anyhoo, the skirt is just two pieces of fabric sewn up the sides, a wide hem and an elastic fitted under the hem. Easy peasy lemon squeezy. Costume cost = zilch.
The 'fur lined boots' were a pair of fun fur topped striped baby leggings tucked into a great pair of black boots. The baby leg warmers I had on hand from last Christmas and the boots were another hand me down. Great touch though right? Costume total = nadda.
Last but not least I had to buy a pair of tights for her little thighs. I found a pair on clearance at Wal-Mart for three bucks. So, costume total? Three dollars + one and a half days effort. Not too shabby for my first time doing the Mama-come-Martha eh?
That night we carved the pumpkins. I asked Wednesday what she wanted and she said a monkey, so a monkey I gave her. For the bigger pumpkin I had wanted to carve something from a stencil but my poker took was not sharp enough for the intricate design so I let Wednesday draw on the pumpkin and then carved out her design. It actually looks kinda cool.

I roasted the pumpkin seeds by rinsing them, drying them in the oven a few moments and then I used this for a (lol) recipe:
Put seeds in a bigger bowl than you think you need.
Sprinkle with oil About two teaspoons per bigger pumpkin`s worth.
Sprinkle with about one teaspoon (per medium sized pumpkin) of sea salt. (Grind up bigger salt with a mortar and pestle or a rolling pin and sandwich bag. But sea salt does make the difference.
Mix well. Lay in a single layer on cookie sheets and bake at 375 until golden brown.
Try not to eat them all yourself. I said try. They are so very good!
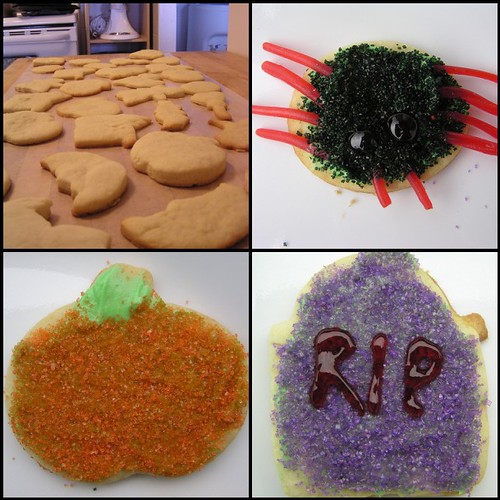
When I took Wednesday shopping the other day she saw all the Halloween decorations and wanted "Spiders Mommy, spiders!" I couldn't find anything I wanted her to have (you know, that is not the kind of junk that falls apart in a day) so I promised to make her spider cookies. I bought some cookie cutters and Halloween coloured sprinkles for cookie fun. What a mistake, well in the beginning anyways. I tried out Martha's sugar cookie recipe because I had made it years ago and it worked perfectly for cut out cookies. For some reason though, I couldn't get it to work. I don't know if I didn't use enough butter or if I was too impatient when it came to the chilling but it didn't work out. So, I thought this one time I will buy a pre-made dough thinking of Pillsbury doughs. We went to three different grocery stores and no one carried it. I was getting really flustered. I went through my cookbooks and found a recipe in a book I trusted. I made the recipe exactly as it stated and chilled it overnight like a good girl. The next morning (Halloween)I pulled it out but it was so sticky as it warmed up. I thought "OMG this cannot be happening again!" but with a lot of flour I managed to get the cookies cut and almost three times the recipe yield. (Some were super thin). Thank goodness. I watched them like a hawk in the oven they turned out perfectly. I spent Wednesday's naptime decorating them with leftover cream cheese frosting and sprinkles. I had a lot of fun with the decorating. I had originally wanted Wednesday to help but I had managed to fluster myself so much trying to get the dough just right that I just made them up and let her have one after lunch. I put them into wax paper treat bags I made by sewing up the sides and middle of some folded wax paper. I stapled them shut and covered the staple with a pumpkin sticker. I had originally wanted to make them prettier but had no time for Halloween ribbon shopping. They still looked and tasted fantastic though. The cookie recipe? One of my new favourites for sure. Ron likes them plain and I can't wait to make a bunch for Christmas! This post is long enough, I will share the recipe at a later date most likely for an MMmm good Monday.
The sun started to come out so we used the available light to take some photos. Then over to a family member's house for even cuter photos!
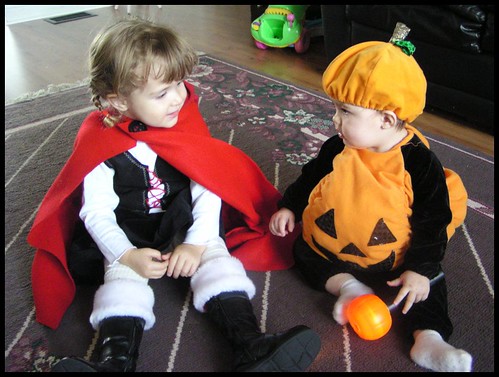
We went trick or treating after much hub bub (It was almost like the world did not want us to go!) But we made it!
We let her trick or treat for about a half hour. And then we bundled her up under a wool blanket in her stroller and we went home. She was so pooped from the day she was in bed and asleep by eight o'clock. We ate some of her stash but we are not big on candy either. I'll let you know how long it lasts with everyone chowing down. Poor Wednesday, doesn't get any of it. The "Hide it and forget about it" method mentioned over at Unplug Your Kids works well!
I think, that is it! What a great three days! I will leave you with a slide show of the rest of the photos we took of the day. I hope your Halloweens were all happy, healthy and fun!
Wednesday, October 28, 2009
Halloween-is-a-comin'
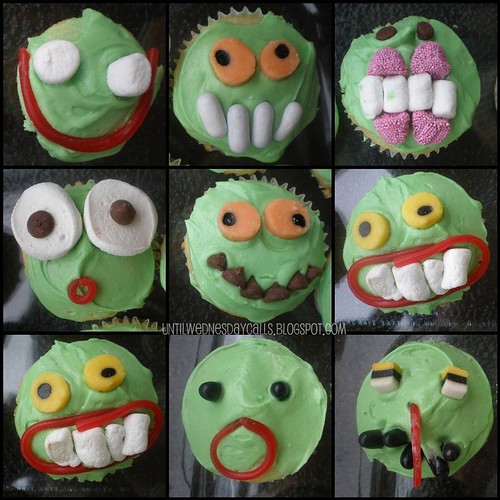
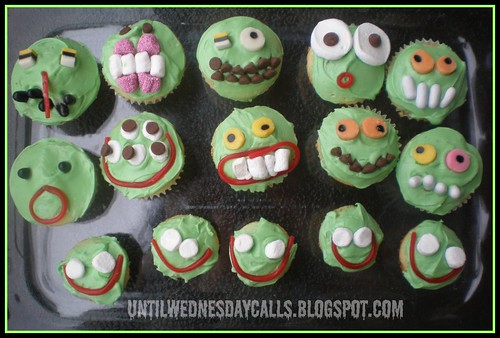
Pretty awesome yes? I really want to say these were fun to make but I had a deadline and things just seemed to keep going wrong! First, a batch of twelve Yellow Buttermilk Cupcakes burned thanks to the muffin tin I was using. The bakers Secret non stick tins cook really hot. I don't like it. But the recipe says it yielded 36 cupcakes and it actually yielded almost 48. This was especially helpful because in my haste I forgot to spray the mini muffin tin and was only able to save half of those as well. So much for being the cupcake fairy to a few friends.
But I got over it and moved on to the icing, a Swiss Meringue Butter Cream again a la Martha Stewart. Again a big fail. First it took a pound of butter which I didn't have on hand and had to wait until Wednesday was finished lunch before I could go and purchase. Then, I don't think I let the meringue qhip enough because after I added the butter and let that whip It really just tasted like sweetened whipped butter. And to top it off when I added my colouring it separated and made the icing look (but not feel) gritty instead of green. Grr!
But, I managed to whip up a cream cheese icing that turned a great shade of green and finally began to decorate. The time limit I had (we were going to a relative's for some pumpkin picking fun) meant I couldn't calm down and let my creative juices flow, or really use any icing for decorating but the pictures in Martha's Cupcake book were super easy and super healthy and I ended up copying most of them.
All in all they did turn out great (Both in looks and taste) and I did learn a few things so next time it should not take me four hours to make some cupcakes! They were enjoyed by those that ate them and that is what counts. Although Wednesday woke up asking for marshmallows and cupcakes for breakfast.
Author's note: I find it hard to bake fom Martha's book when it is not a special occasion because the recipes yield so many (on average I think 24) and I do not eat many sweets. I am more of a muffin kind of gal, fruits and nuts and such right? But Halloween is the perfect time to break out of that norm right? Right!
Monday, October 26, 2009
Buttertart Awesomeness!
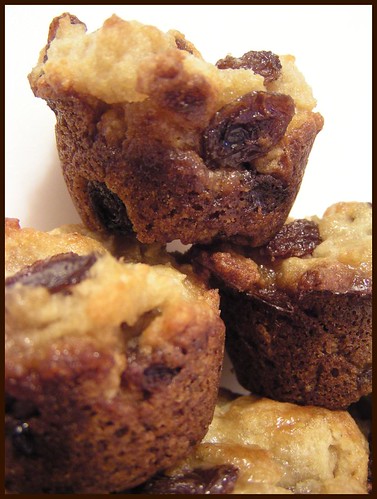
Mmmm good Monday already! For this edition I bring you Butter tart Mini Muffins! These are so good you will have to give them away to stop eating them. For realz.
I have been on a buttertart binge (well not binge but my butt was paying the price) because the local tartery (Rachel's Tarts) makes the most delish deep butertart with a homemade super flakey crust. But at 160 calories a tart I coudn't keep up the habit. So when I was at one of our local farmers market and a woman had butter tart muffins I thought hey! this might be the answer. Alas, her muffins were just too much. Mostly too much sugar. But I thought hey, if I tone down the sugar and make them in a mini muffin tin we just might have something.
That was weeks and weeks ago. The muffins were baked on Friday. I ate little else for two days. Thank goodness they are gone! But ow I have another gift I can make for Christmas Presents. I found the recipe through a google search and it was perfect. You can find it here at Chatelaine.com. But, I like to give the recipe text for linkaphobes.
Ingredients
- 1-1/2 cups ( 375 mL) raisins
- 3/4 cup ( 175 mL) granulated sugar
- 1/2 cup ( 125 mL) butter, cut into chunks
- 2 eggs, beaten
- 1/2 cup ( 125 mL) milk
- 1 tsp ( 5 mL) vanilla, rum or butterscotch flavouring
- 1-1/2 cups ( 375 mL) all-purpose flour
- 2 tsp ( 10 mL) baking powder
- 1 tsp ( 5 mL) baking soda
- 1 pinch of salt
- 1/2 cup ( 125 mL) walnuts, chopped
- 1/3 cup ( 75 mL) corn or maple syrup
1. Place raisins, sugar, butter, eggs, milk and vanilla in a large heavy-bottomed saucepan. Place over medium heat and cook, stirring frequently, until mixture is hot, slightly thickened and just beginning to bubble, from 4 to 5 minutes. Cool slightly, uncovered, in the refrigerator, while continuing with recipe.
2. Preheat oven to 375F (190C). Grease 12 muffin cups or coat with cooking spray. Stir flour with baking powder, baking soda and salt in a large mixing bowl. Make a well in centre and pour in warm raisin mixture, stirring just until combined. Stir in nuts until evenly mixed.
3. Spoon batter into muffin cups. Bake in centre of preheated 375F (190C) oven until golden and a cake tester inserted into centre of muffin comes out clean, from 15 to 17 minutes. Remove from oven and immediately pour about 1 teaspoon (5 mL) syrup over top of each muffin. Cool in cups for 10 minutes, then turn out onto a rack. Muffins are wonderful served warm. Store in a sealed bag at room temperature for up to 2 days or freeze.
* If you make mini muffins like I did, cook for 8 minutes and just drizzle a smidgeon of corn syrup on the top.
Friday, October 23, 2009
For the Love of Laundry
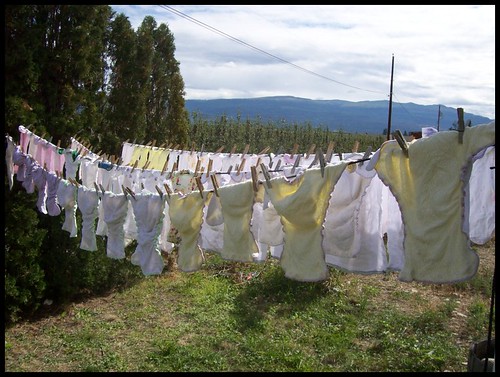
When I had my own laundry room and a clothesline I loved laundry. Seriously, it was my favourite chore. I think my love of laundry started with cloth diapering and just grew from there. I was always looking for greener methods to keep our clothes looking good and clean. I made my own scented waters for ironing, had baskets of things for stain removal and even started to enjoy ironing. And hanging clothes on the line? That was my favourite thing ever on a nice day, it was soothing. And it was contagious, our college kid boarder liked to hang his clothes on the line as well. So relaxing.
But now that we are crammed into an apartment across the country from my old home I dread laundry day. No longer do I look forward to any of it particularly the trips on the elevator. It is so small here and everything is so crammed that I can't keep baskets of stain removal tools and jugs of distilled water for my iron. Evrything is condensed, even my clothesline. Now I have a collapsible rack and a couple clothespin rings that just don't work the same because of the amount of wind the balcony blocks. It takes up to two days to dry the heavier diapers and sweaters. Sometimes I just don't have that kind of time. I need my diapers now! (Well, not now so much as we are int he thick of potty learning, another post for another time.)
As I look over at the mountain of laundry I cringe at the thought of sitting there folding it just to start again in a couple days time. I long for my laundry room and clothesline. But what can we do? We can do what we can.
I still use ECOS laundry detergent which lasts for freakin' ever, smells good and works on both cloth diapers and clothing. I still abhor the use of fabric softener and dryer sheets. I used wool dryer balls that I made myself. I use baking soda and vinegar with my diapers. And I hang what I can out on the balcony.But it is just not the same. especially at $3.10 a load! Sigh.
But, for those of you who are looking to make your laundry routines greener or just plain better smelling, I will share with you my favourite things.
ECOS laundry detergent. I buy it in a 6L container and it washes some 215 loads in a HE machine. Even in my old top loader it lasted a long time because it suds up really nice in hot water. I think I used to pay eighteen dollars for the jug but recently found it for fourteen. That works out to less than seven cents a load. I buy one jug every six months. That is thirty dollars a year. that is awesome for someone who does as much laundry as me. I have a carpenter hubby and a cloth diapered babe, I do a lot of laundry! Speaking of cloth diapers, some websites don't recommend it because of the soy fabric softener in it but it has never hinder the absorption of my diapers and I am going on a year and a half of washing with it.
In lou of fabric softener I use a combination of white vinegar and baking soda because with diapers they also help to combat bacteria and odour. I find when you hang things like denim and terry on a line you will always have a crunch regardless of how much commercial softener you use. I found ironing helped to soften cotton right up. that or toss your air dried clothes int he dryer for a couple-ten minutes. Softens them up in a jiffy with less than a tenth of the power used to dry.
To keep static to a minimum when using your dryer, dry synthetic fabrics separately. When I dry my diapers I get absolutely no static because the bulk of the items are cotton and/or hemp. The microfibre inserts and PUL do not seem to affect the static levels probably due to the sheer outweighing of the natural fibres. Dryer balls are also great because they keep the clothes moving for air flow therefor leaving your clothes int he dryer for less time. I made three in a half hour using this tutorial from Goodmama.
For stain removal I had a basket that had things like peroxide (for blood), rubbing alcohol (for ink) laundry soap in a dish soap dispenser for stains that required a lather, tooth brushes and embro
 idery hoops (to isolate the stain and keep fabric taught). This basket was a big help and it made it really easy to attack the stain as soon as it happened. (Unlike now where sometimes I forget and the item gets washed and dried and the stain is there forever.)I read a great book called Clean House by Alison Haynes. I highlighted green cleaning recipes, post it noted pages about organization and probably read it in two days. I also kept in in my laundry room for quick reference. I recommend it, and if not that one I recommend buying a book to keep on hand to help you take care of your things.
I read that to prolong the life of your iron (or at least the steam function) it is best to use distilled water. I bought a 4L jug while grocery shopping and left it in my laundry room so no one would use it. I think it cost me less than two dollars. I used it for both my iron and a bottle of laundry scented water that I kept in a spray bottle for ironing and linen refreshing. Here is the recipe originally posted at PatternReview.com
Linen Water
1/4 cup vodka (price does not matter as long as it is 80 proof, and rubbing alcohol works too)
10-20 drops essential oil*
2 cups distilled water **
Mix vodka and oil first...the vodka is an emulsifier...then add the water.
*your choice of scent, but it must be an "essential oil"...these can be purchased at a Health Food Store.
**must use distilled, chlorinated water will kill the essential oil scent
I put it in some Christian LaCroix designed water bottles that I bought for the design. Because my iron manufacturer specifically stated not use linen waters in my iron I put it in a spray bottle to use while ironing.
When the babe was sleeping and I had the time to just hang out in my laundry doing laundry things like ironing, I brought my laptop with me and caught up on Bones and Criminal Minds. Who doesn't want to watch David Boreanez while doing chores?
Speaking of chores, I must go do mine alas sans Mr. Boreanaz.
Wednesday, October 21, 2009
Strollin' in a Zapp

So what do you do when your toddler outgrows her stroller just in time to double her body mass with clothing and snow suits? Go shopping of course! But what do you do when you are on an incredibly limited budget but absolutely have to have a new one because your toddler absolutely will not fit in hers for one more minute? Go shopping consignment store styles. But! What if your standards are set way too high for your budget because of the stroller you got at an incredibly good deal and are only replacing because you have to and not because you want to? You go to a liquidation store for a major retail chain and buy a brand new stroller for the same price as the second hand stroller you bout a year and a half prior!
Now, I am not endorsing Quinny as a stroller maker but our luck with the second hand Buzz model we bought for a fraction of the price was/is a great stroller and I was very sad to have to replace it. I was for serious. I like shopping for new shiny things as much as the next person but we really didn't have the money for a new stroller and the ever so practical mama inside me was really quite happy with the stroller we had. But, Wednesday was just not fitting in it one more second and with snow suit season approaching I just couldn't cram her into that harness one more day.
We were directed to a local liquidation store for Sears (who conveniently sell the Quinny brand) and as luck would have it I found a really nice stroller for just inside our budget. About half that price would have been better but with our needs we knew we would not get one under a hundred dollars even second hand. Our needs being smooth gliding action, good maneuverability, quality construction and compact once collapsed.We paid 125 on sale second hand for the last one. So, this one being 125 brand new was just what we needed.
It is the most compact full size stroller I have ever seen. Collapsing to a mere 27" x 11" x 13"and weighing in at a mere 14lbs it fits inside a large gym bag, which by the way it came with and matching. Serious plus over here. Canadian Dad describes it as an "expensive alternative to a umbrella stroller", and he is half right it is an umbrella stroller but it is a fantastic one and even full price it is 229.00 CDN and I can tell you from experience that is a decent price for a quality stroller.
Ours does not have the single front wheel like most pictured but this stroller really glides nicely and turns on a freakin' dime. We love it. It has so much more room for Wednesday than her last stroller both in strap, bum shelf and foot rest that we are just so happy with this purchase.
It has removable everything for cleaning which is uber awesome. But, as much as it is perfect for shopping in its compactness and maneuverability it is not built for shopping accessory wise. There is no giant accessory basket to hold a diaper bag or even cupholders for your fair trade organically grown coffee in a travel mug made from recycled materials. It does have a little basket underneath big enough to hold a purse and some snacks? I just hang the diaper bag off the back and use it like a basket though, and for the cup holders I bought a Jolly Jumper stroller caddy and that worked awesome for snacks, keys, cups etc.
We took it out for a spin this evening, and it was wonderful. We are talking one handed, no effort pushing. Which is nice because with the last stroller it took some control to keep it riding smoothly. The handles are not telescopic which was a selling feature for the last stroller but they are long enough to be comfortable for me and Ron didn't seem to mind the height of them at all.
I believe that is all I can say about our new toy. Sorry if this post read like an ad, it is not meant to I am just excited about having a shiny new toy...that accidentally matches my jacket. ;)
Tuesday, October 20, 2009
Too much of a good thing?
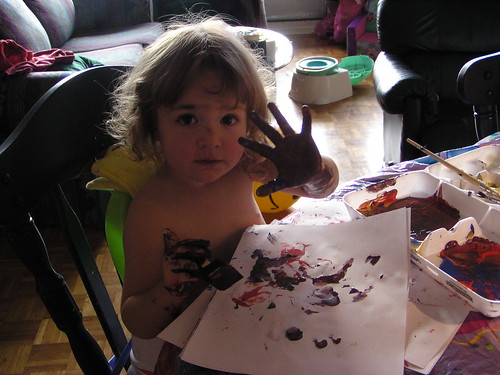
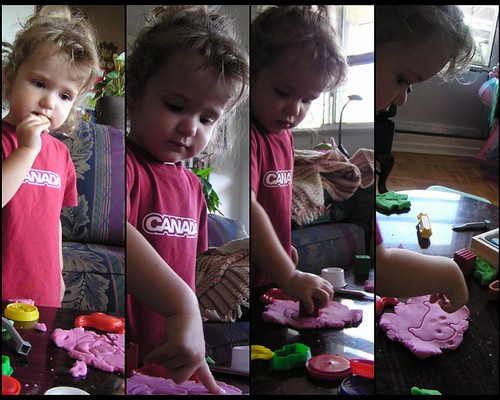
With he cooler weather approaching we don't get outside as often as I would like. To make up for it I am trying to create some real quality activities for Wednesday. Easiest of course is arts and crafts. Today, I pulled out some paints. Twice. This morning Wednesday painted for about an hour. But she was tired from an early rising and we were cleaned up without any sort of protest. Here are some photos from the fun.
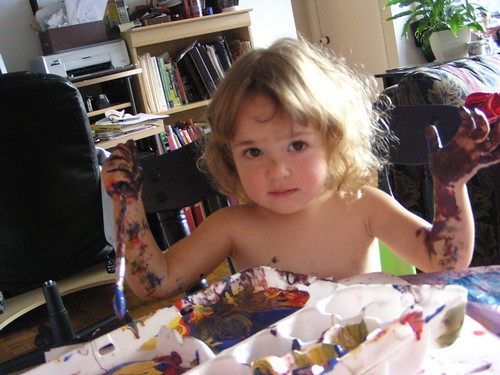
Apparently though, I have created a monster. After Wednesday went down for her nap I went out for some much needed shopping. I came home to her crying. Just beside herself. Apparently she woke up from her nap and was ready to get back to painting. She didn't want lunch she wanted to paint. It took everything we had to redirect her attentions whilst the pasta cooked. (Can elbow macaroni take any longer to cook?!) I managed to talk her down long enough to eat some lunch and we were back to painting.
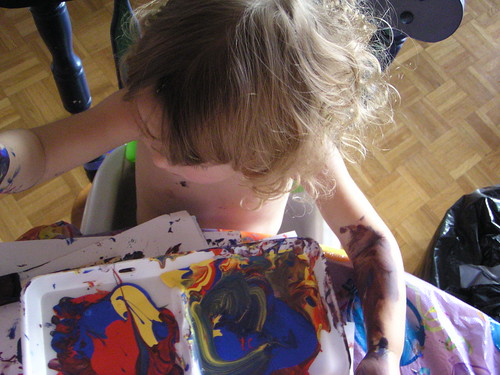
As it happened, whilst I was doing some much needed thrifting I came across a basket of tempera paints for two bucks. Sold. I was excited to bring them home for Wednesday, I had no idea they would be the end of my entire afternoon. I undressed her, put her in her booster seat, covered the table, put paint(s) in the egg tray and let her go to town. After she used up all the allotted paint I had givene her and a lot of paper she of course wanted more. I felt bad but had it been up to her she would have painted herself out of the paints I had bought her. So I told her we had to clean up the paints so that we could play with sparkly stuff.
Oi vey. there went my evening. We played with the sparkly stuff. making butterflies, that we had painted that morning we added glue and rhinestones and marker etc. Whilst she cared little for the butterflies, she loved the glue and rhinestones (obviously) but when it came time to pack it up for a stroll outside things got a bit hairy (is that how you spell it in that instance?).
I completely understand it was more about bounderies than glitter. Daddy was home and he has a habit of giving in whereas I am the enforcer of rules (naptimes, sugar content etc.)But this time he had my back and I think that bothered her even more. she became grabby with things and cried when she couldn't have them. It happens I know. But, afetr we got home from our stroll to the store she was adamant about glue and sparkles. Right up until bedtime. Carzyness.
Here is my dilemma though; I love love love to encourage her creative side. Her fatehr is both an artist and a carpenter and I am a craftbot so it is truly wonderful for both of us. But. Between the paly dough, paints, markers, colouring books, crayons, pencil crayons, glitter, pipe cleaners and pom poms I am forever fetching and cleaning. For serious. Today we painted twice, pulled out the play dough once, played with glue and glitter and coloured with markers before bed.
Is this normal? How do I get anything done? How do you mamas get anything done? And another problem has creeped up. Now with the glitter and paint Wednesday is too good for her colouring books and crayons. She went from colouring on and off all day and loving it to turning her nose at the suggestion. For that I have a solution. No more paint and glitter until she appreciates the simpler things a bit more. I know she is a toddler, not even two years and three months but she is both smart and too smart. So I think for both of us this is a good decision. The whining will drive me crazy but I am just as stubborn as she.
The artwork she is making is great though. When she draws, she draws a shape and can give it eyes, ears, nose, smile, feet and now hair without any help. She has been colouring as much in the lines as possible for her age since summer and is really getting the hang of play dough. Her imagination is growing every day and I want to encourage it but I also need her to love the little things again. Everyday cannot be twice painting. I think everyday cannot be painting. I'll figure out a schedule maybe...what do you do?
Bye!~
Apparently though, I have created a monster. After Wednesday went down for her nap I went out for some much needed shopping. I came home to her crying. Just beside herself. Apparently she woke up from her nap and was ready to get back to painting. She didn't want lunch she wanted to paint. It took everything we had to redirect her attentions whilst the pasta cooked. (Can elbow macaroni take any longer to cook?!) I managed to talk her down long enough to eat some lunch and we were back to painting.
As it happened, whilst I was doing some much needed thrifting I came across a basket of tempera paints for two bucks. Sold. I was excited to bring them home for Wednesday, I had no idea they would be the end of my entire afternoon. I undressed her, put her in her booster seat, covered the table, put paint(s) in the egg tray and let her go to town. After she used up all the allotted paint I had givene her and a lot of paper she of course wanted more. I felt bad but had it been up to her she would have painted herself out of the paints I had bought her. So I told her we had to clean up the paints so that we could play with sparkly stuff.
Oi vey. there went my evening. We played with the sparkly stuff. making butterflies, that we had painted that morning we added glue and rhinestones and marker etc. Whilst she cared little for the butterflies, she loved the glue and rhinestones (obviously) but when it came time to pack it up for a stroll outside things got a bit hairy (is that how you spell it in that instance?).
I completely understand it was more about bounderies than glitter. Daddy was home and he has a habit of giving in whereas I am the enforcer of rules (naptimes, sugar content etc.)But this time he had my back and I think that bothered her even more. she became grabby with things and cried when she couldn't have them. It happens I know. But, afetr we got home from our stroll to the store she was adamant about glue and sparkles. Right up until bedtime. Carzyness.
Here is my dilemma though; I love love love to encourage her creative side. Her fatehr is both an artist and a carpenter and I am a craftbot so it is truly wonderful for both of us. But. Between the paly dough, paints, markers, colouring books, crayons, pencil crayons, glitter, pipe cleaners and pom poms I am forever fetching and cleaning. For serious. Today we painted twice, pulled out the play dough once, played with glue and glitter and coloured with markers before bed.
Is this normal? How do I get anything done? How do you mamas get anything done? And another problem has creeped up. Now with the glitter and paint Wednesday is too good for her colouring books and crayons. She went from colouring on and off all day and loving it to turning her nose at the suggestion. For that I have a solution. No more paint and glitter until she appreciates the simpler things a bit more. I know she is a toddler, not even two years and three months but she is both smart and too smart. So I think for both of us this is a good decision. The whining will drive me crazy but I am just as stubborn as she.
The artwork she is making is great though. When she draws, she draws a shape and can give it eyes, ears, nose, smile, feet and now hair without any help. She has been colouring as much in the lines as possible for her age since summer and is really getting the hang of play dough. Her imagination is growing every day and I want to encourage it but I also need her to love the little things again. Everyday cannot be twice painting. I think everyday cannot be painting. I'll figure out a schedule maybe...what do you do?
Bye!~
Monday, October 19, 2009
Peanut Butter Goodness!
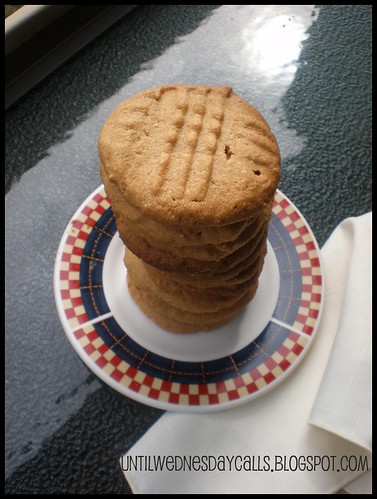
For today's edition of Mmm Good Monday I bring to you two wonderful peanut butter treats! Ron's favourite baked goodie is peanut butter cookies so when I baked him up a batch I had to bake myself something so that I wouldn't eat his cookies. I found a great peanut butter oatmeal bar that was awesome.
The cookie recipe is from Kraft's website and only bakes up a dozen, not enough in my book. But it is fairly low in sugar and high in awesomeness.
1 cup Smooth Peanut Butter (Kraft or a nice natural works well)
1/2 cup sugar (White works best but I like brown too)
1 egg
Preheat oven to 325º F.
MIX peanut butter, sugar and egg.
ROLL into 1-inch balls. Place, 2 inches apart, on baking sheets.
Flatten with fork.
BAKE 15 min. (Do not overbake.) Let stand on baking sheets 5 min. Remove to wire racks; cool completely.
And you get twelve of these delectable goodies!
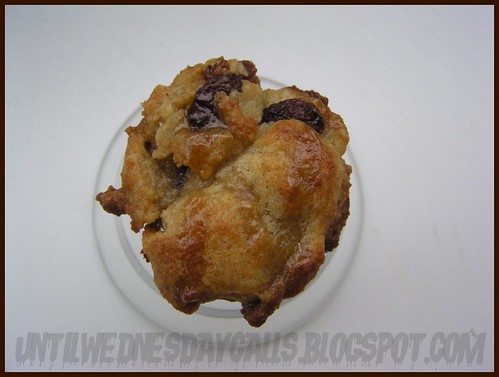
The peanut butter bars were found through a google search for peanut butter and oatmeal. Unfortunately I forgot to bookmark it and I can't seem to find the one I used so for now you just get a picture of the uber tasty bars.
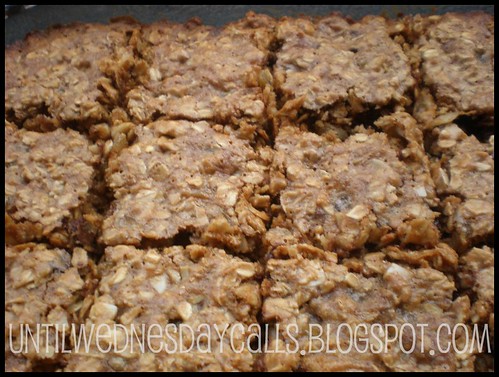
These lasted a few days and were perfect for snacking and taking places when we were in a hurry. I hope I can find the recipe (I printed it out at least just can't find that either.)
As the days get cooler I am hoping to use our crockpot more, maybe next week I'll have a chili recipe to share. :) (Or you could share yours with me!)
Bon Appetit!~
The cookie recipe is from Kraft's website and only bakes up a dozen, not enough in my book. But it is fairly low in sugar and high in awesomeness.
1 cup Smooth Peanut Butter (Kraft or a nice natural works well)
1/2 cup sugar (White works best but I like brown too)
1 egg
Preheat oven to 325º F.
MIX peanut butter, sugar and egg.
ROLL into 1-inch balls. Place, 2 inches apart, on baking sheets.
Flatten with fork.
BAKE 15 min. (Do not overbake.) Let stand on baking sheets 5 min. Remove to wire racks; cool completely.
And you get twelve of these delectable goodies!
The peanut butter bars were found through a google search for peanut butter and oatmeal. Unfortunately I forgot to bookmark it and I can't seem to find the one I used so for now you just get a picture of the uber tasty bars.
These lasted a few days and were perfect for snacking and taking places when we were in a hurry. I hope I can find the recipe (I printed it out at least just can't find that either.)
As the days get cooler I am hoping to use our crockpot more, maybe next week I'll have a chili recipe to share. :) (Or you could share yours with me!)
Bon Appetit!~
Wednesday, October 14, 2009
Mmmm squishy!
I first gave Wednesday play dough to play with shortly after last Christmas. I had bought her a Melissa & Doug set that had some dough, rollers, molds and such. The dough she really didn't care for but all the contraptions and the plastic molded packaging that acted like a 3D puzzle had her captured for some time. I didn't give play dough another thought until a couple months ago I was in the dollar store and they had a little six mini containers and some cookie cutters. I brought it out on a rainy day and she played with it for a solid hour and a half. We had a winner.
The next time I brought out the play dough she played with it for another hour. When I had to take her away from it for a nap she was just beside herself. She cried herself to sleep she was so upset. She eventually gave me a couple high fives, but she was weepy when she fell asleep. The third time I pulled out her play dough I found out the difference between the name brand Play-Doh and the cheap stuff. It was crusty and drying quicker and quicker with each use.
I found a homemade recipe that seemed easy enough. Remembering the homemade play dough recipes of my youth I was worried that it would not be vibrantly coloured enough for my tastes. I was very wrong. The recipe I made turned out quite pretty even using the super cheap food colouring I had on hand. I only made two colours because each recipe makes quite a bit but you could make every colour of the rainbow if you have the room to store it. It lasts quite a while too so you will be storing it for some time.
After I made the play dough I realized I needed a place to store it and the bit and bobs we had collected to play with the play dough. We had found a couple small sand molds from her beach toys, some plastic tools from a birthday goodie bag, Christmas cookie cutters not to mention the things to put in the play dough like shells, buttons and feathers! To house the fun stuff I converted an old train case I had laying around by conditioning the faux snakeskin with canola oil and giving the inside a good wipe down. Than I duped in the toys, put the dough into sandwich bags and then a plastic ice cream container and voila! You have a portable play dough station.
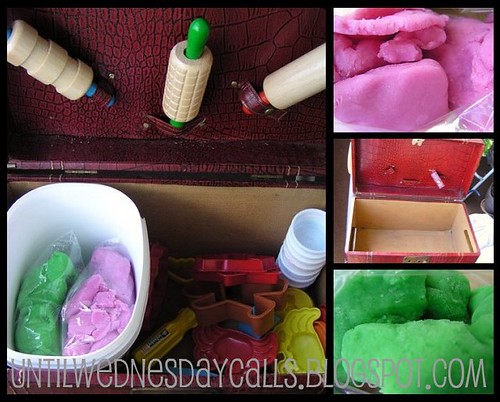
She plays with these toys at least three times a day. I think right now she is on her fourth time pulling it out. I put it away in between meals and other childish pursuits to keep the dough from drying out. The dough is great though, even if it does dry a bit you just knead it a couple seconds and you're good.
Also, the train case latch is still in working order and she has not figured out how to open it so she can only play with the play dough when I give the ok. Which is every time as long as I have had at least one cup of coffee in the morning. And now for the recipe. I got this from a book of eco-friendly kids crafts called Green Crafts for Children by Emma Hardy published by Cico Books London & New York.
1 cup white flour
1/2 cup salt
2 tablespoon cream of tartar (find it in the spice section)
1 tablespoon oil
1 cup water
food coloring
Mix first 4 ingredients in a pan. Add food colouring to water and mix. Add water mixture to pan and mix well. Cook over medium heat, stirring constantly, for 3 – 5 minutes. Dough will become difficult to stir and form a “clump”. Remove from stove and knead for 5 minutes
This was so much fun. I stopped at two colours because it makes a lot of dough, but if you have lots of children to entertain you could keep going, the colour possibilities are endless.
Have fun sculpting!
The next time I brought out the play dough she played with it for another hour. When I had to take her away from it for a nap she was just beside herself. She cried herself to sleep she was so upset. She eventually gave me a couple high fives, but she was weepy when she fell asleep. The third time I pulled out her play dough I found out the difference between the name brand Play-Doh and the cheap stuff. It was crusty and drying quicker and quicker with each use.
I found a homemade recipe that seemed easy enough. Remembering the homemade play dough recipes of my youth I was worried that it would not be vibrantly coloured enough for my tastes. I was very wrong. The recipe I made turned out quite pretty even using the super cheap food colouring I had on hand. I only made two colours because each recipe makes quite a bit but you could make every colour of the rainbow if you have the room to store it. It lasts quite a while too so you will be storing it for some time.
After I made the play dough I realized I needed a place to store it and the bit and bobs we had collected to play with the play dough. We had found a couple small sand molds from her beach toys, some plastic tools from a birthday goodie bag, Christmas cookie cutters not to mention the things to put in the play dough like shells, buttons and feathers! To house the fun stuff I converted an old train case I had laying around by conditioning the faux snakeskin with canola oil and giving the inside a good wipe down. Than I duped in the toys, put the dough into sandwich bags and then a plastic ice cream container and voila! You have a portable play dough station.
She plays with these toys at least three times a day. I think right now she is on her fourth time pulling it out. I put it away in between meals and other childish pursuits to keep the dough from drying out. The dough is great though, even if it does dry a bit you just knead it a couple seconds and you're good.
Also, the train case latch is still in working order and she has not figured out how to open it so she can only play with the play dough when I give the ok. Which is every time as long as I have had at least one cup of coffee in the morning. And now for the recipe. I got this from a book of eco-friendly kids crafts called Green Crafts for Children by Emma Hardy published by Cico Books London & New York.
1 cup white flour
1/2 cup salt
2 tablespoon cream of tartar (find it in the spice section)
1 tablespoon oil
1 cup water
food coloring
Mix first 4 ingredients in a pan. Add food colouring to water and mix. Add water mixture to pan and mix well. Cook over medium heat, stirring constantly, for 3 – 5 minutes. Dough will become difficult to stir and form a “clump”. Remove from stove and knead for 5 minutes
This was so much fun. I stopped at two colours because it makes a lot of dough, but if you have lots of children to entertain you could keep going, the colour possibilities are endless.
Have fun sculpting!
Sunday, October 11, 2009
So glad to see these finished!
What do you get when you add 240 buttons, 20 pieces of felt and a billion stitches? You get dominoes!
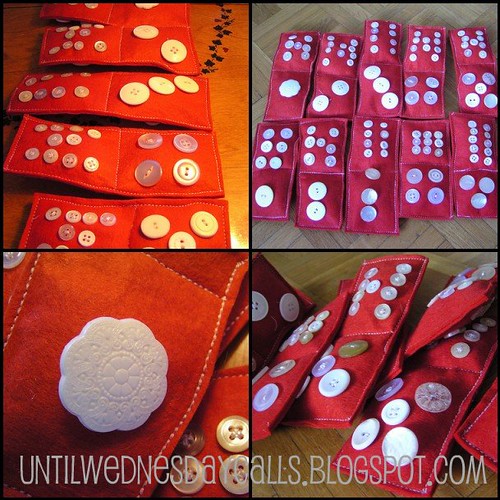
These took me what seemed like forever! In truth I worked on sewing the buttons on and off for a month and spent two hours sewing, stuffing and trimming today. The buttons took me so long because my neck would be sore after just a couple of dominoes so I tried to keep them to a couple times a week. It was great work for keeping my hands busy whilst watching television though. But I don't think I will ever do these again, nor would I think of doing them for selling because of the sheer length of time it takes to sew 240 buttons.
An online friend of mine sent me the felt for the cost of shipping. This plus yards of other stuff I can't wait to do more things with it! The idea came because Wednesday is starting to actually count things, not just recite her numbers. She also loves buttons (she has her own bucket of buttons for sorting and counting etc.). I thought thsi was the perfect way to combine all those things.
Each button is sewed and sewed and sewed again so that none come in mouths or hands. Each domino is stuffed with a batting made from corn and each stitch is triple stitched for both looks and function.
Love these so much. I can't wait to play them with Wednesday.
Tuesday, October 6, 2009
To be or not to be...homeschooling that is.
 Since falling in love with sewing all over again and stalking the blogosphere for tutorials and inspiration I have found that many of my favourite blogs of late are also homeschooling moms as well. As I followed these blogs I noticed that their lives with their children were all that more enriched and rewarding and the gears in my ehad began to creak and moan but the turning began and I thought that maybe homeschooling was something that I should be considering. But as I kept reading these few blogs I thought more and more that maybe I was not cut out to teach my daughter anything more than her ABCs, 123s and colours and it made me sad. I too wanted to share in the wonder that is a child learning.
I talked to a few moms at Livejournal (my favourite place for instant feedback and answers) and my fears were quickly abated. Most importantly I was reminded that children do not start off learning grade ten algebra (seriously, if algebra was a person they would be my arch nemesis) and that was probably what I needed to hear most. After a few discussions I learned that homeschooling was very parent friendly and that not every parent need be a teacher in one of their former lives. *phew* Also I was informed that if I thought it necessary I can buy lesson plans and teaching aides that even tell you when to "point at the board". *phew*
That night during a leisurely drive through the country I (as nonchalantly as possible) asked Ron how he felt about the subject. Since I was expecting him to put up a fight (seriously, I was waiting for him to draw the line at my crunchy behaviour right then and there) I was speechless for a moment (even a little flabbergasted) when he said he was for it. After I closed my mouth and collected my thoughts a moment we talked about all the reasons to do it. We talked about how rewarding it would be for the entire family I had to mention how it would ensure the library I had been building (and moving cross country multiple times) over the last few years would be put to good use! By the time we got home we were both quite excited about it and have even discussed it with a couple friends who think it is a great idea too. *phew*
So, with some reassurance and a little advice I began looking into homeschooling. First exploring the aforementioned blogs in more depth. Then I googled for any support networks in my area (one lonely Christian homeschooling network) and then I started requesting books from my local library network. My first book made it to my hands yesterday. The Homeschooling Handbook (1st Edition) written by Mary Griffith.
This edition is more than ten years old (I realized that when I tried googling a cover image and could only come up with the 2nd edition until I found the one pictured above. Regardless, the book has already given me much food for thought such as theories of learning, learning practices and grading (or not). A definite jumping off point for more research. And although the book is definitely written from a very pro-homeschooling perspective it does give a lot of anecdotal evidence from other homeschooling families who use different techniques, schedules and disciplines.
Particularly interesting is the case for unschooling. At first when I kept coming across this term in my research I shied away from it more and more. I was worried that it was another neo-crunchy term that would serve as yet another pissing contest between parents. I have my own thoughts on the crunchy movement even though I feel that I am firmly entrenched in it. But I digress. This book actually turned me around. A little bit. Like much of my life and parenting 'style' (for lack of better word) I found comfort in knowing there were a lot of parents out there who found a way to blend the best of both worlds (school at home and unschooling). I am of the 'everything in moderation even moderation discipline' in life.
The book is also written for homeschoolers in the United States and although Canada and Canadians are very similar we can be worlds apart when it comes to bureaucracy and laws so I will definitely be researching further into Canadian laws regarding homeschooling most likely through the internet and support groups because I just have not found a lot of Canadian titles on the subject. Expect updates on that area most definitely.
Also something to note is how the homes of homeschooling parents are most definitely full of life, chaos and thereby the mess both create! It is nice to know (even if it just secretly) all of these wondermom blogs I read have messy kitchens too. That will just be our little secret though. ;)
I have a few more books to pick up though, I had thought they were to be sent to my local branch but apparently I must go to the next town over. I can't wait though. I am so very intrigued by the entire idea that sometimes I forget that Wednesday just turned two in July!
So, that is where we are right now. Still very early in the research stage but definitely falling in love with it the more and more we look into it. I will leave you with the aforementioned wondermom blogs I mentioned that are truly inspiring (and even a little intimidating).
In no particular order because they are each equally wonderful.
Ordinary Life Magic
Lapaz Home Learning
Collecting the Moments
5 Orange Potatoes
Happy Tuesday!
Sunday, October 4, 2009
Blueberry Pie made to order...

Happy Monday my fellow foodies!
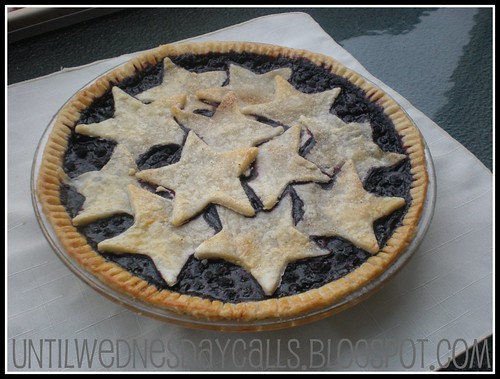
Mr. Sweet and I were invited to a birthday dinner this evening and a blueberry pie was requested. At first I was a little trepidatious about making a pie because my experience with pastry is nil. The last pie I made was when I was seventeen, a bittersweet 14 years ago. A cherry pie incident that never really faded from memory. But I digress. I thought it is now or never, if I really want to call myself a baker (and I do, I really do) than I must take on...the pastry.
So, remembering a conversation with my mom about lard and shortening (shortening makes a great crust for those that are experienced crust makers)I bought a pound of Tenderflake (lard) and two bags of frozen wild Canadian blueberries.
The crust was so easy I thought I must have screwed it up. Seriously, I think I had the crust for both pies rolled out in a matter of tennish minutes? Maybe fifteen. The filling was equally easy since it was just sugar, lemon juice, lemon zest, cornstarch and...blueberries. Four cups per pie!
The crust recipe is from the box of Tenderflake, I made the three double crusts and froze one of them.
Ingredients........
5 and 1/2 cups of all purpose flour
2 teaspoons of salt
1 lb of Tenderflake Lard
1 tablespoon of vinegar
1 egg, lightly beaten
Water
Mix together the flour and salt
Cut in Tenderflake Lard with a pastry blender or 2 knives until the mixture resembles coarse oatmeal or peas.
In a 1 cup measure, combine the vinegar and egg. Add water to make the 1 cup measure full. Gradually stir liquid into the flour/lard. Add only enough liquid to make dough cling together. I used my hands, and had no remaining liquid but I like to keep my surfaces floured.
Gather this into a ball and divide it into 4 portions. Be sure to cover whatever you are not using at the moment with saran wrap to keep from drying out.
Roll out each portion as you need it on a lightly floured surface.
For the Pie Filling I used the recipe from Joy of Baking.
4 cups fresh blueberries
1/2 cup granulated white sugar
2 tablespoons cornstarch (corn flour)
2 tablespoons lemon juice
1 tablespoon lemon zest
Egg Wash:
1 large egg yolk
1 tablespoon cream
In a small bowl mix together the sugar, cornstarch, lemon juice and zest. Place the blueberries in a large bowl. Add the sugar mixture to the blueberries and gently toss to combine. Pour the mixture into the prepared pie shell. Then, in a small bowl, whisk together the egg yolk and cream. Lightly brush the rim of the pastry shell with the egg wash. Starting at the outside edge of the pie, place the cut out pastry stars in a circular pattern on top of the blueberries, making sure the tips of the stars are touching. Once the top of the pie is completely covered with the pastry stars, brush the entire surface with the egg wash, making sure that it does not pool. Place the assembled pie back in the refrigerator to chill for about 30 minutes.
Preheat the oven to 400 degrees F (205 degrees C) and place the oven rack in the lower third of the oven. Remove the chilled pie from the fridge and place on a larger baking pan, lined with parchment paper, to catch any spills. Bake the pie for about 20 minutes and then reduce the oven temperature to 350 degrees F (177 degrees C). Continue to bake the pie for about 35 - 45 minutes or until the crust is a deep golden brown color and the juices are bubbling and thick. If the edges of the pie are browning too much during baking, cover with a foil ring.
Place the baked pie on a wire rack to cool for several hours. The pie needs time for the cornstarch to thicken and leaving it be (or putting it in the fridge) for a couple to three hours is recommended. We tried to eat it warm and it was good but the juiced leaked out where we sliced into it. We then put the second pie in the fridge to cool completely and just warmed it in the oven at the party and it was perfect. We also chilled the pie we sliced into and waited till evening to eat it and it turned out great as well.
This pie is super simple and super tasty. I am so happy with it that I intend on making tarts with the renmaining frozen dough. I am really happy though because now all those recipes that call for crust (quiche for example) can now be added to the to-do list. Also, with Thanksgiving next week I am now adding pie to my roster of treats to bake! For serious I think Mr. Sweet fell in love with me all over again today. ♥
Friday, October 2, 2009
Zebra Hat
So, I realize the other night that my child is not prepared for winter. But it is not winter yet, you say? Well, it is rear it's ugly head around here. Some more Northern parts of the province received snow just the other day. In a panic I went ot the nearest department store and proceeded to buy her a toque and two pairs of mitts. I got home and nothing fit her properly. Then it donned on me that I have enough fleece kicking around that I could probably wrangle something up.
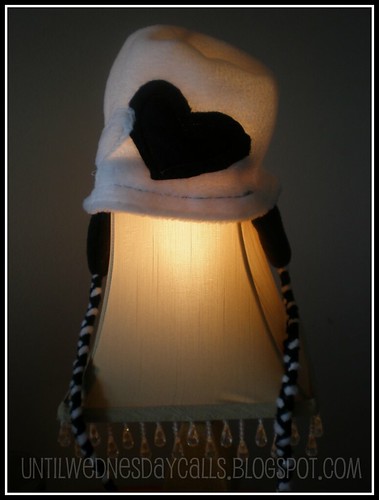
Well, this is what I made. I am totally impressed with myself with the exception of how it fits. It does fit, but just. Really she could do with one an inch bigger circumference wise and maybe some wider ear flaps.
I made the cap part from the Sweater hat pattern in Amanda Blake Soule's Handmade Home. But I made the cap long enough to hide the seam of two ear flaps. I braided three pieces of fleece together for the straps. (Which is why Wednesday calls it her Zebra hat.
I added the matching fleece hearts both before and after I sewed the two cap pieces together. I remembered to do the black one first but forgot about the cream coloured heart until after It was sewn together. I had to both sew the cream heart on and then do the triple stitching afterward. I gotta say, I am getting pretty darn good at that sort of thing.
The hat came together from cutting to finish in a matter of maybe two hours. I spent more time looking for a tutorial (never finding exactly what I was looking for) than I did on actual construction.
I have another hat, scarf and mittens cut and pinned and ready to be sewn but the sewing machine needed some tlc and so it was cleaned and oiled and sitting for the night so my fabric doesn't fill with 3in1 oil odours.
Pictures soon!
Wednesday, September 30, 2009
More Love for the Market
I tell you what, I have not stopped in a week! We have been zoom zooming all over the place what with play dates, pre-school music classes, sewing, baking and just plain living! I love it. My favourite part about last week had to be the nature walk with Ron and Wednesday. Pictures of that here on Flickr.
Today though, I thought I would bring you pictures of what I whipped up yesterday,because gosh darn it I am ever so proud!

These are my new pretty market bags. I have lots of fabric shopping bags, each from their respective retailers but none that I had made, or thought were aesthetically pleasing. So with my confidence up from the Silky Eye Pillows and Cozy Pockets I thought I would give the Broadturn Bag pattern from Amanda Blake Soule's Handmade Home a try. It was so easy I made two!
I cheated and well I paid for it. Instead of giving the bag two side seams I folded one thirty inch piece in half and only sewed one side seam. Well, when it was time to attach the bottom I had too much fabric. Had I sewed two half inched seams it would have been perfect. Still, it was the bottom and no one will ever notice and I love love love them! They are so pretty and bright and cheerful. Another great excuse to head to the Farmers market(because I need another one lol).
That makes something from each chapter of the book save one. I am hoping to make a couple of the mama bags this weekend as a start to my Christmas gift making. That would make something from each chapter and it also gives me a good base of practice to jump in feet first into both the book and Christmas gifts. I won't scare you buy telling you how many days until Christmas but it is coming too soon for this cat.
Okay, I gotta run and entertain my babe. She has been incredibly patient with me and these pictures and this post. Happy Humpday!
Today though, I thought I would bring you pictures of what I whipped up yesterday,because gosh darn it I am ever so proud!
These are my new pretty market bags. I have lots of fabric shopping bags, each from their respective retailers but none that I had made, or thought were aesthetically pleasing. So with my confidence up from the Silky Eye Pillows and Cozy Pockets I thought I would give the Broadturn Bag pattern from Amanda Blake Soule's Handmade Home a try. It was so easy I made two!
I cheated and well I paid for it. Instead of giving the bag two side seams I folded one thirty inch piece in half and only sewed one side seam. Well, when it was time to attach the bottom I had too much fabric. Had I sewed two half inched seams it would have been perfect. Still, it was the bottom and no one will ever notice and I love love love them! They are so pretty and bright and cheerful. Another great excuse to head to the Farmers market(because I need another one lol).
That makes something from each chapter of the book save one. I am hoping to make a couple of the mama bags this weekend as a start to my Christmas gift making. That would make something from each chapter and it also gives me a good base of practice to jump in feet first into both the book and Christmas gifts. I won't scare you buy telling you how many days until Christmas but it is coming too soon for this cat.
Okay, I gotta run and entertain my babe. She has been incredibly patient with me and these pictures and this post. Happy Humpday!
Tuesday, September 29, 2009
Mmmm Good Monday on Tuesday...
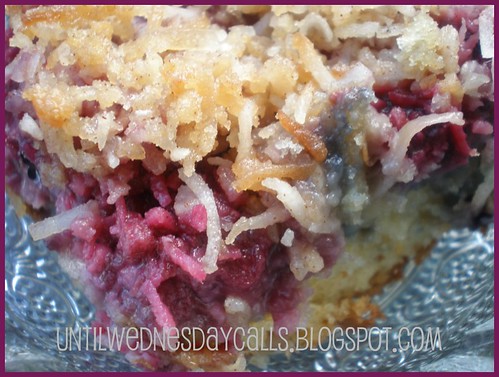
I am a day late and dollar short I know. But the weather here has been sub par to say the least and when the weather is dreary so is the lighting in this apartment. But, today I managed to get a picture of a piece of the delicious cake I made yesterday.
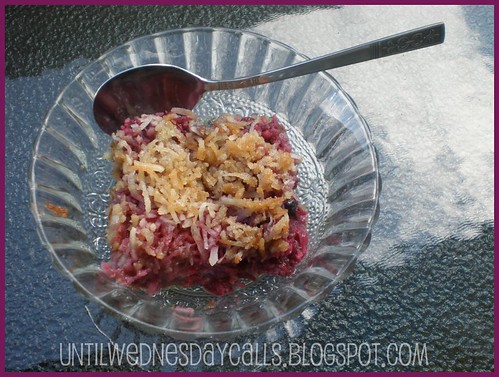
I have been holding on to this recipe all summer wanting to try it but with all of the birthdays to make cakes and cupcakes for it kind of got put on the back burner (no pun intended). With the dreary weather and no birthdays in sight yesterday I was able to buckle down and bake it. Even Wednesday gave me the breathing room I needed to bake up a storm. Gosh that kid is great. The result was a very tasty Berry Coconut Cake from Canadian Living Magazine's website. Recipe and nutritional information to follow.
Berry Coconut Cake
1/2 cup (125 mL) butter, softened
3/4 cup (175 mL) granulated sugar
2 eggs
1 tsp (5 mL) vanilla
1-1/2 cups (375 mL) all-purpose flour
1-1/2 tsp (7 mL) baking powder
1 tsp (5 mL) baking soda
1/4 tsp (1 mL) salt
1 cup (250 mL) sour cream
3/4 cup (175 mL) each raspberries and blueberries
(I used a frozen mix totaling almost two cups)
Topping:
1 cup (250 mL) shredded coconut (I used sweetened)
1/2 cup (125 mL) packed brown sugar (I used 1/4 cup)
2 tbsp (25 mL) butter, softened
1 tbsp (15 mL) all-purpose flour
1/4 tsp (1 mL) cinnamon
Preparation:
Topping: In small bowl, combine coconut, sugar, butter, flour and cinnamon until crumbly; set aside.
In large bowl, beat butter with sugar until fluffy. Beat in eggs, 1 at a time; beat in vanilla. Stir together flour, baking powder, baking soda and salt ; stir half into butter mixture. Stir in sour cream. Stir in remaining flour mixture.
Spread in greased 9-inch (2.5 L) square cake pan. Sprinkle with raspberries and blueberries. Sprinkle with topping. Bake in 325°F (160°C) oven for 60 to 75 minutes or until tester inserted in centre comes out clean. Let cool in pan on rack.
Nutritional Info
Per serving: about -
calories 425
protein 5 g
fat 21 g
carbs 54 g
A couple notes:
I don't know if my oven is baking hot these days but I used frozen berries and still baked it for 15 minutes less than the recipe called for (55 minutes instead of 60-70).
The same thing happened with the lemon loaves I baked last week so it could be my oven. But it could have been the glass cake pan I used for the cake. All I can say is watch your cake and start checking it at 55 minutes. (I use a wooden skewer.)
I only had sweetened coconut and was not about to go out to buy a lowly bag of unsweetened. So I halved the brown sugar amount in the topping. It was good, maybe a little sweet but not too sweet. Good. But if you have unsweetened I would probably recommend it.
There is one last piece sitting in the pan on the counter as I type this and it will take all of my will power not to eat it.
Bon Appetit ~!
Friday, September 25, 2009
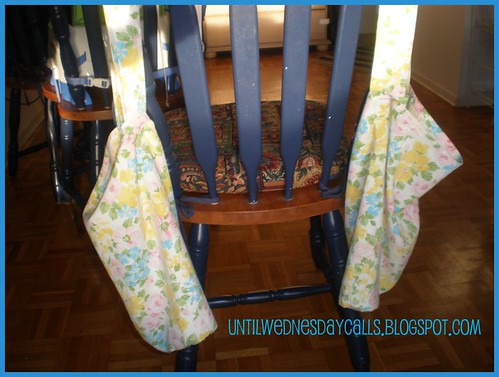
Soothing, yes. Fun, definately.
I have not been posting any crafty bits lately because I had to take a break from sewing and crafting due to some neck pain. And by neck pain I mean almost debilitating headaches due to the strain I was putting on my shoulders and neck whilst sewing and crafting.
But after a much needed break (both physically and mentally) I have returned with a finished project and another in the works.
Today I bring you Lavender/Flax eye pillows made from instructions in Amanda Blake Soule's Handmade Home. Slowly but surely I will make all of the projects from this book!

These were simple and fun and really are immediately soothing. My mom is under the weather and I plopped a finished pillow on her eyes and she just kind of sat there sniffing away. Good stuff. I am sure I will be using one this evening after crafting in the near-dark. (Long story full of inadequate lighting.)
The blue floral material is a silk scarf I bought at a local thrift shop for just this purpose and it conveniently made exactly three scarves with no inches to spare. So I made one for my mom, one for my mother-in-law et moi aussi.
The inside sachet is made from a thrifted cotton remnant and the lavender I dried myself from a neighbor's garden back when I was living in Kelowna. It all came together so well. I have never used flax in it's whole seed form (for eating or crafting) but I can see why she recommends it. It i s a perfect weight (much lighter than rice) but still heavy enough to keep your eyes closed and yet there is a fluidity to it that makes it most comfortable.
Good stuff! If you haven't purchased the book I cannot tell you how happy I am that I did over and above the many books on my Chapters wishlist. Go now, buy, make, love.
Love my work too. Here are some photos four your viewing pleasure.

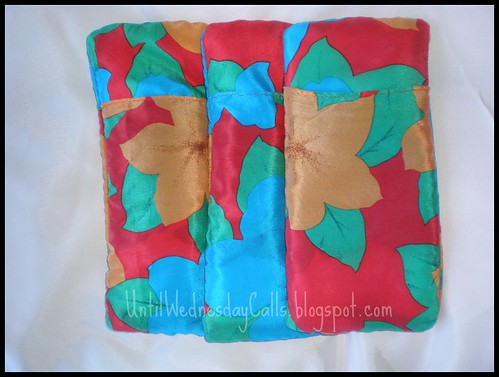
But after a much needed break (both physically and mentally) I have returned with a finished project and another in the works.
Today I bring you Lavender/Flax eye pillows made from instructions in Amanda Blake Soule's Handmade Home. Slowly but surely I will make all of the projects from this book!
These were simple and fun and really are immediately soothing. My mom is under the weather and I plopped a finished pillow on her eyes and she just kind of sat there sniffing away. Good stuff. I am sure I will be using one this evening after crafting in the near-dark. (Long story full of inadequate lighting.)
The blue floral material is a silk scarf I bought at a local thrift shop for just this purpose and it conveniently made exactly three scarves with no inches to spare. So I made one for my mom, one for my mother-in-law et moi aussi.
The inside sachet is made from a thrifted cotton remnant and the lavender I dried myself from a neighbor's garden back when I was living in Kelowna. It all came together so well. I have never used flax in it's whole seed form (for eating or crafting) but I can see why she recommends it. It i s a perfect weight (much lighter than rice) but still heavy enough to keep your eyes closed and yet there is a fluidity to it that makes it most comfortable.
Good stuff! If you haven't purchased the book I cannot tell you how happy I am that I did over and above the many books on my Chapters wishlist. Go now, buy, make, love.
Love my work too. Here are some photos four your viewing pleasure.
Colour of Grey is A-Ok
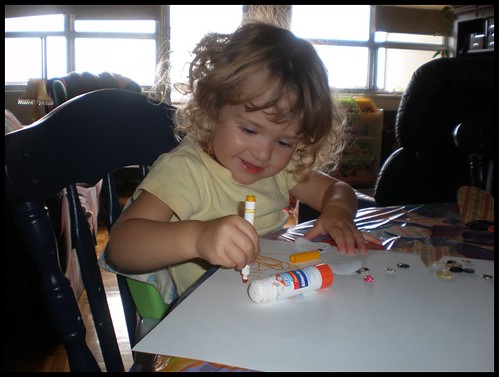
Today is absolutely gorgeous. We have already been to the park, had a nature walk and back. Wednesday is just winding down for her nap while I type this. But most of the week was under the colour of grey. The skies were full of dark clouds and sometimes rain. So we pulled out the big guns. Glue sticks! And markers of course.
I put down a table cloth and let Wednesday go to town with the glue stick (which rarely actually glued anything down) and markers which she rarely gets to play with. She was easily entertained and quiet for a good forty five minutes. Long enough for me to make four loaves of lemon zucchini bread.
Although she loves colouring in her ever expanding collection of colouring books she also likes to colour different pages printed up sometimes with her favourite characters, sometimes pictures of things she loves like butterflies and sometimes just random papers that need colour. This is a great way to use up scrap paper and don`t forget to print on both sides of the paper!
Here is some of my favourite links to free colouring pages.
Toopy and Binoo activities here. Some colouring, some finger puppets some activities. Right now Wednesday`s favourite show is Toopy and Binoo so needless to say these go over well.
Here is a link to some great Sesame Street pages. Wednesday likes the show Play With Me Sesame so Ernie and Grover are always welcomed.
Treehouse TV is the equivalent of Nick Jr. (I am assuming since many shows on this channel are Nick Jr. labeled) and they have a host of fun stuff at the website. For now I just print up these colouring pages which are very plentiful.
Here is a site for very simple one dimensional (mostly) drawings of animals and flowers etc, This is where I print up the butterfly pages for Wednesday to colour.
And finally here is some art history colouring. I like these pages in particular in the American Gothic couple.
Happy colouring mamas (and babes)!
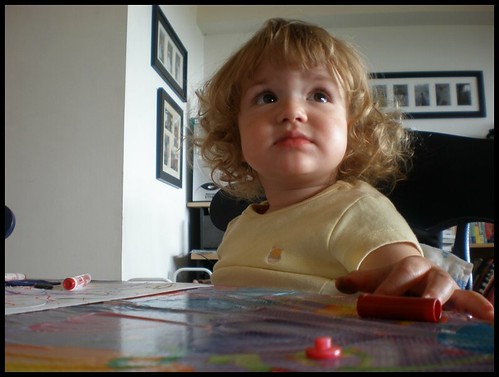
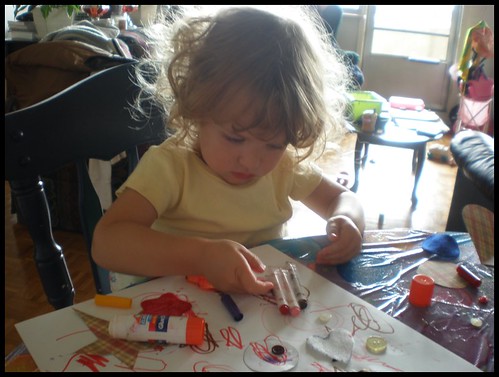
Monday, September 21, 2009
Upside Down Does Right by Me
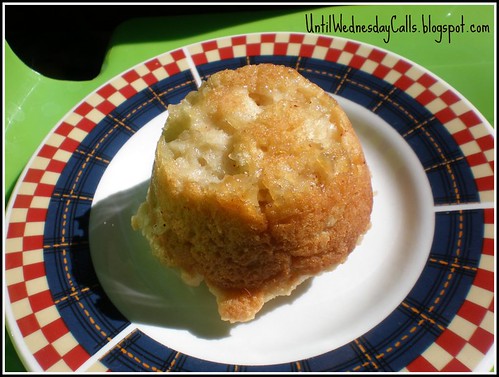
Happy Monday! As mentioned in my last entry I managed to squeeze some baking into my wonderful weekend. I realize now that the last few entries have been goods that fit into muffin tins. This is not the only thing I bake. But It is just so simple, so sweet and so perfect for running out the door to have these portable little goodies on hand.
The goodies this time are Upside Down Apple & Honey Muffins. The apples and honey were both bought at the farmers market the same day and you could taste it. These were super simple, I dare say almost healthy and super tasty! The pieces of apple gave them flavour where normally sugar may have been used. next time I make these I am going to try and substitute whole wheat flour and see what happens. (I am currently out right now so unbleached all-purpose it was.)
Here is the recipe.
Apple & Honey Upside Down Muffins
* 3 apples
* 2 tbsp honey (the stronger the flavour the better, I used buckwheat)
* 2 tbsp cinnamon
* 2 tbsp sugar
* 2 cups all purpose unbleached flour
* 3/4 cups packed brown sugar
* 1 tbsp baking powder
* 1 cup buttermilk or sour milk substitute
* 1/4 cup oil
Pre-heat oven to 400 degrees Fahrenheit. Liberally grease muffin tin.
Mix cinnamon and sugar. Measurements are approximate because I used leftover cinnamon sugar sprinkle from my blueberry muffins made from "The Joy of Cooking" 75th anniversary edition. Sprinkle generously over muffin tin so that each cup has a nice coating of cinnamon and sugar.
Peel and core first apple. Dice into tiny pieces and mix with honey. Spoon into muffin tin. You don't need a lot in each cup, one good sized apple diced should be enough.
Mix all remaining ingredients together at once. Don't over stir (muffins hate it when you do that). The batter is not nearly as runny as most don't be alarmed at its stickiness.
Spoon mixture evenly into tins.
Slice remaining 2 apples thinly leaving peel on. Cut out core as pictured below. Place over batter in each cup.
Bake about 17 minutes or until a toothpick inserted in the middle comes clean. (I used a non stick pan and this was the perfect amount of time you may need to adjust for different pan finish.)
Remove immediately from pan and let cool on rack. Makes 12 scrumptious muffins.
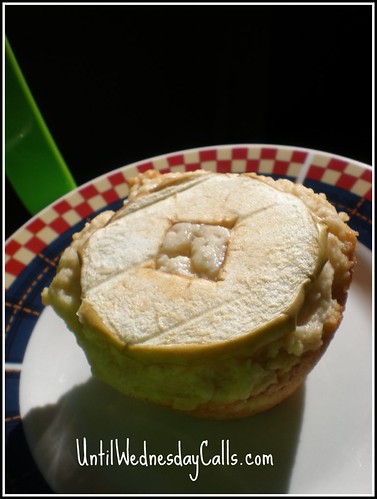
Sunday, September 20, 2009
Ahhh weekends, these are the things dreams are made of.
The weather this weekend has been truly wonderful. Cool crisp mornings perfect for farmers markets and long walks at the beaches and wonderfully warm sunny afternoons great for lounging outside and baking inside.
It was a wonderful weekend. I have the photos to prove it. We started out at the farmers market where it was kids day with the local health unit putting on small events like zucchini car races and a colouring contest.
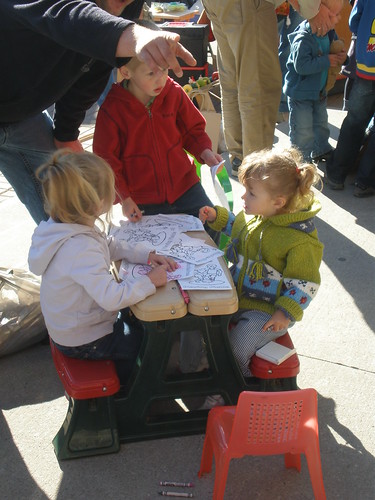
We bought some great stuff. Buckwheat honey and apples which I used to make some upside down apple muffins. I also bought tomatillos but I have not quite figured out how I will use them. Some seriously sweet baked goods and whole wheat bread and of course cherry tomatoes for the wee one. Wednesday loves "tatoes".
We thought we were going to go to another market in "The County" (Prince Edward County) but instead ended up at Sandbanks Provincial Park and wandered along a rockier part of the beach. It was absolutely gorgeous.

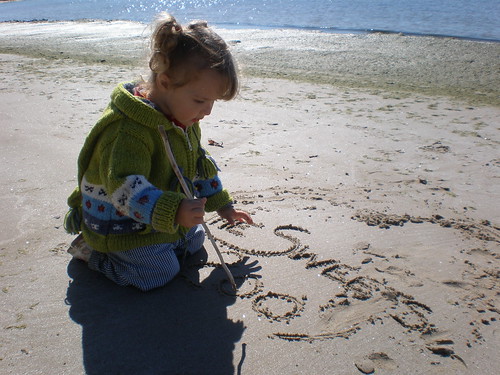
Wednesday fell asleep for the long sunny drive home. When we got home I fought off a case of the dozies (from the sunny drive) but baking with the apples. In addition to the aforementioned muffins I baked an apple crisp with my mom's recipe but I did not know she doubles the topping and although it turned out okay, it was not awesome. Next time.
For giggles Ron and I went to the movies to see Whiteout. It was okay. I don't think I would tell anyone to spend thirty bucks on tickets and munchies to see it but definitely a renter. Kate Beckinsale looks a lot like Neve Campbell but thankfully she doesn't act like her. Because it is set in Antarctica it does not take too much to weed thorough the who-dunnit but still, not bad and I definitely liked hanging out with Ron.
Today we rose and ran early again. This time to walk the newly refurbished boardwalk at Presqu'ile Provincial Park. It was gorgeous. So...marshy. We did not get to see much wildlife but the scenery was beautiful and Wednesday loved running around. She managed to stay on the boardwalk the entire time, no trips or falls. When we walked through any wooded areas (or drove through later) she kept saying "Mommy, it's dark." Now, she is not afraid of the dark so I haven't any idea where that came from. she wasn't scared but felt the need to point it out, every single time there was heavy shade. Kids are so darn cute.
Speaking of cute...

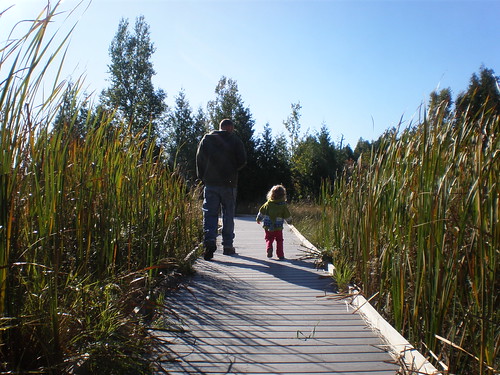
The wee one is napping now. I think we are taking her to visit Ron's parents this afternoon. The home for lasagna and hopefully some sewing to share this week. If you like you can see more pictures from this weekend at my flickr photostream.
See you tomorrow for Mmm good Monday!
It was a wonderful weekend. I have the photos to prove it. We started out at the farmers market where it was kids day with the local health unit putting on small events like zucchini car races and a colouring contest.
We bought some great stuff. Buckwheat honey and apples which I used to make some upside down apple muffins. I also bought tomatillos but I have not quite figured out how I will use them. Some seriously sweet baked goods and whole wheat bread and of course cherry tomatoes for the wee one. Wednesday loves "tatoes".
We thought we were going to go to another market in "The County" (Prince Edward County) but instead ended up at Sandbanks Provincial Park and wandered along a rockier part of the beach. It was absolutely gorgeous.
Wednesday fell asleep for the long sunny drive home. When we got home I fought off a case of the dozies (from the sunny drive) but baking with the apples. In addition to the aforementioned muffins I baked an apple crisp with my mom's recipe but I did not know she doubles the topping and although it turned out okay, it was not awesome. Next time.
For giggles Ron and I went to the movies to see Whiteout. It was okay. I don't think I would tell anyone to spend thirty bucks on tickets and munchies to see it but definitely a renter. Kate Beckinsale looks a lot like Neve Campbell but thankfully she doesn't act like her. Because it is set in Antarctica it does not take too much to weed thorough the who-dunnit but still, not bad and I definitely liked hanging out with Ron.
Today we rose and ran early again. This time to walk the newly refurbished boardwalk at Presqu'ile Provincial Park. It was gorgeous. So...marshy. We did not get to see much wildlife but the scenery was beautiful and Wednesday loved running around. She managed to stay on the boardwalk the entire time, no trips or falls. When we walked through any wooded areas (or drove through later) she kept saying "Mommy, it's dark." Now, she is not afraid of the dark so I haven't any idea where that came from. she wasn't scared but felt the need to point it out, every single time there was heavy shade. Kids are so darn cute.
Speaking of cute...
The wee one is napping now. I think we are taking her to visit Ron's parents this afternoon. The home for lasagna and hopefully some sewing to share this week. If you like you can see more pictures from this weekend at my flickr photostream.
See you tomorrow for Mmm good Monday!
Monday, September 14, 2009
Dad's 50th Birthday Meatitarian Feast

For this weeks edition of Mmmm good Mondays I bring you Cheeseburger Cupcakes and a feast fit for any carnivore!
We themed the party "Meatitarian" after the Wendy's commercial. Ron and I are raising Wednesday vegetarian and we ourselves only eat meat rarely and when this commercial was released we recieved a couple phone calls from our family making reference to it. We decided to use it as the them to the dinner because my dad is always complaining about the lack of meat at dinnertime these days and I thought he would be able to appreciate a meat buffet.
The buffet consisted of dry rubbed and marinated for two days in a homemade sauce by Ron and then slow baked in the oven ribs, meatballs slow cooked in a crock pot in the same homemade bbq sauce, Sweet and spicy Thai chicken wings, two coleslaw (another homemade ginger sauce by Ron) type salads, bake potatoes, cheese bread, mac n' cheese bake and the Cheeseburger Cupcakes for desert.
The cupcakes were almost as big a hit as Ron's ribs. I got a lot of oohs and aahhs but Ron's ribs were eaten into extinction. I tried a couple meatballs and although the sauce was wonderful I cannot stand ground beef and it's meatballs counterparts. Give me a meatless meatball any day! I did manage to fill up on a bake potato with sour cream and some mac n' cheese. After the entire day in the kitchen making the cupcakes, I really was not that hungry anyway.
The cupcakes were inspired by this flickr tutorial set. I tweaked them a bit using brownie hamburgers (inspired by Martha's brownie cutouts from her Cupcakes book) and buttermilk in the vanilla cake mix (it was a *gasp* box mix) and I made my own vanilla icing recipe from Martha Stewart Cupcakes book. A tip: Dust your cookie cutter with cocao to cut out browine 'burgs. I used icing sugar without thinking first and well...you can see where I am going with this.
Topped with some killer 5-0 shaped sparklers they were worth all of the effort.
Better than all of the cooking and baking though was having my family here. My sister and brother were here from Toronto for the night and my other brother came in from Kingston the day of the dinner. Very close friends of the family made it in from out of town for dinner and cake and it was great. Said friends even bought dad a t-shirt that went perfectly with the theme it said "There is room for all of God's creatures, right next to the mashed potatoes." I was sad when everyone had to start heading out hoping to beat the Sunday night traffic but I was exhausted at the same time. After battling that cold this month, having a child who now rises with the sun (literally) and company, visiting and baking I am truly exhausted. I slept like a rock last night and I just might nap with Wednesday in the next hour.
Then again, I might start another craft project because I am a glutton for punishment.

Subscribe to:
Posts (Atom)


