Never let it be said that I do not appreciate a good tartan. Especially one on a wee lass. Especially especially a tartan I sewed on a wee lass of my very own. It started a couple weeks ago, while at the Early Years Family Centre having some fun in the indoor sandbox there was a little girl wearing the most adorable half denim skirt half kilt store bought refashioning kinda thing. It was adorable. And it was right after I made the Romantic Ruffled Skirt so I was all hopped up on self confidence. But not so much confidence that I was willing to chop up a pair of Wednesday's jeans. She recently just grew into her size three pants so they fit too well to refashion. So I had to bide my time until I had both the time and extra money to go thrifting. Well, I tell you size two to three jeans are not so easy to find in thrift shops these days. But, last week I scored! I managed to find two pairs of jeans that fit Wednesday from the crotch to the waist. So, this is what I made. It is not a perfect copy of the skirt I saw, that one was probably knife pleated and mine is box pleated. Hers had some embellishing on the front that I just wasn't inspired to replicate on a vague memory and mine is longer. But I love it. I mean I L-O-V-E it!
 The top I refashioned from a shirt I thrifted a couple weeks ago when I was going to make a kilt out of the tartan fabric. I did a bit of refashioning. I cut off the flowers and then cut off the sleeves, bottom and collar and then lettuce edge ruffled it. I am not overly sold on it, but it helped to top off the skirt.
The skirt was super easy. Too easy. I see myself doing a lot of refashions along these lines. This one I think was easier though because I chose to let the denim fray in spots. I also frayed the plaid but I double stitch zig zagged the edge first. I then pleated it. The pleating was pretty easy although I defy anyone to show me the actual difference between a box pleat and an inverted box pleat. I didn't measure the pleats exactly, and the seam at the back I got excited and forgot to line up the pleats. But on the whole I am really impressed with my first pleats ever. I added the embroidery stitching last. I think it is the best part of the skirt after the pleats of course. I created a fabric belt to kind of top off the skirt, at first it was just a tying belt but I did not like the bow at all so I created a loop and like it much better.
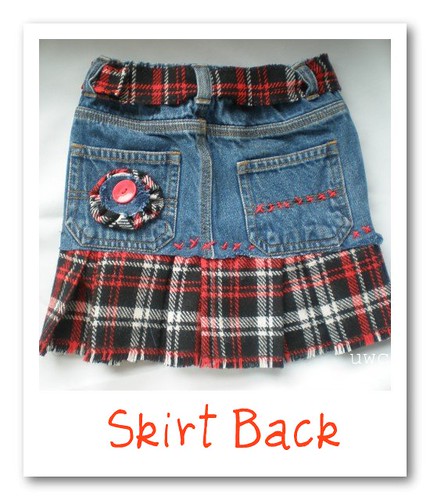 I added a yo yo and button at the back just for kicks, but I really think I might take the yo yo off and add more pocket stitching. I really really like how that stitching came out. Now that I have seen how low the top comes down on the waist line I think the yo yo AND belt might be too much. What do you think?
Also, Wednesday has worn this and I have washed and dryed it to check for wear and I gotta say I am getting really good it this. All seams held up well, all zig zag stitches kept the fraying in check.
Now my question is, would rather a tutorial on how to make the skirt from start to finish, or just the pleats? I started a tutorial but I realized the black and red tartan fabric was probably not the best choice for showing you certain techniques. Fear not though, I have plenty of ideas for pleated skirts. Depending on how much time I get to sew during daylight hours for best photographic light I should have one done by the weekend.
For more shots of my gorgeous daughter modeling the outfit, or detail shots of my handiwork you can check out the flickr set here.
Happy Sewing!
p.s. I will be posting this to Wardrobe Refashion and a couple link parties over the next few weeks so those of you that follow that blog to will see a bit of cross posting.