Wednesday, December 21, 2011

Wednesday on Wednesday

Christmas Card 2011
Wishing you and yours a holiday filled with hot cocoa, warm hearts and great memories.
Cheers, Melissa, Ron & Wednesday

Monday, December 19, 2011

How To: Beaded Garland Christmas Card Holder

One last tutorial before I take the week off to enjoy the holidays and recoup thereafter. I have had this done or some time but every time I would go to post it, I would create something much more fun that I wanted to share with you!
Doncha love the card!

Seriously though this is almost as easy as the stocking pillows. And here is proof:

Gather Ye Materials
Wooden clothespins
Mod Podge (I used Sparkle Mod Podge.)
Large wooden beads. (I think mine were about 3/4" in size) They were also from an old beaded garland from Christmases past.
String/yarn

Begin at the beginning...
Step 1: Cut paper scraps to size of clothespin front.
Step 2: Adhere paper to clothespin with one coat of Modpodge on Clothespin and then give paper one top coat of Mod Podge. Let dry.
Step 3: String beads (I used ten) in between clothespins. Simply put string through coil in clothespin.
Step 4: Hang and ill with cards from your loved ones.

This will be the last tutorial from me until the new year. I might pop back in with something shiny and fun or New Year's Eve but right now I just plan on finishing my Christmas prep and then recuperating from the holiday madness.

Happy holidays!

Sunday, December 18, 2011

Scrapbooking Sunday : A New Link Party!

Green Christmas


Recently I have discovered that I love digital scrapbooking. I know, duh right? But as much as I have been playing with elements o digital scrapbooking with things like Wednesday's birthday invitations and blog headers and buttons I have never really scrapbooked with it. As in make photo layouts. Well, I have begun to scarp every morning with my coffee. It seems to be my best time creatively as I am freshly alert with my coffee and my head is not yet clouded with elements of the day.
It started less than two weeks ago with a Christmas card. Then it was the first snowfall layout you saw a couple Wednesday on Wednesdays ago. I have since created a half dozen photo layouts and I am just itching to show them to you.
I already have a couple favourites but really, I am just pleased as punch with my progress. I thought maybe I would start a link party. Scrapbooking Sundays or digital, paper and card making.
I am hoping that with enough momentum and success that maybe we can have some sponsored challenges in the new year!
Drama Queen-001
My New Favourite.
Turtledove
Today's creation.
Sweety at Christmas
Our Springer named Sweety under the tree.


I have to partially thank Mymemories for the new found addiction. At first when they gave me a copy for review and giveaway I was thinking "OK, I have Photoshop so why would I use it? But whatever, I'll give a copy away." Well, after the initial getting used to a program that was not Photoshop I was sold. It really is a stellar program and for $30.00 (with coupon code on my sidebar) you cannot go wrong. Honest. And before you think I am just trying to sell you something that I get for free let me tell you that I have bought more than my share of digital design packs. BUT here is the best part, after your initial purchase, you not only get credits for ten dollars worth of design packs but there are five pages worth of free kits. The kit I used to make last week's Wednesday on Wednesday was totally free. The elements I used for my last two pages were all free, sourced from around the web over the last two years. Just some food for thought. I do still use Photoshop for things, but I use Mymemories every morning for layouts.

And now it is your turn! What have you been working on? Do you love digital scrapbooking? Are you more traditional with paper and glue? Do you make cards? Or design blog headers and buttons? Show me! Show us! Just link us to your blog POST or Flickr Photo(set) and each week I will Share the two links with the most clicks.


Friday, December 16, 2011

How To: Repurpose Stockings to Throw Pillows

Recycled Stocking Pillows


Well, this isn't so much a how-to as a go-do! I had been meaning to make some felted-sweater-stocking-pillows for a couple weeks now but you know how things get this close to Christmas. Thankfully, I had a light bulb moment and decided that filling extra stockings with fabric scraps I have hoarded saved or just this purpose would be even better! Pretty freakin' adorable right?


Recycled Stocking Pillows

All I did was fill and sew. See the seam at the top? Looks like it supposed to be there doesn't it? Well, almost. You could even hand sew it. Machine not required for this one. In fact a blanket stitch would probably look lovely.


Recycled Stocking Pillows

They are surprisingly comfortable, even two stacked in a wing back chair.


Ruffled Christmas Tree Garland


I was just happy to have a use or some of the extras we had. We have a total of nine stockings. Nine. We are only three people. But A friend made Wednesday's stocking and machine embroidered her name on it so we keep that one out. I mean, how often do you think Wednesday will receive personalized items? I have the black and white denim patchwork one you see in my header. It is just too pretty not to hang, and it is kinda small so Ron doesn't go broke trying to fill it. Finally, I made Ron a new stocking this year out of two felted wool sweaters. He loves his wool socks so I mimicked one for the stocking. (I had in previous Christmases used a wool sock or his stocking but they are just too small for things like movies, cds or novels.) His ace lit up when I showed him his new stocking, I was so proud.

Happy Christmas Crafting!

Thursday, December 15, 2011

How To: Recycled Crayon Wax Christmas Ornaments

Purple-Tart-Ornament

You know all those cheap wax crayons you get at restaurants? Or in bags o crayons at thrift shops and yard sales? Well, they do not make good cupcake crayons. They don't, I have even mixed them with Crayolas. The thing is the cheap wax is light and floats to the top o the crayon instead of mixing with the good wax. So, what do you do with all your child's broken crayons and cheap crayons? Well, you can make candles. But it takes a lot o crayons to make candles. (And I cannot attest to the safety o crayon candles.) So what else? Well you can make Christmas tree ornaments. It is super simple! Wednesday was able to help with most of the process. he liked sorting and breaking the crayons. (I  asked her to pick out all the pink, green, red and white ones.)

Gather Ye Materials
Broken crayons
Glitter (I used fine, medium and chunky)
Screw Eyes
Ribbon
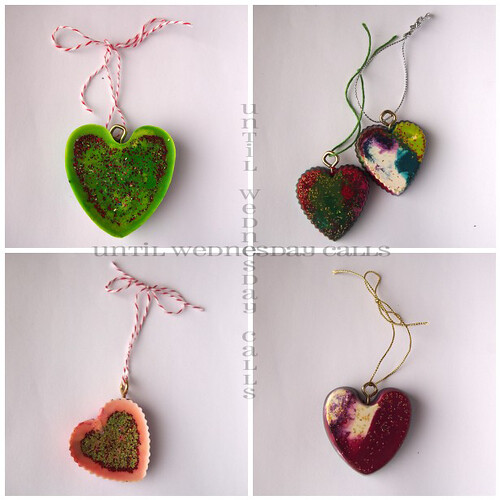
Cupcake molds The smaller hearts are Wilton Mini Scalloped Silicone Cupcake Hearts and the bigger hearts are dollarstore valentine molds. (Super flimsy)

Begin at the beginning...


Wax-Tart-Ornament-Mosaic

You are essentially making crayon cakes with LOTS o sparkles....

Step 1: Remove wrappers from crayons and break crayons into small pieces.

Step 2:  Sprinkle glitter in the bottom of the molds/tins. (Little or lots, it is totally up to you)
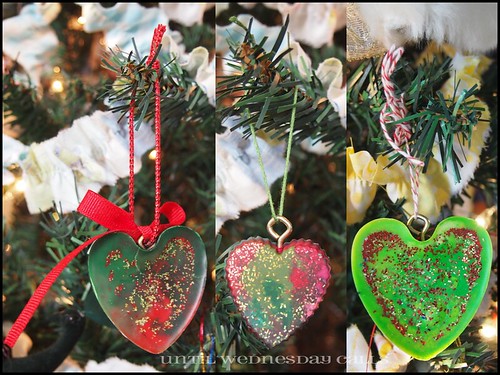
Step 3: Line a baking sheet with tin-foil or parchment paper and set molds on top. Fill each mold with crayon pieces.You can make these monochromatic, keep it Christmas-sy or just go-to-town with the rainbow.

Step 4: Put baking pans/cups in an oven pre-heated to 250 degrees Fahrenheit.
Step 5: Leave in for ten(ish) minutes, you want the crayons to be melted leaving a smooth surface but not boiling.
Step 6: Remove from oven and sprinkle with more glitter. (Don't go crazy, most of it sinks to the middle of the wax cake anyways.)
Step 7: Let cool. (This really doesn't take as long as you'd think) and remove from molds.

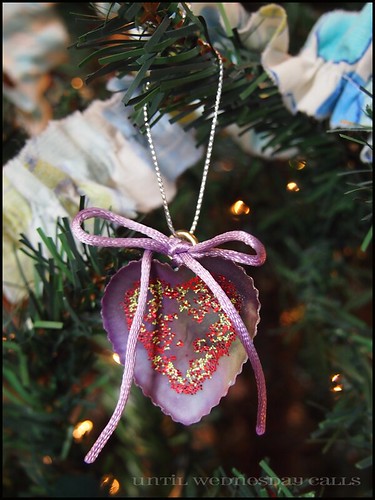
Step 8: Carefully attach screw eye to wax tart.
Step 8.5: I found pre-poking a hole with a tooth pick helped.
Step 8.75: I also found that if I broke some it was no biggie, I just pooped the broken ones back in the oven or a couple minutes and we were golden.
Step 8.9: I also found that if the screw eye fell out, I just heated it up for a second with a lighter and it glued itself to the whole, better than before.
Step 9: Add ribbon and voila! You're done!

P.S. I you need pictures of a crayon cake tutorial this one from Indietutes is super!

Crayon Wax tart Ornament Collage
Happy Christmas Crafting!

Wednesday, December 14, 2011

Wednesday on Wednesday

Wednesday and Rosie

This is Wednesday holding Rosie. Rosie is from my childhood, my dad gave her to me when I was two. Although she is a little rough around the edges she has a lot o her left to love. It warms me inside to see her loving the teddy bear I loved enough to pack and move with me  a multitude of times.


**Digital scrapbooking page was made in less than ten minutes with MyMemories software and the Moments FREE kit by Indigo Designs
**MyMemories digital scrapbooking elements (free and for purchase) can be downloaded in PNG format for use in other programs.

Tuesday, December 13, 2011

How To: Ice Cream Cone Christmas Ornament

ice-cream-cone-ornament

I am in love with my Ice Cream Cone Christmas ornament. I made the ornament and how to or Savvymom.ca. It was the least I could do ater they put Until Wednesday Calls AND Storage Geek on their 35 favourite Canadian Mom Blogs List.

To find out how I made this ornament click here!

Authors Note: Pictured at the tutorial is a wreath. The hot glue and the glas Christmas balls did not stay bonded through the first freezing rain storm we had. The glue contracted too much in the cold. But as a Christmas tree ornament it is good enough eat!

Monday, December 12, 2011

How To: Refurbish a Jewelry Box with Clip On Earrings and Paint

before-and-after

Some difference eh? I love it. A little bit of paint, fabric and shiny baubles and this once almost useless jewelry box is useful and pretty. I was on a big spray painting kit one day and collected everything I could find that might make a pretty accessory holder. The pulls were hideous (and hard to use being so small) so I dug into my thrifted clip on earring collection and voila! here is how I made it:

Gather Ye Materials
Jewelry box
Paint (optional) I used Rustoleum Apple Red Spray paint
Clip on Earrings (1 for each drawer/door)
Small piece of fabric

Gather Ye Tools
Hot glue gun
Scissors
Pliers
E600 glue

Begin at the beginning...

Step-1

Step 1:  Remove hardware holding door glass and the door glass.
{If painting}Remove drawer pulls and tape a pice of paper to where door glass was.
 Rustoleum-Apple-Red-Spray-Paint
Step 1.5: Paint
Step-2
Step 2: Use glass as template for fabric. Cut fabric larger than glass.
Step-3
Step 3: Glue down fabric to inside of door frame.
Step-4
Step 5: Trim fabric.
Clip-On-Earrings

Collect your clip on earrings.
Step-5
Step 5: Remove backs from clip on earrings. I did this with a pair of pliers. I held onto the earring with a pair and pulled on the clip with a pair.
Step-6Step 7
Step 6: using a glue that can bond metal to metal (like E600) to glue the earrings to each drawer pull.
finished red jewelry box
Step 8: Add post earrings to fabric and you're done!
Closet1Red-Accessory-Holders Closet
Add it to your bedroom and fill with your fabulous accessories!
Happy refurbishing!

Friday, December 9, 2011

How To: Picture Frame Brooch Display

Finished-Small-Red-Brooch-frame

I love red. Seriously. Since I was a kid I have been choosing red game pieces, red lollipops, red clothing and as an adult I still do that but I also choose red home decor pieces like my red Ikea duvet cover. So it was only natural that when I had two cans of apple red spray paint land in my lap that I go to freakin' town on something right? Well, I did.

Jewelry-Organizers-before-re
Looks like this Island of Misfit home decor doesn't it? It kind of is.


Rustoleum-Apple-Red-Spray-P

I gathered together two plastic dollar store picture frames, one hideous and almost not even useful jewelry box from my Mom, a thrifted mug rack and an empty picture frame collected during a trip to the dump (not shown). I gave everything three light coats of Rustoleum Apple Red paint, added some cork board here and clip on earrings there and voila!
And voila! You have a gorgeous framed brooch display made in minutes!

Red-Accessory-Holders
This is what happened to my closet when I put it all together! I love it!


While the mug rack is pretty simple (Find one and paint it.) The others do require a bit of a step by step. I am not going to make one or the larger earring display though. All I did was staple some wire mesh I had laying around to the painted frame. I had wanted to use lace but didn't have a piece large enough. I like the bigger mesh though, it supports the bigger post earrings. But i you need a tutorial there are lots of great ones out there. Here, here, and here are all great ones to get you started.

In this post I am going to run through the brooch display. I'll post the step by step for the jewelry box in just a couple days.


Gather Ye Materials
Picture frame finished to your liking
Piece of cork board at least as big as your frame
Piece of batting (or any bulky sot material like felt or fleece) as big as frame
Piece of fabric a couple inches larger than your frame

Gather Ye Tools
Hot glue gun and glue sticks
Picture hanging hardware in case your frame doesn't have that. (Mine didn't)

Begin at the beginning...

Brooch-Display-Step-1 and 2
Step 1: Place your frame backing on a piece of cork and trace. Cut out your cork and fit it in the frame. make any necessary adjustments.
Step 2: lay cork on batting and trace. Cut.
Warm-and-White-Cotton-BattiStep-3
Step 3: Layer your fabric, your batting and your cork board so that the cork is on top and fabric is on the bottom.
Step-4
Fold each side over and glue with hot glue one side at a time. Do this in opposite sides creating a nice taught front piece of fabric.
Step-5
Step 5: Flip over and check for taughtness or in my case wavy stripes.
Step-6

Step 6: Fit back into frame.

Step-7

Step 7: If you are using the frame as a dresser top display, this is where you try and squeeze the back, back into the frame.

Step-8

Step 7.5: If you can't fit the frame back on, or want to hang the display on the wall using tack, little nails or a good glue attach picture hanging hardware directly to the cork board.

Finished-Big-Red-Brooch-Dis

And voila! You have a gorgeous framed brooch display made in minutes!

finished red jewelry box
Come back soon to see how I made this gorgeous little number!

Wednesday, December 7, 2011

Wednesday on Wednesday

A couple weeks ago (in November) we had out one and (so far) only snowfall of the season. There was just enough on the ground we were able to go out and play for a little while. I managed to snap a couple great photos of Wednesday in a great mood. How are your towns doing snowfall-wise?
♥ ♥ ♥


Layout is made with MyMemories software (mostly) Eskimo Kiss design pack.

Monday, December 5, 2011

How To: Ruffled Christmas Garland

Christmas Garland On The Bannister

A couple months ago, I organized my vintage sheet collection. I made some mini fabric bolts from corrugated plastic. It looks great, but I had to trim a lot of large pieces of most of the sheets. I also decided to thin out the stash a little bit. My solution was a braided rag rug for Wednesday's play space. I have no idea what cold medicine I must have been on because as soon as I had torn up the sheets I realized that it was just too big of a job. So, now I had three large reusable shopping bags full of torn strips of vintage sheets and no way to use it all fast enough. Enter Christmas and my sewing machine ruffler foot.


Ruffled Christmas Tree Garland

I managed to use up one out of three bags making a skinny garland for my tree and a fatter garland for my banister. I love them both. Captain Awesome called it "Country cute". I prefer chic to cute but I'll take what I can get! I almost feel silly for posting it as a tutorial but I took process photos and thought I would share. ***Authors Notes*** You could try this with burlap, or double up on your fabric, a skinny strip on top o a wide one. Or ribbons, have some spools of ribbon you haven't used in since last Christmas? Or scraps, the strips would be smaller of course but the variety and colour would be gorgeous!

Gather Ye Materials
Fabric (The longer the pieces the better, I used vintage bed sheets.)

Gather Ye Tools
Sewing machine
Ruffler foot (Gathering foot will work as well, it just produces a less full ruffle.)

Begin at the beginning...


Ruffled Christmas Tree Garland

Step 1: Tear your fabric into strips. The easiest way to do this is to snip the fabric at regular intervals at one end and just tear down at each snip to the end of the fabric.


Ruffled Christmas Tree Garland

Step 2: With your ruffler foot set to rufle @ every stitch, and your stitch length set to the most per inch (I think mine was twenty?) feed the fabric into the ruffler foot a single layer at a time. This is just like using a serger.


Ruffled Christmas Tree Garland

Step 3: To join fabric pieces slide the next piece under the current piece with a half to full inch of overlap.


Ruffled Christmas Tree GarlandRuffled Christmas Tree Garland

This is to show the different width and what the ruffle looks like. I used a skinny ruffle on my tree because it is a tiny tree (Artificial 6ft)I probably could have used a fuller ruffle but I am totally happy with how it turned out. I used a wider ruffle for my banister and also upped the fullness.

Ruffled Christmas Tree GarlandRuffled Christmas Tree Garland
Shabby farmhouse chic by day and Country chic by night.
This our first Sweet family tree in the six(ish) years we have been together. Oh, we have had tree branches, and potted Norfolk pines, table top artificials and even giant firs (the fir was at my parents when we stayed with them upon moving back to Onatrio.) but this our first standard sized, lit up Christmas tree. At first I wanted a real one (Farmed trees are my eco choice) but the space we had to fit it was so narrow that really only a fake tree could fit. Also, our budget was nil so when this pre-lit 6ft went on sale at Canadian Tire I begged for harassed Ron jumped on it. The bonus is that it is small enough to be a second tree if we ever have a place that is big enough for two trees.
Christmas Garland On The Bannister

Christmas Garland On The Bannister

Nighttime-ruffles-and-Sweetie
Our very old Springer Spaniel, Sweetie Sweet. She is deaf and mostly blind and always looks like someone has beaten her or will be beating her soon. Emotionally high maintenance this dog.


Happy Holidays and of course happy crafting!