You know what I love about lasagna? Everything! For serious folks, is there anything this dish cannot be or do? With the exception of dancing a jig I say nay. It can have lots of meat, or no meat. Red sauce or white sauce. Roasted veggies or raw or even no veggies (although why would you?). And best of all, the leftovers are scrumdiddlyumptious!
This is a recipe I came up with that is make-ahead for the taste not the convenience (although no pots and pans at after dinner is nice too). Tomato based pasta dishes have always tasted even better when eaten as leftovers so I thought why not just make it ahead of time and reheat it for that oh-so good leftover taste?
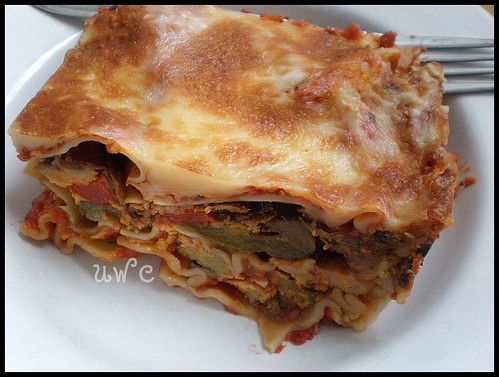
So I bring to you my Vegetarian Leftover Lasagna. I would like to note that this dish is made in a ginormous deep dish lasgana pan so that it goes for a couple days worth of lunches and inners. But because of the size and depth of the pan it does take a lot of grocery to fill it.
**Please adjust according to your pan size and budget. ***Also, I am not much for measurements when I create so these are rough guesstimates, don't worry it really does not matter much. Melissa's Vegetarian Leftover Lasagna
-Ingredients- 6 yellow onions sliced into 1/4-1/2" rings 1/2 cup of butter 2 tbsp sugar
6 sweet peppers assorted colours (or not assorted)cut into quarters sesame oil (olive is a fine substitute) sea salt (table with do, but if you don't already use sea salt you should start!)
2 cans diced/crushed tomatoes 1 can pasta sauce (I love Primo brand, it has enough tomato paste in it that you needn't add any to the dish) 1 tbsp olive oil 4-6 cloves garlic (depends on your taste for garlic)finely chopped
8 oz mushrooms (any kind will do, I used white but I love criminis) 2 heads of broccoli (just one if they are bigger than average) 1 box of oven ready lasagna noodles. (You could use fresh, or pre-boiled ones but I happen to have a box of these in the cupboard) Cheese, lots of cheese. I used three pounds of shredded marble and Italian blends. We like a cheesy lasagna around here but you do not need to use that much. because this is a meatless lasagna the cheese content is really what ups the budget for this one.
-Modus Operandi-
In a large saucepan or dutch oven, melt the butter and sugar. When the sugar has dissolved into the butter add the sliced onions and cook until soft and dark brown. You are caramelizing them with the sugar here not just frying.
Meanwhile, core the peppers and slice them into quarters. Put on a cookie sheet lined with foil and brush with oil (sesame really does works well here) and sprinkle with coarse sea salt. Put on the middle rack in the oven with the oven set to broil. Remove from oven when just starting to char.
In another large saucepan, heat olive oil and add chopped garlic. (Make sure the oil does not get too hot because that can make the garlic bitter.) When garlic is soft and just turning brown add the two cans of tomatoes. When tomatoes have warmed add the can of pasta sauce. Let warm through and then turn down to simmer.
This is where you would be slicing mushrooms and broccoli if you are adding them. I blanched the broccoli (through in a pot of boiling water for about a minute)but it is a taste thing.
layer ingredients in the following order:
Sauce Noodles Roasted peppers (all of them) Cheese Sauce Noodles Caramelized onions (all of them) Cheese Sauce Noodles Broccoli & mushrooms (all of them) Cheese Noodles Sauce Cheese
Cover with foil and bake at 350 degrees for an hour. Remove from oven let cool completely and transfer to fridge if you are eating it the following day or freezer if you are saving it for later later.
Whenever you decide to eat it, I would take it out at least a couple hours before you want to eat it and bake it for about an our. Honestly, I learned that the best time to take it out of the oven was when you could smell lasagna throughout the house. When this is happening, take the foil off cover with more cheese (there is always room for more cheese) and broil until cheese is browned and bubbly.
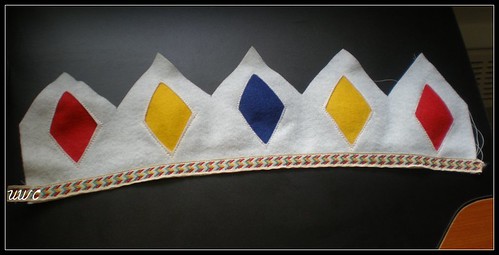
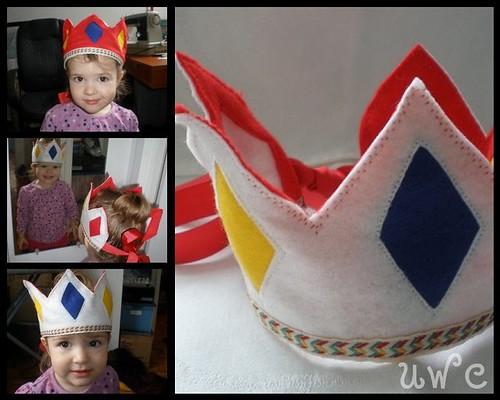
This idea rolled around in my head for about a day. I designed and redesigned it a few times and it still didn't turn out anything like the one in my head. But, I love it! I love it so much I am sharing it with you. The tutorial is pretty straightforward but I am including the crown and diamond pattern pieces. I also have a felt tiara in the works but it is an overcast day and getting the final product pictures on the crown were tricky enough. But, the crown looks great and so I have both a tute for you and some great pictures, complete with *gasp* toddler model!
The supplies you need really vary on how you want to embellish your crown. This was a total stashbuster project for me since I actually had everything on hand. Free is my favourite price. Also, even when I paid for the felt it was near free as it was all thrifted pieces. The only thing I used that was not felt was some vintage trim I bought in a lot off of EBay. I had thought about making the diamonds argyle with embroidery thread (that was my initial idea but it looked so good just the way it was) I had thought about using buttons and rhinestones but really, I thought less is more. So, with that ebing said here is the list of materials I used:
Felt (whatever you have on hand, wool or ecospun or even tightly felted sweaters would work I think:
2 pieces 15" in width, 4.5" in height
10 pieces 2.5"x3.5"
Trim:
2 15" pieces (I used some vintage bought on Ebay)
2 12" pieces of ribbon (I used grosgrain leftover from a Christmas gift I received but any ribbon that holds a tied bow would do.)
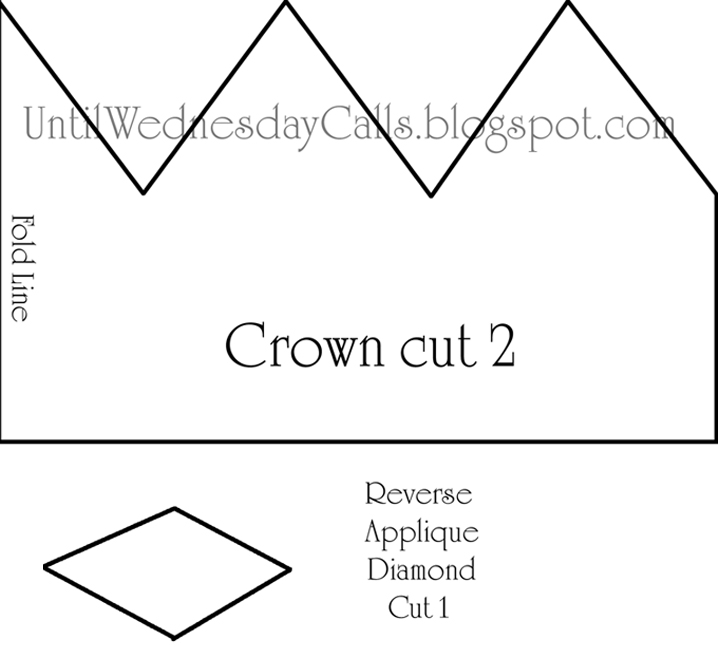
Pattern to be found here. Which took me ages to size properly. If you have a fool proof plan for making patterns in Photoshop in a printable size feel free to let me know it!
And now on to the Construction Instructions;
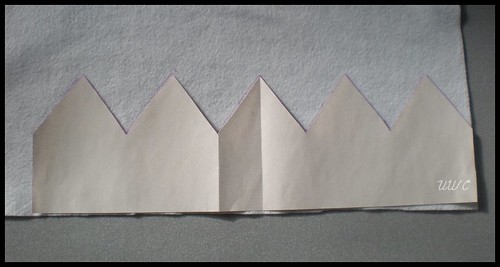
Print pattern and cut out felt crown pieces.
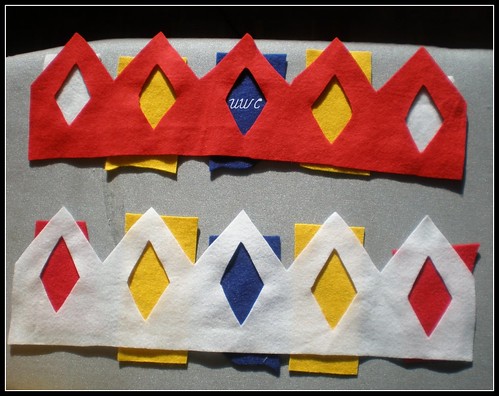
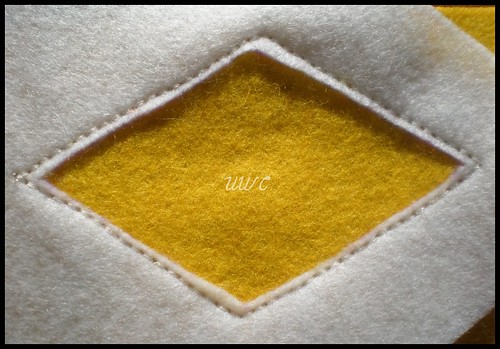
When cutting diamonds, I found it quickest to trace them individually on one crown and then use that crown as a stencil on the second piece of felt. You could use an Xacto knife on a cutting mat but I just used some super sharp snips. Then cut out the rectangles to go behind the cut out diamonds.
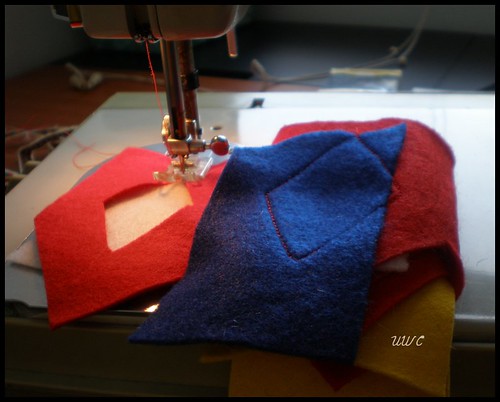
You may find that folding the crown up as you go along prevents it from getting caught on the machine.
Stitch the felt pieces to the back side of the felt crown one at a time. When you are done,trim as close to the stitching as you can. From the back they should look like this. *Note* If you like the look, you could always keep going like that and have an appliqued look instead of reverse applique. I thought about it, but again was seduced by the reverse applique look.
After you have sewn the pieces to the back of the crowns and trimmed away the excess, the front should look like this.
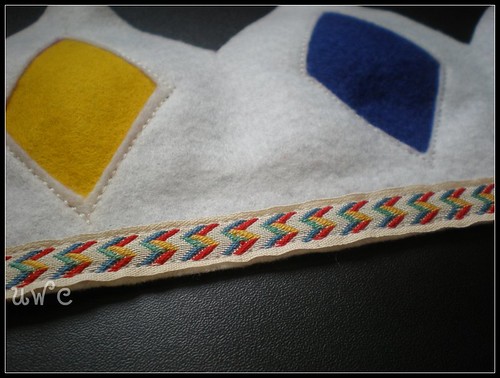
Once all your pieces are trimmed you can add the trim. This was super easy because it had a pattern I could line up with the foot on my machine.
Isn't the vintage trim just adorable?!
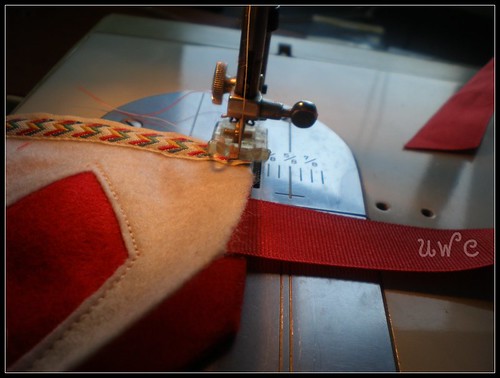
Insert your ribbon between the two layers of felt and sew.
Sew the two felt crowns together, wrong sides facing eachother. Keep stitches as close the the edge as you can get. I did it in a zig zag stitch but I think a running stitch would have been just as nice. Also, I didn't use a contrasting thread but you could.
Finally, have your two and a half year old model your after much begging, and promise of her becoming a queen!~
This would have taken me just a couple of hours but I spent some time developing another pattern (a tiara)and then because I was impatient and I didn't double check my tension I had to rip out half a crowns worth of triple stitches. All in all it would have taken a morning had a I had the pattern already and not have to rip out stitches.
The tiara one will be coming soon, I am just waiting for better light. Happy Crafting folks!~
I am linking to a couple of link events. One is @ Skip to My Lou
I recently read a book that has not changed my life per se but definitely given me the final push over a fence that I needed. It is called Eating Animals and is written by Jonathan Safran Foer. It is actually less about eating meat and more about factory farming practices and processes; seafood, poultry, pork and beef. Nothing is left out. "We have waged war, or rather let a war be waged, against all of the animals we eat. This war is new and has a name: factory farming." It is a sad and yet ultimately true description of how our meat is brought to our tables.
I would like to point out two things before I begin this review/reflection. The first is that we have been raising Wednesday vegetarian since day one for health reasons. The second is that like the author, I have been waffling in my decision to go vegetarian myself so this book did not 'change my life' so to speak. Ron and I eat very little meat, maybe four times a month we will have some breakfast meat like bacon or sausage, maybe add some chicken to a creamy pasta dish we are preparing or because fast food poses few options that taste good at all, we might grab a chicken sandwich in a drive-thru. This book changed that for me though.
While my decision to raise Wednesday vegetarian was based solely on the thought of her health (hormones, antibiotics, genetic engineering etc) the detailed (but not needlessly graphic) accounts of senseless animal abuse was all I needed to finally say, even once a week is too much meat. I even decided to give up sea food which has always been my main weakness. Learning of how much ocean life is lost due to by catch and the absolutely filthy conditions of fish farms I can now no longer eat sea food and enjoy it.
I would like to also say that though I believe vegetarian/vegan diets are extremely healthy I am not against eating meat for the sake of eating meat. I am okay with most practices in what is (maybe sadly)now known as Heritage Farming. I am okay with humane farming practices and hormone and antibiotic free meat. I am okay with eating the unfertilized off spring of chicken harvested in such a way that does not include cages and broken legs and no access to the outside.
The information about both how birds are treated during growth and confinement and how they are processed is stomach turning. I promise you, you will never eat another dead bird again without wondering how many diseases and bacteria you are also ingesting. I am not going to regurgitate (no pun intended I swear) the facts and statistics of the book, but they are both staggering and sickening.
The information we are given about pig farming is probably the most disturbing though. From the abuse and confinement, to the environmental impact of these factory farms on not only the communities surrounding them but the earth in general. Methane gas is a serious issue and as long as the demand for meat grows, the factory farms will keep supplying and those animals have to shit and that shit has to go somewhere. Hey! I know! Why not into the air we breathe? Sound like I am being sarcastic? Only partly. Pig farms release toxins into the air and water supplies daily around the world. It is a sickening though, literally.
What horrified me most though was the processing plants. The stories of how poultry, pigs and cows are slaughtered was gut wrenching. Especially that of cows (who lead the least abused lives of livestock). Stories of live cows being skinned and limbs amputated. Like the horror novels that made me take a deep breathe and look away from the pages in my youth, this book literally took the wind out of me in some places.
But, Mr. Foer is a clever man. His book does not read like a preachy-you-must-not-eat-meat-ever-because-I-say-so sort of book. Instead he gives his gives his narrative quite objectively (only touching on opinion a few times) and includes the points of view from many different people. Not just a quote here and there, but actual stories from the mouths of these people. There is the animal rights activist, the factory farmer, two heritage farmers, a vegetarian rancher and her husband a carnivorous rancher, a PETA officer and even a vegan slaughterhouse designer. These are wonderfully written accounts of what these people see as needs for both the animals and the consumers and also give good balance to the book.
I brought the book home because the description on the inside jacket said that Mr. Foer's journey into research began with the news of his soon to be fatherhood. Which is exactly what had been driving me to eat less and less meat over the last few years. His research project turned book is much more than food for thought. It really will make you think before you eat. Like the author I am not telling or even asking you to become vegetarian/vegan. I am only asking you to read this book which is incredibly informative and yet not dry at all. I read the book in less than two days, would have been one but this mama has a bed time. It is a great place to start your journey into really finding out where some of your food comes from.
For me, I have made the decision to become vegetarian until I can find local meat raised by farmers who treat their animals like they are alive when they are alive. I am lucky to live in an agriculture rich area, I am sure with a little research I can find free range eggs that actually run outside. I will actually find turkeys raised like Frank Reese's. We do not eat red meat here because it is too hard on the digestive tract of even near-vegetarians and I have never been much for pork. But if I find some sausage from pigs raised in humane ways I just may have to bring some home and eat covered in locally tapped maple syrup. But until then, my once a week meat fix is no longer. Thank goodness I like TVP!
Because I do no not want to come off as a born again vegetarian, or preachy or anything of the like, I will leave you with a few links I found while looking into factory farming in Canada (which differs almost not at all from factory farming in the U.S.A.)and some links to some organizations mentioned in the book Eating Animals.
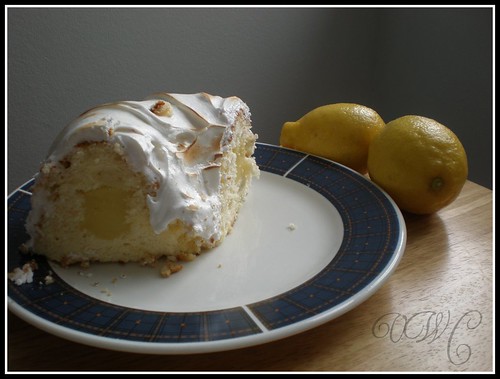
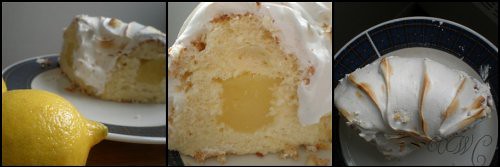
Ahh, blogger how I have missed thee! But I am back now. And with lemony goodness from above! T'was my youngest brother's birthday on Tuesday so we had a dinner for him yesterday. The siblings were supposed to come down from the city but the weather did not cooperate so we had a lot of Leftover Lasagna (to be shared with you next week) and leftover Lemon Joy cake. So I managed to snag a couple photos to share with the recipe(s).
The cake was inspired by the Lemon Meringue Cupcakes I made on Christmas day from the Martha Stewart Cupcakes Book. Those were incredible. So tasty, but messy (My icing kept sliding off the lemon curd) but when Matt asked for a non-chocolate cake, I thought this was as far from chocolate as we could get.
The cake is a combination of three different recipes in the Joy of Cooking cookbook. The first is the Lemon Chiffon Cake (pg. 710). I doubled the lemon zest amount and substituted a half cup of freshly squeezed lemon juice for a half cup water. If you have never made a chiffon cake I urge you too. So light, so airy so wonderfully moist. I made it the day before and left it in the pan with plastic wrap to seal it and it was still super fresh when I pulled it out to fill.
The filling is a simple lemon curd recipe (pg. 687) made mostly of cornstarch, water and a bit of lemon juice and zest. I may have doubled the zest called for in this recipe as well, but maybe not. Super simple though. To fill the cake, I slice of a layer off the top, cut a channel with a serrated knife, pulled out the spare cake and filled with curd. Replacing the top piece was easier than getting it off in one piece and once done, you would never have known I hollowed it out.
The icing is Seven Minute Icing (pg. 790). Let me tell you, Joy of Cooking's recipe is super simple compared to the recipe in Martha Stewart's Cupcakes book. I managed to screw that up on Christmas day, but this one was easy peezy lemon squeezy. It is super sticky, and hardens super fast though so you need to work quick on a light and delicate cake like chiffon. I found the trick was to dollop generously, then spread with a wet spatula and 'slice' the icing off the spatula with a butter knife. After making the cake I realized a video tutorial would have been helpful. Next time, I promise.
The reason I used Seven Minute Icing was so I could brown it with my kitchen torch like meringue. The cake had so many lemon elements I thought a meringue like topping was fitting. It looked wonderful. It tasted wonderful too. It was rich though. The chiffon cake was the perfect base for the lemon curd and super sweet icing. You definitely wouldn't have wanted a sweet buttermilk vanilla cake under that.
I think I am happy with the new look. Kind of wintery with a splash of fun in the banner. Isn't Wednesday just too freakin' cute?! And can you believe it, fifty posts~! Just like the little engine that could, I am. Anyhoo, I have been easing back into the internet and will have a post for MMmm good Monday. A lemony good post! I hope everyone has a happy weekend!
I am currently taking a hiatus from the web. I do miss the blogging back and forth with other mamas but it has been good for the family relationship. After the holidays I will be back with lots of fun posts, a more seasonal look and comments on other blogs.
Until then, I hope your holidays are all safe and joyous!
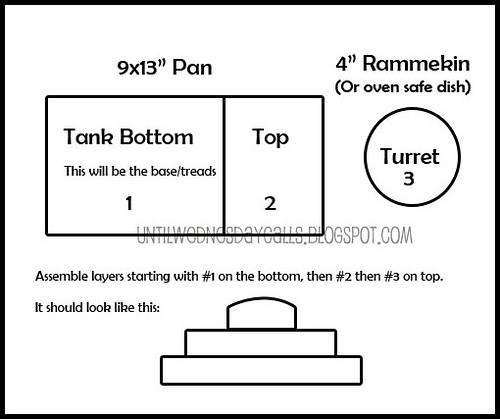
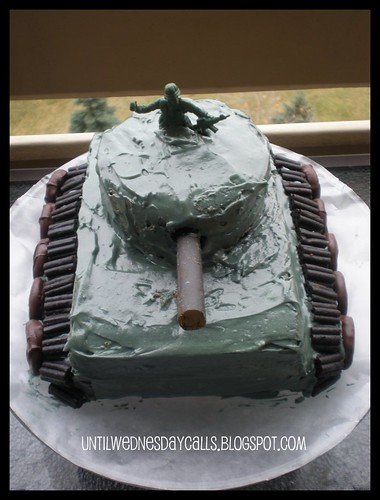
This edition of Mmmmm Good Monday is construction instructions for an army tank birthday cake like this one!
There are lots of images of army tank cakes to be Googled. There are even some tutorials out there, but I found that they were all just smidgen vague for my liking. So, forgive me if I break it down too much I am not making any assumptions about your intelligence, it is more a reflection of mine! :)
Note*** I made this from a carrot cake bundt recipe. I cannot see why a regular double cake recipe would not suffice.
Materials: For tank body: Cake batter, your choice. 9x13" Cake pan (I used a glass lasagna pan) 4" Ramekin or oven proof dish with straight sides.
For accoutrements Licorice cigar (cannon) You could always use a tube shaped biscotti) Licorice pieces halved (tracks) Circular sweets, I used chocolate covered mint patties (wheels) Green plastic army guy(s)
Icing: Your favourite icing recipe. (I used cream cheese because it was a carrot cake.) Light green or yellow and light blue colour pastes to make a bright light green. Black (or purple) icing colour paste.
Construction Instructions
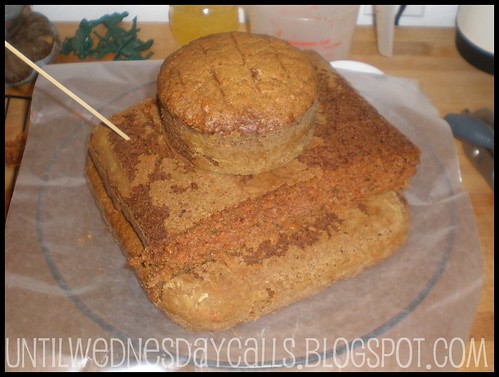
Bake cake recipe according to instructions, but watch times because of the rammekin dish. Cut and assemble as pictured below.
Here is a picture of mine pre-icing. Mind the wooden skewer, I broke a corner off whilst removing the cake from the pan.
After the cake has cooled and you have cut and assembled it to something at least resembling the one pictured it is time to ice! First mix your green. Mine looked this at first (It was actually left over from those every cupcakes). Once you are happy with the green, add a little bit of dark purple (I used black) food colouring paste at a time. A little goes a long way and you want your icing to be army green, not grey (I assume.). You don't have to mix it all the way, it will blend itself as you apply it to the cake.
Spread it as evenly as possible. Leave the top of the turret until last. Cut a little hole out and insert a toy army man. Ice around him.I would have liked to smooth mine more but I didn't have the proper tool and really, I just got excited at how awesome the cake looked.
After you are satisfied with your icing job you can apply the wheels, tracks and cannon. I would take care to either leave the cannon as long as you can or insert it almost half way. It saves it from sagging down to the cake. (The cigars are a bit heavy.)
Last but not least, I have made up some cake flags. Cut out and glue together with toothpicks in between. These are great. This way you don't have to find somewhere to write on the tank. (But feel free as it is YOUR cake.)
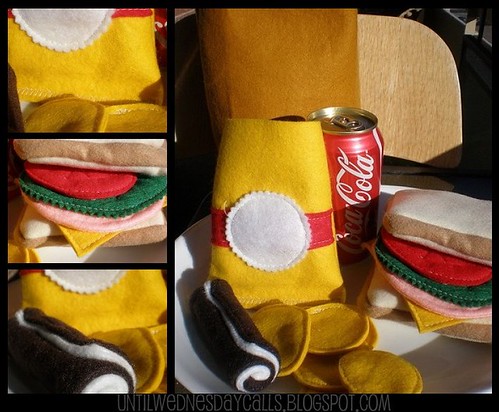
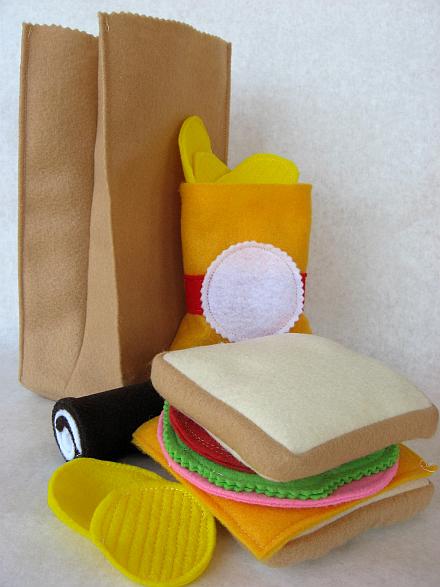
The pattern I recently won at Today's Creative Blog by Skip To My Lou. It sat idle for less than twenty four hours! It took a couple days to do because I had to wait until Wednesday was sleeping and she recently fell ill with a cough but I finished it! And here is the finished product!
I actually had all the colours of felt to make this little project. (Having all the materials is so rare for me!) Between the thrifted felt remnants, Eco Spun store bought felt and the wool felt remnant oh and the corn batting this was a very eco friendly project. I could say it was a use what you got type project too. But in all honesty I am most happy about having a present made for Wednesday. It seems I keep adding to my list of homemade gifts for her and this was the first one I could check off. Just the sort of motivation I need to get me further in gear. Truth be told I am scared to look up how many weeks are left before C-Day! But like the Little Engine that Could, so can I!
I am also officially addicted to making felt food. It was so easy, so cute and thanks to my super duper sewing machine I don't have to do a lot by hand, which is nice because my hand stitching skills leave a lot to be desired. But I am okay with that. To help me on my way I have been googling free felt food patterns and have come across some most ingenious and absolutely adorable blog posts. Here is a sample of my favourites:
One Inch World has a few great tutes, I particularly love the lollipops and bow tie pasta, both for their sheer cuteness and crazy simplicity! This is also a wonderfully child friendly crafty blog you should spend some time surfing!
Here is the pattern for a super simple peelable banana from Deviant Art user starxxlight who also has the most adorable marshmallow plushie on her homepage.
And last but not least (and definitely not the last of links I have bookmarked) here is a quick tute for some felt sushi by http://hoogliart.wordpress.com/.
The list just keeps going but these were some of my favourites and 'fer sure gonna do's' and I thought I would share. There are so many more inspiration sites to choose from on Flickr and Etsy. And really, a peek in your own fridge and pantry just might be the inspiration you need!
That is correct folks, I won my first blog giveaway this weekend. It is so cute it almost hurts too! It is a Skip to my Lou pattern via Todays Creative Blog. So yes, this pattern which can be purchased for 1.75 USD or you can place her button code on your blog and you will receive the pattern for free. That is wonderful, I had no idea until right now! Details and tutorial are here. It is so cute and I think I might even have all of the colours in my stash! So this week, add it to the must do before Christmas pile!
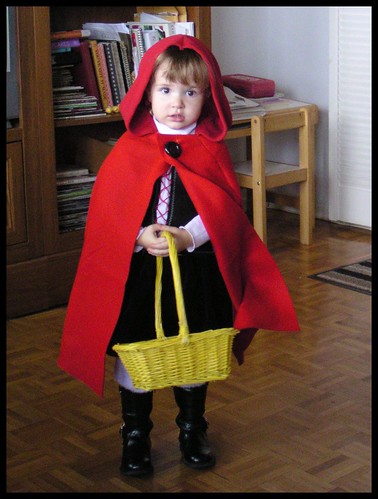
This is Wednesday in her Little Red Riding Hood costume I made her! Is she not the most adorable thing you EVER DID SEE?! And she wore it! Twice! Love it.
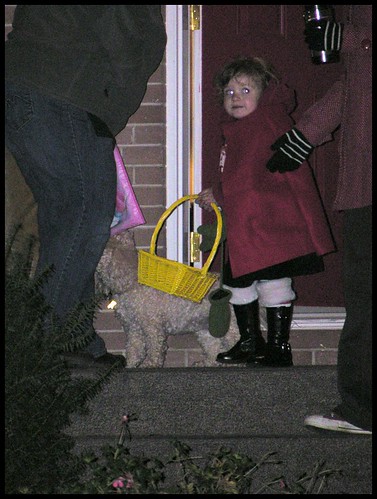
The costume was inspired by this one at Martha Stewart.com I thought it would be a great idea for Wednesday because she really does not enjoy bulky costumes, things on her head or being a showpiece. Kind makes Halloween tricky non? (No pun intended) so I thought if I can get her to wear the cape (even by itself) then everyone will know what she is and we can both be happy. It worked, I had a blast making it and watching Wednesday trick or treat in it! Even with a red hooded sweater cloak on without the cloak people knew. She stayed super warm though with the coat and cloak and the layers on her legs. If a really cold wind hadn`t come up when it did we would have let her keep going for the fun of it.
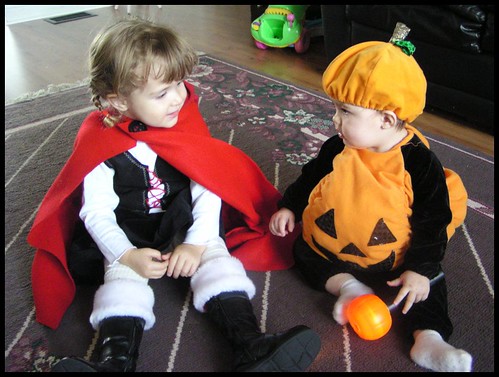
This was her first year trick or treating and we were lucky enough to have a little friend for her to go around with. Her play date friend Sydney was a lion and man was she cute! They caught on to the process after the second house and then it was us parents who had to keep them from going to houses that were not giving out candy. Wednesday used a yellow basket for her treats but it emptied quickly when being swung about so we had to keep emptying it for her. She didn`t mind, she though getting candy was great but the whole process and being out with the big kids and the moon made her very happy. Daddy and I managed to get a few pics in but the camera was not cooperating. *sigh* Our little girl went trick or treating. She is growing so fast!
Details on the costume construction:
I started with the hooded cape. My mom had originally bought me a simplicity pattern that used a single yard of six foot wide felt but I did not have a six foot wide yard of felt. So, I used this tutorial at blueprints to make the cape. (Sort of, I cut it differently, made it from felt and tweaked it more) but she was a big help for the basic idea. I did use the Simplicity pattern for the hood though. Because the pattern did not have a seam allowance due to it being intentionally cut from felt I cut the pieces from a red fleece sweatshirt and used the nice wide bottom hem as the front of the hood. I had to tweak the cape a bit to accommodate the hood and the big fat black button (from an old Mrs. Claus apron of my mom's) but Wednesday was super accommodating in the many "Wednesday, can you try this on a moment for Mommy?" So far cost of costume = zero dollars.
Next I made the bodice-ish-shirt-thing. I just so happen to have a white turtle neck kicking around that Wednesday never wore (I am not a big turtleneck fan). I found two very nice pieces of black felt and laid them on top of the shirt and with a white pencil crayon just kind of drew the curve for the arm and a vest front. I ran the pieces through the machine with a semi-decorative stitch around the edges and then basted the pieces to the shirt. I finished it off by giving it a faux lace up with red embroidery thread. The felt and floss were both thrifted pieces) So far cost of costume = zero dollars.
The next day I began the skirt. Which was so ridiculously simple that I might lose this week to the sewing machine for Wednesday's wardrobe. But I digress. The skirt came from an old corduroy skirt my mom had in her alterations pile for some five years. She thought of it when I said I needed some black fabric for the skirt and offered it up. I snatched it without hesitation. It is lovely, I may have to use it elsewhere soon. Anyhoo, the skirt is just two pieces of fabric sewn up the sides, a wide hem and an elastic fitted under the hem. Easy peasy lemon squeezy. Costume cost = zilch.
The 'fur lined boots' were a pair of fun fur topped striped baby leggings tucked into a great pair of black boots. The baby leg warmers I had on hand from last Christmas and the boots were another hand me down. Great touch though right? Costume total = nadda.
Last but not least I had to buy a pair of tights for her little thighs. I found a pair on clearance at Wal-Mart for three bucks. So, costume total? Three dollars + one and a half days effort. Not too shabby for my first time doing the Mama-come-Martha eh?
That night we carved the pumpkins. I asked Wednesday what she wanted and she said a monkey, so a monkey I gave her. For the bigger pumpkin I had wanted to carve something from a stencil but my poker took was not sharp enough for the intricate design so I let Wednesday draw on the pumpkin and then carved out her design. It actually looks kinda cool.
I roasted the pumpkin seeds by rinsing them, drying them in the oven a few moments and then I used this for a (lol) recipe:
Put seeds in a bigger bowl than you think you need.
Sprinkle with oil About two teaspoons per bigger pumpkin`s worth.
Sprinkle with about one teaspoon (per medium sized pumpkin) of sea salt. (Grind up bigger salt with a mortar and pestle or a rolling pin and sandwich bag. But sea salt does make the difference.
Mix well. Lay in a single layer on cookie sheets and bake at 375 until golden brown.
Try not to eat them all yourself. I said try. They are so very good!
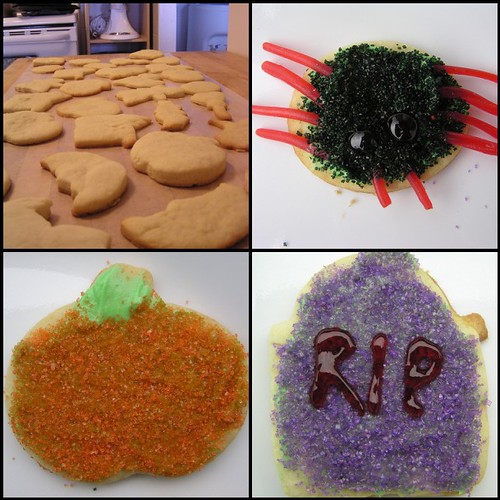
When I took Wednesday shopping the other day she saw all the Halloween decorations and wanted "Spiders Mommy, spiders!" I couldn't find anything I wanted her to have (you know, that is not the kind of junk that falls apart in a day) so I promised to make her spider cookies. I bought some cookie cutters and Halloween coloured sprinkles for cookie fun. What a mistake, well in the beginning anyways. I tried out Martha's sugar cookie recipe because I had made it years ago and it worked perfectly for cut out cookies. For some reason though, I couldn't get it to work. I don't know if I didn't use enough butter or if I was too impatient when it came to the chilling but it didn't work out. So, I thought this one time I will buy a pre-made dough thinking of Pillsbury doughs. We went to three different grocery stores and no one carried it. I was getting really flustered. I went through my cookbooks and found a recipe in a book I trusted. I made the recipe exactly as it stated and chilled it overnight like a good girl. The next morning (Halloween)I pulled it out but it was so sticky as it warmed up. I thought "OMG this cannot be happening again!" but with a lot of flour I managed to get the cookies cut and almost three times the recipe yield. (Some were super thin). Thank goodness. I watched them like a hawk in the oven they turned out perfectly. I spent Wednesday's naptime decorating them with leftover cream cheese frosting and sprinkles. I had a lot of fun with the decorating. I had originally wanted Wednesday to help but I had managed to fluster myself so much trying to get the dough just right that I just made them up and let her have one after lunch. I put them into wax paper treat bags I made by sewing up the sides and middle of some folded wax paper. I stapled them shut and covered the staple with a pumpkin sticker. I had originally wanted to make them prettier but had no time for Halloween ribbon shopping. They still looked and tasted fantastic though. The cookie recipe? One of my new favourites for sure. Ron likes them plain and I can't wait to make a bunch for Christmas! This post is long enough, I will share the recipe at a later date most likely for an MMmm good Monday.
The sun started to come out so we used the available light to take some photos. Then over to a family member's house for even cuter photos!
We went trick or treating after much hub bub (It was almost like the world did not want us to go!) But we made it!
We let her trick or treat for about a half hour. And then we bundled her up under a wool blanket in her stroller and we went home. She was so pooped from the day she was in bed and asleep by eight o'clock. We ate some of her stash but we are not big on candy either. I'll let you know how long it lasts with everyone chowing down. Poor Wednesday, doesn't get any of it. The "Hide it and forget about it" method mentioned over at Unplug Your Kids works well!
I think, that is it! What a great three days! I will leave you with a slide show of the rest of the photos we took of the day. I hope your Halloweens were all happy, healthy and fun!
Welcome! My name is Melissa and I love to create. Mostly I collect ideas and every now and again I have some good ones of my own. I love my family, coffee and storage. (Usually in that order.)If you have never visited here before please, grab a coffee and poke around. If you have any questions I am super easy to reach by clicking on a link below!


