As a precursor to a tutorial you will be seeing here shortly I did a quick photo tutorial on buttonholes. I did this for two reasons, the first being that I know buttonholes are incredibly intimidating to novice sewers. Seriously, how many projects did you/have you avoided because they required buttonholes? Or, you did do the the project but avoided any buttonholes and it just didn't turn out the same? That is why. The other reason is because when I searched for easy tutorials to link for you I couldn't find a single one that did not include using a buttonhole foot. I will admit, my machine has a buttonholer (It is so cool to watch) but not everyone has that option and I didn't want you to not make any upcoming projects because of that that little detail.
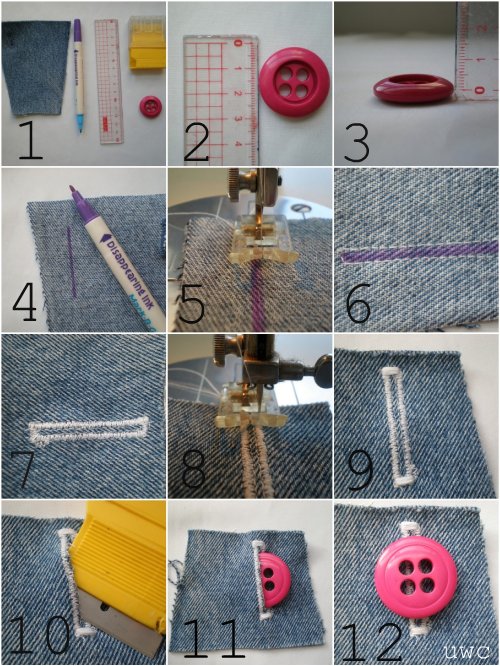
A manual button hole is super simple. I developed this method from scratch for the sake of the tutorial having never made a buttonhole before so that should tell you how easy they are. Below is a series of twelve photos numbered to the corresponding step below. Each step is so simple I almost thought about not posting photos but we need photos and then I thought about labeling the collage with one word of text but that was just not quite enough. So hopefully the numbered photos and the super simple written steps written below work for you.

1. Supplies: Scrap fabric, ruler, marker, razor blade (Or super sharp, super pointy scissors), button
2. Measure diameter of button.
3. Measure thickness of button.
4. Add together and mark on fabric.
5. With marked line on the outside of the needle sew a running stitch around the mark.
6. Check it out, a nice little rectangle guide.
7. Set zig zag width to 1.25 and use buttonhole/applique/satin stitch setting. Sew around running stitch. You might need to do this twice if your stitches are not close enough together.
8. With the center of the buttonhole lined up with the center of your foot and needle, set the zig zag width to its widest setting. Mine is 4 and it fit perfectly.
9. At the top and bottom of the buttonhole stitch approx 1/8" to give it some added resistance to wear.
10. With your razor blade (or super sharp super small scissors) slice down the center of your buttonhole, making sure not to get any stitches.
11. Check your button in your newly fashioned hole.
12. Tadaa! You did your very first buttonhole without a fancy machine foot!
If you have any questions, or if any readers have an helpful comments please feel free to share them! And with that, I bid you adieu and happy sewing!


28 comments:
Hi Melissa..I didn't know you were moving! I really like the new picture at the top. What a great idea to post how to do button holes manually. I've done it that way for years because it was so much easier than trying to use the machine's feet and programs. This way you are in control! (I did get brave a few years ago and practiced like crazy till I figured out my machine...but I still think manual is a great way to do it.)
Good post!
My poor hubby is going to die when he sees your blog picture! He wishes he were there instead of good ol' Texas. He's from Washington State and has never quite 'acclimated'.
I don't think I'm going to let him see THIS picture...he might make us pack up and move!
THANK YOU! THANK YOU! THANK YOU!
I am a new at sewing and teaching my self! This is so helpfull and looks easy. Can't wait to try it out!
Great tute! I linked on my Treasures for Tots Facebook Fan page!
http://www.facebook.com/#/pages/Treasures-for-Tots/189979926301?ref=ts
Come share it in this week’s Thursday’s Treasures too! I'll have it up tomorrow!
http://treasuresfortots.blogspot.com/
Hi Melissa, You asked me if I thought anything need to be added. I think this is a very good tutorial for manual button hole making.And the idea of sewing a guide line is fantastic. I think maybe the only thing to mention is to widen the zigzag at the top and bottom, so it is the width of both sides.
Great job! I'm so glad you thought to share this with your readers. You are right, button hole making intimidates everyone I know who doesn't sew regularly.
Awesome!! My main machine has a stepped buttonhole feature, but I have another one (older) that does not. Now I know exactly how to make that older machine make a buttonhole as well.
I linked to your tutorial on Craft Gossip Sewing:
http://sewing.craftgossip.com/tutorial-manual-buttonhole-with-your-sewing-machine/2010/03/12/
--Anne
It never occurred to me to do a buttonhole manually - I've never wanted to figure out how to use the scary looking buttonhole foot on my mechanical machine so I just avoid buttonholes. This method looks very doable - I can't wait to try it! Thanks for a great tutorial :)
LOVE!! What a great tutorial for buttonholes!! You make it look not scary at all :)
-Mags
I have a confession to make: I've never sewn a button hole before. I'm going to try it now with your help, thank you!
Thank you so much! I use my mom's old industrial Necchi which doesn't have a buttonhole feature. I couldn't find any good tutes for showing me how to do one manually but the one you've written is great! Thanks again!
This I needed to know. ThankS!
AWESOME!!! I needed this SO bad!
Count me among those who have avoided buttons like the plague for fear of buttonholes! I linked to this on my weekly roundup - thanks so much for sharing!
Great tutorial.
Thanks for posting this easy to understand tutorial. I tried to sew a button hole stitch today with my 10 year old machine, but all it kept doing is sew one stitch on top of another and I end up with what looks like a big french knot. I've never used it for a button stitch so I don't know if it ever worked. :)
It is good to know this. My machine has a buttonhole setting and foot so I do buttonholes. In fact, I convert zipper projects to buttonholes because my zipper foot is the stupidest design on earth (even my very experienced Mom says it is dumb and doesn't work).
Thanks for this tutorial - I have done buttonholes in the past, I've got an old machine so have to do them manually, I just winged it on the couple occasions I did them - but this method looks neat and foolproof!
http://bella-boutiqueuk.blogspot.com/
Thanks for a brill tutorial, I've today featured on The Sewing Directory blog with a post on sewing buttonholes and have linked to your post as an alternative, hope that's ok. You can pop over to view it (and enter my button stash giveaway if you like) at http://bella-boutiqueuk.blogspot.com
Thank you so much for doing this tutorial! I've been struggling with these bigger buttons and was so ready to just put them in a box and stick with the smaller ones. You're a life saver!
Thank you so much! I can't figure out my buttonhole setting on my machine, so I would place elastic in some projects instead. Ive dine it manually like this as well but never got it as neat and tidy as yours. I will have to practice! Great tut.
Thank you so much--I am a self taught seamstress and recently my machines self button hole system has clogged up on the return stretch EVERY time! Thankful I was practicing on other material first. I am going to quit doing that frustrating item and just use your instructions!! You are a blessing!
I have been trying to get a good buttonhole forever! Your tutorial helped make my life wonderful :) I linked your post in my blog http://thehoneysucklehouse.com/how-i-kicked-buttons/
Thanks!
You are my new best friend. Thank you.
That is an excellent way of making a buttonhole. I have an older ( 1960's Singer Slant-O-Matic ) and it has a buttonhole attachment, but only a thin amount of fabric will fit under it and the buttonholes are really not that great. (The only advantage is that they are constantly the same size ). I have been making buttonholes using your basic method but you added the straight stitch reinforcement, which is an excellent idea.
Happy Sewing, Richard Beman
برنامج إدارة مراكز التدريب
دليل عناوين الفنادق السعودية
Post a Comment