Monday, December 5, 2011

How To: Ruffled Christmas Garland

Christmas Garland On The Bannister

A couple months ago, I organized my vintage sheet collection. I made some mini fabric bolts from corrugated plastic. It looks great, but I had to trim a lot of large pieces of most of the sheets. I also decided to thin out the stash a little bit. My solution was a braided rag rug for Wednesday's play space. I have no idea what cold medicine I must have been on because as soon as I had torn up the sheets I realized that it was just too big of a job. So, now I had three large reusable shopping bags full of torn strips of vintage sheets and no way to use it all fast enough. Enter Christmas and my sewing machine ruffler foot.


Ruffled Christmas Tree Garland

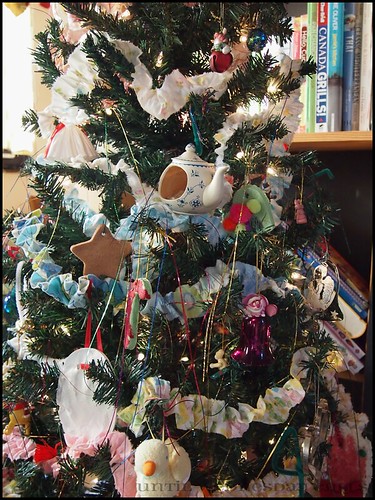
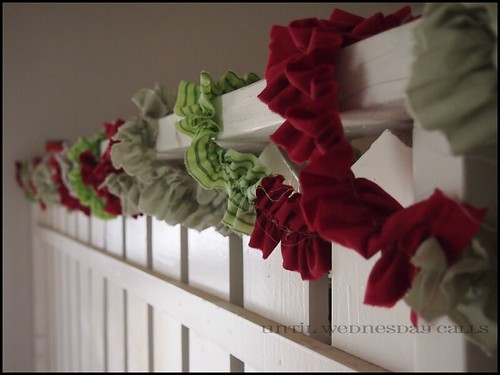
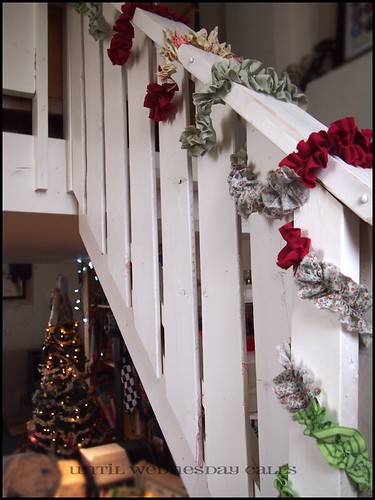
I managed to use up one out of three bags making a skinny garland for my tree and a fatter garland for my banister. I love them both. Captain Awesome called it "Country cute". I prefer chic to cute but I'll take what I can get! I almost feel silly for posting it as a tutorial but I took process photos and thought I would share. ***Authors Notes*** You could try this with burlap, or double up on your fabric, a skinny strip on top o a wide one. Or ribbons, have some spools of ribbon you haven't used in since last Christmas? Or scraps, the strips would be smaller of course but the variety and colour would be gorgeous!

Gather Ye Materials
Fabric (The longer the pieces the better, I used vintage bed sheets.)

Gather Ye Tools
Sewing machine
Ruffler foot (Gathering foot will work as well, it just produces a less full ruffle.)

Begin at the beginning...


Ruffled Christmas Tree Garland

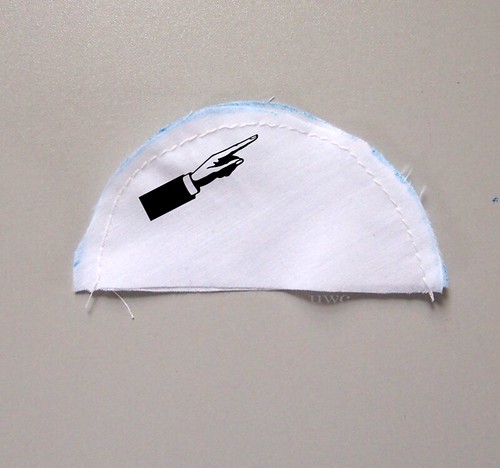
Step 1: Tear your fabric into strips. The easiest way to do this is to snip the fabric at regular intervals at one end and just tear down at each snip to the end of the fabric.


Ruffled Christmas Tree Garland

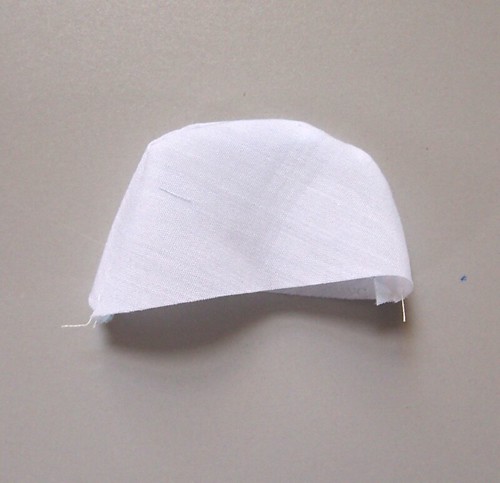
Step 2: With your ruffler foot set to rufle @ every stitch, and your stitch length set to the most per inch (I think mine was twenty?) feed the fabric into the ruffler foot a single layer at a time. This is just like using a serger.


Ruffled Christmas Tree Garland

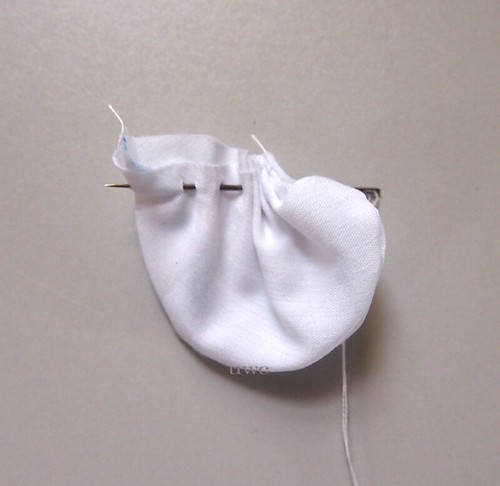
Step 3: To join fabric pieces slide the next piece under the current piece with a half to full inch of overlap.


Ruffled Christmas Tree GarlandRuffled Christmas Tree Garland

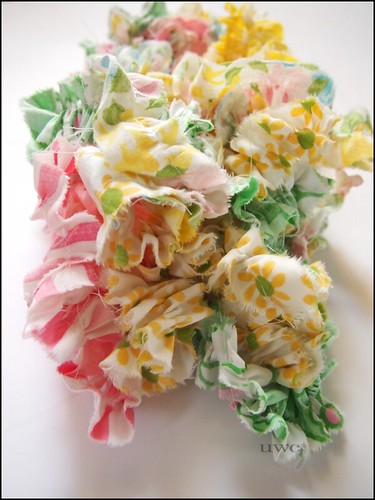
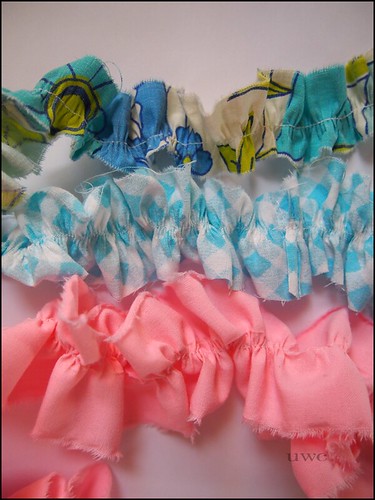
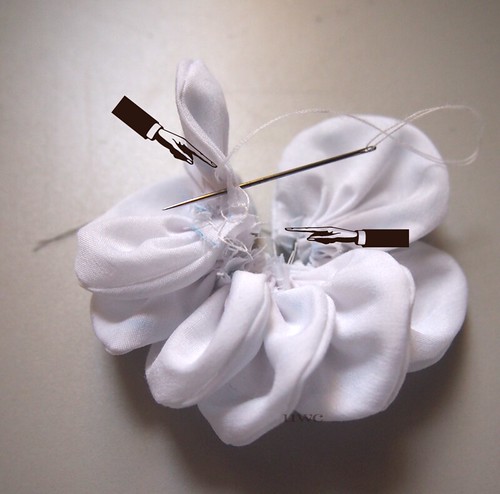
This is to show the different width and what the ruffle looks like. I used a skinny ruffle on my tree because it is a tiny tree (Artificial 6ft)I probably could have used a fuller ruffle but I am totally happy with how it turned out. I used a wider ruffle for my banister and also upped the fullness.

Ruffled Christmas Tree GarlandRuffled Christmas Tree Garland
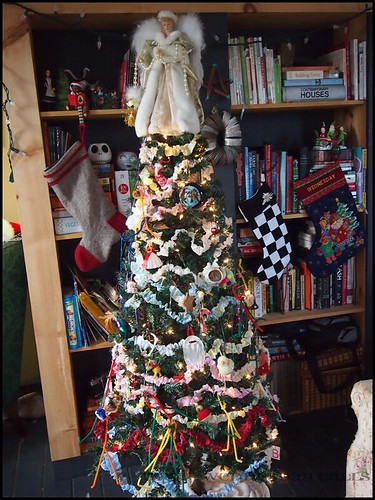
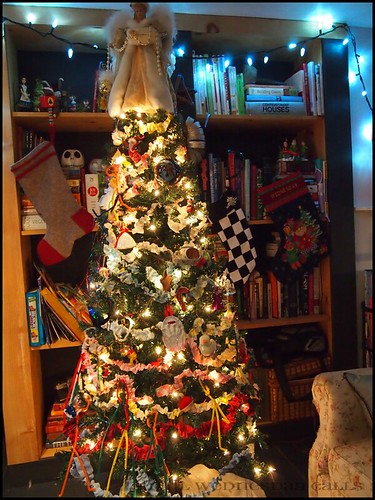
Shabby farmhouse chic by day and Country chic by night.
This our first Sweet family tree in the six(ish) years we have been together. Oh, we have had tree branches, and potted Norfolk pines, table top artificials and even giant firs (the fir was at my parents when we stayed with them upon moving back to Onatrio.) but this our first standard sized, lit up Christmas tree. At first I wanted a real one (Farmed trees are my eco choice) but the space we had to fit it was so narrow that really only a fake tree could fit. Also, our budget was nil so when this pre-lit 6ft went on sale at Canadian Tire I begged for harassed Ron jumped on it. The bonus is that it is small enough to be a second tree if we ever have a place that is big enough for two trees.
Christmas Garland On The Bannister

Christmas Garland On The Bannister

Nighttime-ruffles-and-Sweetie
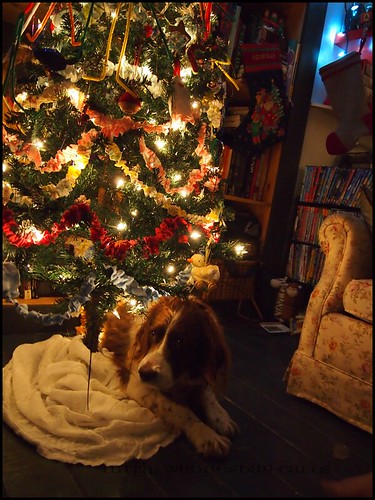
Our very old Springer Spaniel, Sweetie Sweet. She is deaf and mostly blind and always looks like someone has beaten her or will be beating her soon. Emotionally high maintenance this dog.


Happy Holidays and of course happy crafting!

Saturday, December 3, 2011

How To: Scrap Fabric Flower Accessories


What seems like ages ago, I gave away some vintage sheet fat quarters and a fabric brooch I made as a bonus. I was asked by a couple ladies how I made it so I put making a tutorial for it on my to-do list but, as most things blog related last year it was de-prioritized. Well, since I began my fabric scrap management series, it was re-prioritized and finally completed! *yay* Would you like to make one (or five) o these little beauties? Sweet!

Gather ye materials
Fabric scraps cuts into circles (What size, how many different sizes and how many circles is dependent on what you want your flower to look like.) I like six per layer, sometimes eight and even five works.
Coordinating felt scraps (Or now that I think about it, leather and vinyl would look good too.)
Baubles for the center of the flowers (Buttons, brads, pins etc.)
Findings for the back (Brooch clips, alligator clips etc.)

Gather ye tools
Sewing machine (Not necessary but I don't enjoy hand sewing that is not purely decorative)
Needle and thread
Glue gun & glue sticks

Begin at the beginning...
Fabric Flower Tutorial Step 1 and 2
Step 1: Cut circle.
Step 2: Cut the circle in half.

Fabric Flower Tutorial Step 3
Step 3: With right sides together, sew around curved edge.

Fabric Flower Tutorial Step 4
Step 4: Turn right side out.

Fabric Flower Tutorial Step 5
Step 5: Thread a needle, sew a loose running stitch along bottom of turned circles. Pull tightly.

Fabric Flower Tutorial Step 6
Step 6: Continue threading petals onto needle and thread until you have enough petals or a single layer. Tie of after each petal if you find them unraveling to quickly. Tie after last petal before you tie two ends together.

Fabric Flower Tutorial Step 7
Step 7: After you have tied the two ends together, arrange your petals. This might take a bit of shifting and such. I also stitched a few petals in place because I didn't like how they had gathered. You'll figure it out once you get playing with it.

Fabric Flower Tutorial Step 8
Step 8: Repeat steps 1-7 until you have all the petals and layers you would like for one flower.

Fabric Flower Tutorial Step 9
Step 9: Play with the centers. Try a few things out. Here I tried a vintage green button, an extra large white brad and finally a button pin.

Fabric Flower Tutorial Step 10
Step 10: Cut a piece o felt for the back about a half inch smaller than the largest flower. Begin layering and gluing.

Fabric Flower Tutorial Step 11
Step 11: When gluing, add the smallest bit of hot glue (or tacky glue) around the center of each flower.

Fabric Flower Tutorial Step 12-14
Steps 12-14: Attach your desired accessory piece. If you use a brooch pin, I like to add a piece of felt to cover up the glue. But I also made one into a hair clip and one into a wrist corsage. And you're done!

Fabric Flower Tutorial
Voila! Your new fabric scrap flower accessories! Now go make a billion for your little girl(s) and sister(s) and mama and grand mama and co-workers and BFFs and acquaintances! 
 

Wednesday, November 30, 2011

Wednesday on Wednesday


Little Drummer Girl a video by Cara.Mia on Flickr.

Wednesday grabbed her drum and played it while we watched the sing along video to Little Drummer Boy Christmas movie.

She is so cute she gives me cramps..

Winner!! MyMemories Scrapbooking Software


We have a winner!! 10750 Coupons is our winner! You lucky duck!

Thursday, November 24, 2011

How To: Patchwork Mug Rug

It's as if a place mat and a coaster had a baby!
A couple weeks ago I made a post about managing your fabric scraps, it pretty much just boiled down to having a plan or those scraps and then cutting them to the sizes and shapes you need them for for easier storage. I found a use for my bigger scraps. Mug rugs! Super cheerful little bits of patchwork. So easy that I made nine on my first try. :)


Seriously folks. They don't even have to be a certain size. I started out with a template but eventually just worked with what the fabric scraps were giving me.
Most of these are made with vintage sheets. Except for the black and white Ikea print you see in the first photo and a piece of fabric I used in the mug rug for the tutorial. Oh yeah, and a couple of these are backed with a cut up mans shirt sleeve. But mostly beautiful, cheerful vintage sheets! Would you like to make some for yourself? Awesome!

Gather ye materials
Fabric scraps of varying sizes
Some sort of batting material, I used the bottoms of a pair of fleece pants that were cut into shorts and then felt when I ran out of fleece.
Scissors, pins, thread
Sewing machine is ideal for this but not necessary

Note: Finished size of the mug rug pictured in the tutorial was roughly 8.5x8 inches.

Step 1. Gather your pieces and find an arrangement you like.
Step 2. With right sides together sew your pieces together. (Red line is for emphasis.) I like to use my zig zag foot as a guide which is roughly 1/4" I think.  Continue until all of your pieces are joined.

Step 3. Press your seams flat. (Does anyone else use a towel as an ironing board?)
Step 4. Cut your batting/fleece/felt to one inch (length and width) less than your patchwork. E.g.: I your patchwork is 9x9 you would cut your batting to 8x8.
Step 5. Turn over and pin.
Step 6. To quilt the batting to the patchwork, I top stitched some echo stitching along the seams.
Step 7. Turn your quilted piece over and square up your edges.
Step 8. With right sides together sew the backing to the quilting around three sides. Leave one size open or turning. Trim and clip corners.
Step 9. Turn. Use a chopstick or paint brush to get your corners out nicely. Fold the opening into itself so that it looks just like the photo. Press it closed.
Step 10. Top stitch around the perimeter. And ta-daa! You're done!

Groovy baby. Groovy.

Wouldn't these make great Christmas gifts? You could add in a handmade coffee sleeve and a gift card to the recipient's favourite coffee shop. Or with a nice mug and a bag of their favourite coffee or tea! The possibilities are endless!

I hope you enjoyed the first tutorial in my Scrap Management series. If you make one (nine) I would love to see them! Cheers and happy sewing!

P.S. Don't forget to enter my giveaway for MyMemories Digital Scrapbooking software!

Wednesday, November 23, 2011

Wednesday on Wednesday

Wednesday is somewhat of a little fashionista. Seriously she has this knack with clothes. I rarely ever exert my influence. I draw the line at weather inappropriate gear but other than that she has full reign. BUT! Every now and again she likes to mix things up a little. One day she wears black boots and tutus the next day......
I heard a rustling of a plastic bag and I'm all "What are you doing up there?" And this is what she came down the stairs wearing.
"Take a picture of my bum Mommy."

Never a dull moment.

Tuesday, November 22, 2011

GIVEAWAY!! My Memories Digital Scrapbooking Software


Have you heard the latest word in digital scrapbooking software? MyMemories. Well technically that is two words, but it is still the latest and greatest. especially this week because they released a new version just yesterday! And you lucky folks are getting a chance to win a copy today! (Winner to be announced one week from today!)

First, what is My memories software? Well, it is a ridiculously inexpensive way to digitally scrapbook your past, present and future photographs without spending a grand. It has gotten great reviews all over the web including scrapbook.com which was my go to web site when I was strictly a paper scrapbooker. I use Photoshop (A super old release that makes me want to cry when I use it.) for everything from photo editing to blog headers and lately even free printables for the blog. But when I was approached to test out MyMemories and give away a copy I was totally jazzed.

Although I was gifted the software I  have purchased a couple digital kits. This Thanksgiving one in particular ad another gorgeous Christmas one I can't wait to use to make our Christmas cards.
I spent two weeks playing around with the software and I managed to create the Thanksgiving cupcake toppers I posted last week and the Thanksgiving finger puppets I posted this morning. I know, where is the scrapbooking? Well, how about these quick pages I downloaded (For free!)and popped a picture in. Took ten minutes including the downloading time.


That is another thing, My Memories has lots of digital freebies, like five (web)pages worth. There are always sales on the kits that are or purchase AND you can download the files in Mymemories format and PNG format or use in other software applications.

But wait! There's more! I you would like to find out more about My Memories software you can always check out their Facebook page where there are always contests and giveaways going on. In fact right now, there is an Ipad waiting to be given away when they reach 10K likes.

Do you think you could get down with a copy of the software? Awesome! Now, all you have to do is hop on over to MyMemories and browse their gorgeous digital scrapbooking kits and come back and tell me which ones are your favourite.

There are so many additional ways you can enter or this giveaway!
You get one entry for:
Being an Until Wednesday Calls follower (Comment telling me you are a follower.)
Creating a blog post spreading the word.(Comment with a link to your post.)
Tweeting this blog post (Comment with the link.)
Following me on Twitter (Comment with your username.)
Following the MyMemories blog (Comment to let us know.)
Like the Mymemories page on facebook (Comment to let us know.)

**PLEASE LEAVE EACH ENTRY AS A SEPARATE COMMENT**

Bonne chance mes amis!

Free Printable : Thanksgiving Finger Puppets

Hey folks! I am working on the giveaway post as I type this so this is going to be another quickie freebie! Like I said last week when I posted the Thanksgiving cupcake toppers I have been creating things in MyMemories software. This week I tried my hand at finger puppets and I think they turned out fabulous!

I thought I would squeeze in more goodie before Americans celebrate their Thanksgiving. They print out with holes that can be cut smaller for little fingers or bigger for bigger kids. I was able to get most of my fingers in the holes. I might recommend covering the holes in clear tape before cutting though.

Click here for the Google.Doc download.
Please do not share the file but PLEASE DO share the link to here for others to enjoy.

Comeback this afternoon for a chance to win a copy of the MyMemories software I used to create these fun little guys!

***Pilgrim bears are from Cindi Gilmour's  Pilgrim Bears DigiDoodles clip art kit.
***Turkeys are from MyMemories Let's Talk Turkey Digital Scrapbooking kit designed by Just So Scrappy.

Friday, November 18, 2011

Free Printable : Thanksgiving Cupcake Toppers/Food Picks

Hey there folks! I have a quick little goodie for you today! I have a great giveaway coming this weekend (Starting Sunday night!) and this printable ties in with it. For now my American readers can bask in the cuteness that these topper will bring to their food next week.
I made these little numbers with my new copy of MyMemories digital scrapbooking software. Aren't they adorable? I wish I had time to whip up a batch of muffins to pop these in but I am rearranging my house. (Serious undertaking!) So you will just have to use your imagination (and printer).

Click here for the Google.doc download.

Printable sheet made using graphics from MyMemories suite 2 and Let's Talk Turkey digital design pack.
Come back on Sunday to enter the giveaway for your very own copy of MyMemories scrapbooking software! I am so excited about this you don't even know!