Wednesday, August 4, 2010

Wednesday on Wednesday

I don't believe it! A Wednesday on Wednesday post...on a Wednesday! It is going to rain for sure around here! The following are photos from Sunday, we found Crowe River in Marmora & Lake, Ontario and canoed up the river and back.


marmora (16) 
She was so excited for the ride she was ready with  a paddle before we even left the shore.
marmora (6)
 She spent half of the trip with her hands in the water as the canoe trolled down river.
marmora (61)
 Mama was enjoying the ride as well.
marmora (41)
 We stopped at the mouth of the river where it was barely two feet deep. Wednesday swam around for about a half hour, finding zebra mussels to play with.
marmora (15)
She fell asleep in the canoe on the way back. Slept so long we had time to pull the canoe on shore, have lunch and pack up.

For more of the same photos you can find the Flickr set here. Happy Wednesday.

Tuesday, August 3, 2010

My Crafty Weekend : Alice in Wonderland Edition

My Crafty Weekend Collage
Although the party has long been over, and the deco behind me thank goodness I thought I would give you a sneak peak to the upcoming tutorials. I had so much fun creating this party, the only thing that stopped me was time and money, but mostly time. (I am a pretty frugal crafter after all!)

We have a giant hat and a bodacious tea pot. But we also have some great goody bag treats too! So watch for those. But to kick My Crafty Weekend off this week, I am adding my Alice in wonderland Finger Puppet tutorial that I posted this morning.

Don't think for a second you have to link an Alice themed craft (But if you have them I would love love love to see them!) Show me what you have been sewing, gluing, baking, roasting painting and sculpting. Help me reconnect with my fellow crafters!


How To : Alice in Wonderland Finger Puppets

What is this? A tutorial? I don't believe it either! I know it has been awhile, and I super appreciate everybody's patience with my blogging self! To celebrate, I have a super fun tutorial to share. I made these as favours in Wednesday's party favour bags. They are super easy and they look super awesome, you'll want to make a bajiliion!


I made these to fit on wee little fingers but they are big enough so that Mommy can play too.

You don't need much to make these but you do need Iron On Transfer sheets. I used Avery brand, I bought six for twelve dollars CDN at a local department store. You can probably get better deals on line (I'm thinking Dharma Trading Co.) but I didn't think of that soon enough. You can fit a lot of puppets on one page though, I think I fit thirty two on one page.

Materials:
Iron On Transfer Sheets
Light material (I used White broadcloth)
Pinking shears (optional)
Fray Check (optional)

I love the simple kind of lists yes? Two materials is a great start!

Construction Instructions

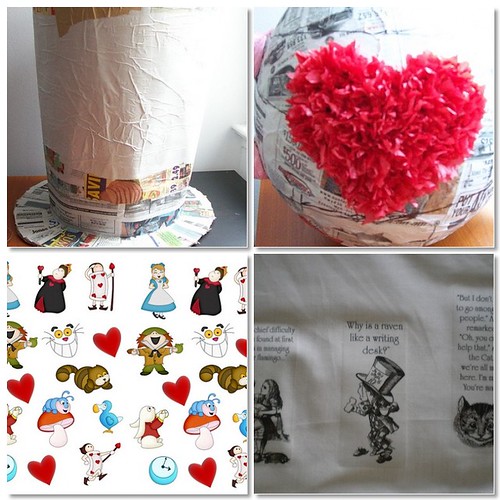
Okay, first things first. You need to find the images for your puppets. I used images from the Alice collection from Tainted Sweets at mygraphico.com . It cost seven dollars. You don't get a lot of images for that price, but you do get the images in PNG and JPEG formats. And, c'mon how cute are these images?!

When you have chosen your images, you need to re-size them. I found by making sure the height was no more than 1.75", it kept the width in check. You might have to play around a bit though depending on your images.
Once you have them re-sized to the correct height and width you have to arrange them in a document so that they print on one sheet only of your iron on transfer paper.
You can arrange the images super close together, almost touching each other because you are going to trim them within millimeters of the image for ironing.
Once you have your images printed and cut out you can move on to puppet construction.


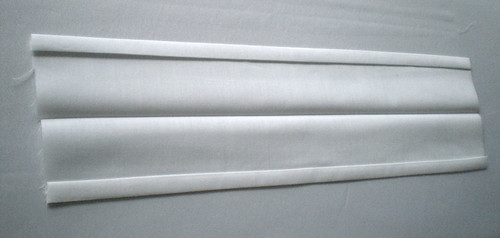
Once you have your images, you'll need to cut your fabric so each puppet has enough to roll a hem and have a half inch in between puppets. I found for four puppets a 6"x 7" sufficient.
Roll up the top and bottom and press into a 1/2" hem. Then fold in half and press again.

Arrange your images on your fabric so that you know you will have sufficient seam space between each one.

Place transfers

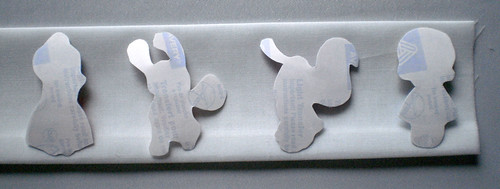
Now turn the images over, making your they are wrong side up.


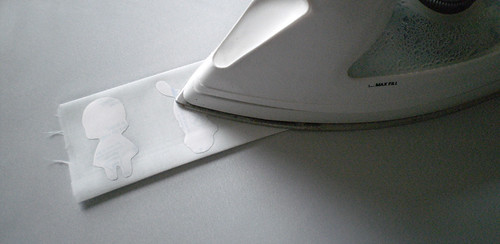
Press according to package directions. High heat NO STEAM and swirling motions with iron for thirty seconds did the trick for me with the Avery paper.


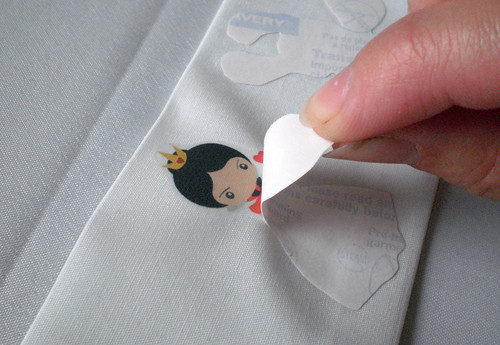
When images are cool to the touch, carefully remove backing. If you do it slow enough, you can watch for any pieces that didn't bond and try pressing it again.


Once you have removed the backing there is no turning back. They look awesome though so we'll move on to the next step.


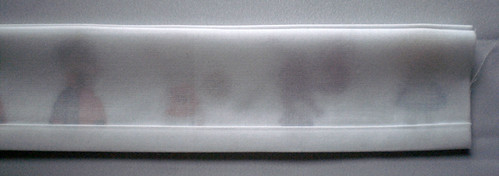
Turn the fabric so that wrong sides are facing out and press.

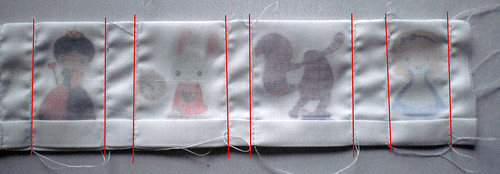
Sew between each image along the edge of each image. If you cannot see your image through your fabric like I could, mark with a ruler where you need to sew. Sew down each side of the image, giving yourself enough room to trim each puppet to 1/4".


Trim (with pinking shears if you have them) and Fray Check (if you have it). Let dry.

Turn out...

Gently turn them out, a chopstick works well for this. Press lightly from the back. The puppet will be a bit wrinkly but it smooths out soon enough.

Puppet Mosaic

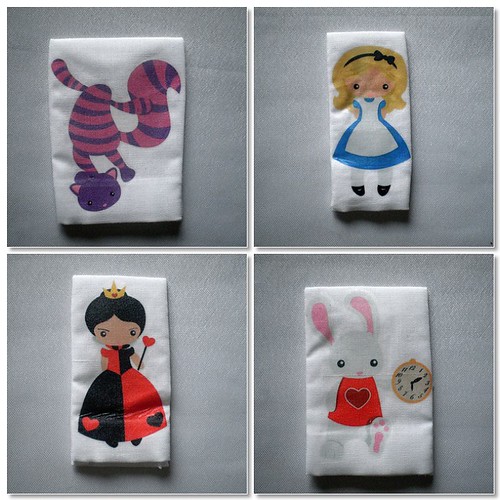
Ta-daaaaaaa! You have your very own Alic in Wonderland puppets.
A few notes from the author:
***To avoid turning your puppets after you have ironed on the transfers, you can opt to iron on images after the puppets have been sewn, trimmed and turned. I just found this way meant I didn't have to do any measuring or marking.
***If you are having trouble resizing and fitting your images to fit in a 8x11" document let me know and I will write a tutorial for that.
***If you would like to make 32 puppets from the exact same images that I have, I have my puppet layout sheet saved as a JPEG format, which I think I can share with you without violating Tainted Sweet's TOU. (The images cannot be re-sized any larger than they are and will be your pain in the butt to try and separate if you so try to do that, which I cannot and will not be held responsible for.) Contact me with your email address and I will send it off.
There ya have it folks. I think these took me an hour from start to finish. I hope you enjoy them! I will be linking to a few fabulous parties this afternoon, one of course being My Crafty Weekend which will be proudly returning this afternoon after I have finished a few things around the house here.


Friday, July 30, 2010

Please Pardon the Mess

This place has a new look and I really like it. It is still rough around the edges though, some of you might notice small changes throughout the next week. Thanks for sticking around though!

p.s. My Crafty Weekend will be returning this coming Tuesday!~

Thursday, July 29, 2010

Wednesday on Wednesday (Or Thursday)

To the park!, originally uploaded by Cara.Mia.
Geared up for the park. Sunshine and fresh air, best way to make a child smile.

Friday, July 23, 2010

Happy Third Birthday Wednesday!

Happy Birthday Beautiful.
Today Wednesday turned three years old. We celebrated by jumping in puddles, blowing bubbles and then getting all prettied up to eat ice cream cake at Grandma Betty's.

Friday, July 16, 2010

Wednesday on Wednesday (Or Friday) With an Update

Splashpad 2Splashpad 1Splashpad 4


These are photos of Wednesday at one of the local splash pads. They have been a God send during the heatwave that has been the past month. It has really been hard to take full advantage of summer with this sort of heat and UV indexes. But we are trying. :)

On a completely separate note...

My blog turned one year last Saturday, and I turned thirty two last Sunday. Friends of ours are having birthday parties and I have been making gifts, attending said parties and all around trying to keep cool. I have also taken up reading fiction again (Currently I am reading Pride, Prejudice and Zombies) so my computer time is little to nil. What is more, when I am on the computer I am searching for Alice themed clip art and the perfect favour box template etc.

I have not forgotten you my blog and followers and to make up for it I will be having a giveaway when Wednesday's birthday fun is over. (Her party is next Sunday) so if you can just bare with me until August I promise to make it up to you.

Wednesday, July 7, 2010

My Creative Space - Mome Wraths & Cheshire Cats

 I have no pictures of my preparations right now due to some serious technical difficulties, but here is one of my favourite scenes from the first Disney movie.

Cheshire cats, tea pots, and hats oh my! I am knee deep in preparations for Wednesday's third birthday party. I now many think this is all my idea. but aside from me executing it the idea was The Mister's. And I promise you, I had no hand in Wednesday loving the stories and movies.

I was going to have a Fancy Nancy tea party but before the thought was voiced The Mister said we should have a Mad hatter tea party where everyone wears a fabulous hat. I thought it genius. And between then and now Wednesday has taken a serious shine to all three movies (We have some random low budget Alice cartoons.) and we read the storybooks (we have a few of those too) at least every other night. So it was a perfect fit.

All my plans are finalized, and I just have execute them. But what I really really really want are some pink flamingos. You know the garden kind that everyone makes fun of? Well, I want to play croquet with them. Unfortunately, the only store here that has them wants twelve dollars plus taxes a piece. Boo. So, I have a couple ideas up my sleeve.

Unfortunately, this heat is melting my brain. For serious I was making a simple backpack for a friend's little guy's birthday and I think I could have made three in the time it took me to sew and seam rip the bloody thing. I eventually just walked away from the room completely. I'll finish it all tomorrow. And then I can carry on with the fabulous Alice fun!

You can never go wrong visiting a few Creative Spaces @ Kirsty's.

Wednesday on Wednesday


In this heat clothing is optional, but wings are essential.

Saturday, July 3, 2010

Sew What! Reader Showcase Week Four Wrap Up!

This has taken a bit longer to get to than I thought, but it has been a very busy week! The day after we returned from our mini trip in the city the Mister says to me "Tomorrow is my mom's birthday." Oh crap! With all of the hustling and bustling I completely forgot! And it was a holiday. (Which I remembered as I was walking out the door. So after the trip, the holiday, the birthday (Which I shppoed for, made a gift and a cake for in record time!) and the invites making (still think they look fabulous!) I can finally show off YOUR submissions to the Sew What! week four challenge aptly named Carry It!

Remember when I said that Cynthia (My incredibly talented co-conspirator) made a delightfully simple version of the doll carrier? This is it. Is it not absolutely gorgeous? Loving the fabric choices here. And the brilliance of the simplicity. It is now on my to-do list for sure!

The Paisley Abby submitted this wonderful diaper clutch. Made from Moda Sock Monkey fabric, the diaper caddie easily slides into most purses and diaper bags for easy and compact travel.The caddy has two pockets that hold diapers and wipes. The chenille side is a changing pad. Loving it! Now, if only cloth diapers fit into clutches am I right mamas?

It would seem that doll toting was a high priority because MamaTave submitted this wonderful doll sling modeled after her own baby sling. I am pretty sure I had a Cabbage Patch Kid with that exact same hair as a child!

It is not always about babies and their dollies. Maekellan submitted this lovely lunch bag. I wish I could give you a better description of her projects but the Flickr photos are lacking. I do ove the colours she chose, and I think the smaller piece might be reusable food wraps?...

 This lovely toile shopping bag was made by Angela Pea. And, she didn't make just one nope. She made twelve! Grocery shopping has never looked so fabulous!

There you have it ladies and gentlemen. Week four wrap up. Now, I know from emails with some readers that there are other submissions in the works, some just got busy and some got busy and finished just in time for their camera to crap out, so this will not be the last you see of Sew What! challenge submissions.

I want to thank all of the participants who helped make this a resounding success! The readers who managed to finish each challenge right up until the last one, you are especially awesome because you kept me motivated to sew and create with you. (The thing about sew alongs of your own creation is you have to see them through in a timely fashion!) So thank you again, I have a gorgeous skirt, a beautiful clutch, a sunshiny pin cushion (which I use regularly) and now Wednesday has the most adorable carry-all for her dolls. All with your support and encouragement. So thank you!