It's as if a place mat and a coaster had a baby!
A couple weeks ago I made a post about managing your fabric scraps, it pretty much just boiled down to having a plan or those scraps and then cutting them to the sizes and shapes you need them for for easier storage. I found a use for my bigger scraps. Mug rugs! Super cheerful little bits of patchwork. So easy that I made nine on my first try. :)Seriously folks. They don't even have to be a certain size. I started out with a template but eventually just worked with what the fabric scraps were giving me.
Most of these are made with vintage sheets. Except for the black and white Ikea print you see in the first photo and a piece of fabric I used in the mug rug for the tutorial. Oh yeah, and a couple of these are backed with a cut up mans shirt sleeve. But mostly beautiful, cheerful vintage sheets! Would you like to make some for yourself? Awesome!
Gather ye materials
Fabric scraps of varying sizes
Some sort of batting material, I used the bottoms of a pair of fleece pants that were cut into shorts and then felt when I ran out of fleece.
Scissors, pins, thread
Sewing machine is ideal for this but not necessary
Note: Finished size of the mug rug pictured in the tutorial was roughly 8.5x8 inches.
Step 1. Gather your pieces and find an arrangement you like.
Step 2. With right sides together sew your pieces together. (Red line is for emphasis.) I like to use my zig zag foot as a guide which is roughly 1/4" I think. Continue until all of your pieces are joined.
Step 3. Press your seams flat. (Does anyone else use a towel as an ironing board?)
Step 4. Cut your batting/fleece/felt to one inch (length and width) less than your patchwork. E.g.: I your patchwork is 9x9 you would cut your batting to 8x8.
Step 5. Turn over and pin.
Step 6. To quilt the batting to the patchwork, I top stitched some echo stitching along the seams.
Step 7. Turn your quilted piece over and square up your edges.
Step 8. With right sides together sew the backing to the quilting around three sides. Leave one size open or turning. Trim and clip corners.
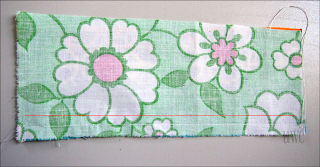
Step 9. Turn. Use a chopstick or paint brush to get your corners out nicely. Fold the opening into itself so that it looks just like the photo. Press it closed.
Step 10. Top stitch around the perimeter. And ta-daa! You're done!
Groovy baby. Groovy.
Wouldn't these make great Christmas gifts? You could add in a handmade coffee sleeve and a gift card to the recipient's favourite coffee shop. Or with a nice mug and a bag of their favourite coffee or tea! The possibilities are endless!
I hope you enjoyed the first tutorial in my Scrap Management series. If you make one (nine) I would love to see them! Cheers and happy sewing!
P.S. Don't forget to enter my giveaway for MyMemories Digital Scrapbooking software!
P.S. Don't forget to enter my giveaway for MyMemories Digital Scrapbooking software!
















8 comments:
How cute are those?!
Commendable, atleast the novice out there would try to learn a lesson.
http://service.ztronics.com
Awesome! This is on my list on things I want to make for Christmas gifts. Thanks for making such an easy to follow tutorial.
so lovely melissa! I like them grouped together. Each unique but similar too. Very pretty!
"It's as if a placemat and a coaster had a baby." That cracked me up. :)
Patch up is most important in life. It seems good to live together with happiness. I really like your thinking.
A short walk with your loving one can make mood happy. I really like all your efforts & will be use if I will have a tension regarding patch up.
Those are a fabulous idea! Now I just have to try it! They would certainly make great gifts. :o)
Donna
Nice Tutorial. Thank you. :)
And yes: I use a towel as an ironing board all the time. Or a folded sheet. Or even just a chair next to me... I fun it so annoying to use the actual ironing board, hehehe... I want to create a small foldable ironing table though... Someday. ;)
Post a Comment