Showing posts with label valentine's day. Show all posts

Wednesday, February 16, 2011

Wednesday on Wednesday

This week,friends of hours held a lil' Valentine soiree for the kids and it was just wonderful. Four kids all age three just having a blast decorating cookies, crowns and eating pizza.

We managed to get a group photo before they were thoroughly involved in the decorating. 

The fabulous mama who through the soiree and her little man!

Laying the icing foundation for sprinkles!

I think she liked the Cake Mate Scribblers more than the sprinkles.

The always fabulous Sydney!

Little A sticks his tongue out even more than Wednesday when he is concentrating heavily. So cute!

Decorating the crown together.

Waiting patiently for the pizza.


Our lovey weekend was full of love.

The party was great. I was surprised that the children (all age 3) participated full in each of the activities, even after eating some cookies. I think part of the success was due to the ten minute play times in between activities. I am so glad we were invited and I can't wait for Easter now! (Wednesday has been talking about dying eggs for over a week now!)

Tuesday, February 16, 2010

How To - ABC Photo Block Puzzle

I really went crazy this year for Valentine's Day. I don't think I have ever crafted as much as I have in the last thirty days! It was a lot of fun, and I am super happy that I was able to turn so many of them into tutorials to share with the blogosphere! This is the last one (for now)I think.

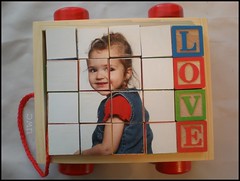
I got this idea from a newsletter sent out by Photojojo. I haven't visited the site that the newsletter linked to so I cannot give credit (I try to bookmark inspiration pages for crediting later) but I figured it could not be too difficult. Into the vault it went for later use. At Christmas I was in a chain department store and they had these alphabet block sets on for five dollars each. Now, Wednesday already has a plethora of wooden blocks and wooden alphabet blocks but five bucks, I couldn't pass them up. And when I remembered the photo puzzle and with Christmas on it's way at the time, I thought I was a genius. Well, Christmas came and went and I didn't crack the plastic fo the block sets let alone get to play with Modge Podge.

This valentine's Day and the obsessive nature in which I embraced it was perfect. Forget the fact that I made one on the eve of and the second on the day of! But, that should give you an idea of how easy and quick these come together! So, without further ado, I bring you our ABC Photo Block Puzzle construction instructions.

Materials:


Wooden ABC block set
Photos and artwork of and by child
Modge Podge
Foam brush
Pen
Ruler
Paper trimmer or scissors (A paper trimmer was my very first investment in my craft tools and it was the best fifteen dollars I have ever spent. Watch for Michael's sales if you do not already have one!)
Razor blade or Xacto knife


Construction Instructions


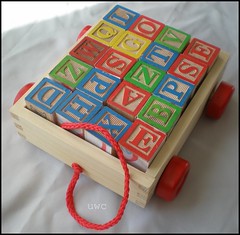
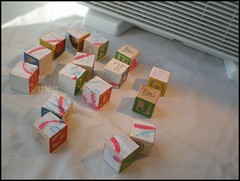
Start with a set of alphabet blocks.


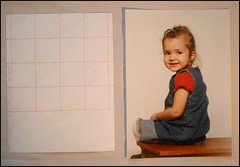
Turn the photo over and grid it off the section you want to be included on the blocks with squares the same size as your blocks.


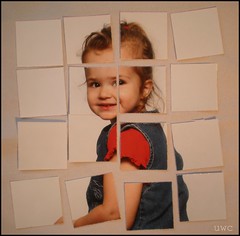
Cut photo into squares.


Coat side of block with Modge Podge, add picture and coat once with Modge Podge once more.


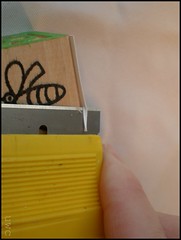
Trim any overhang with a razor blade or exacto knife.


Shampoo, rinse and repeat until all your blocks are covered.


You can cover more block sides with more photos or artwork. I used a hand print and a drawing to cover a total of three sides.


Let dry, if you put them in front of a fan it dries in record time and you can wrap them up for gift giving.


Once dry, you can put them back int heir cart thing and give them to a special person. I gave one of these to each Grandma in Wednesday's life. I should have made a third for Wednesday because she loves puzzles right now and continues to play with these.


This was so easy and a great way to hang out at the kitchen table with family instead of in the back room sewing. So maybe I'll make that one for Wednesday sooner rather than later!

Happy Crafting!

P.S. I know that my tutorials have been taking all sorts of different formats, I am trying to find a cohesive way to format them, but I find it really depends on the pictures, how of them there are and how clear the photos are the smaller they get. Because really, what is the point to a photo tutorial if you cannot see what the heck I am talking about right? So yeah, just saying, I noticed it too ;)

Linked up to Whatever Goes Wednesday @ Someday Crafts

Monday, February 15, 2010

How To - Sparkly Filled Lace Tea Bags for Play

Tea Set (11)

I hope your Valentine weekends were wonderful! It was a warm and loving weekend here indeed. We had a tea party with Wednesday and family for dinner last night. Good food (both real and fake) and good people, how can you go wrong? ♥

I know the previous Felt Sugar Cookie tute was a bit random, but it all came together so quickly I thought I would post it. I made them to go with the sparkly filled lace tea bags of today's construction instructions. Hence the statement of not being able to have a tea party without cookies.

**Note** Due to the nature of the filling, these are not recommended for super small children. Wednesday is two and a half and the hot glue is near impossible to get apart so I am confident that this is safe. If you are at all concerned, do not leave child unattended. OR you could just as easily fill with pieces of felt or stuffing.

I was really excited when I came up with these and even if I severely burned myself twice they turned out awesome! I hope you enjoy them too! Sans burns of course.

Materials:

2" wide lace (roughly 20" long)
Plastic gem stones (or felt scraps)
1/8" ribbon
Red felt
Scissors
Hot glue & gun

Lace Tea Bag Steps 1-3

Lace Tea Bag Steps 4-6

Lace Tea Bag Steps 7-9

Lace Tea Bag Steps 9-11

Lace Tea Bag Steps 12-13

Tea BagLace Tea Bag

Ta -daa! Your front and back views.

Now, you have cookies and tea bags shall we have a tea party?
Tea Set (8)


Linked up to Whatever Goes Wednesday @ Someday Crafts

Sunday, February 14, 2010

Saturday, February 13, 2010

How To - Felt Sugar Cookies


Measure and cut your fabric. I used a cookie cutter for a template.


Sew ric rack to felt hearts in one long strip.


Snip every second felt heart. Fold over and with wrong sides together sew.


Stuff. I found tweezers helpful here.


Trim with pinking shears if you have them and voila, you're done!


You simply must have cookies if you are going to have a Valentine's Tea Party!

Monday, February 1, 2010

How To : Slipcover the Mailbox Part 2 of 2

Valentine Mailbox Slipcover

I loved my mailbox, loved it! But I detested my paint job. For serious, it didn’t come out at all the way I pictured it in my head. Partly due to my lack of practice in decorative painting, partly due to my pickiness and partly due to my hating it.
So, I thought of ways to cover it with fabric. At first I was going to Modge Podge the heck out of it. But again, I have no experience with that and with the painting fiasco still fresh in my head I decided to slipcover it. Does that make me weird? Well if this is wrong I don’t want to be right! *ahem* On to the craft . *Author's Note* After writing this tutorial I realized, the entire slipcover could have been made by hot gluing the seams instead of sewing them, seeing how it is not like it has to stand up to washings or anything. So go ahead, glue with all your might!

Materials

Fabric maybe a half yard? I used a vintage sheet I had been saving for a special occasion.
Hair elastic for closure
Something to hook it on like a push pin
Ribbon
Felt
Buttons
Ric Rac
Hot Glue & Glue gun

Cut your fabric like in this diagram shown. I would take this opportunity to print it out. Even though it is not a pattern (or even to scale) it will help you when reading the directions below and keep you from having to scroll up whenever I reference it. Sorry for the lack of pattern but I don’t know how to make them printable on more than one page, I should look that up. You’ll notice it looks just like the cardboard pattern but with the door attached. It essentially is. I traced around different parts of my mailbox and added a half inch for seam allowances. This is the basis of the pocket for the door flap to go into. To do that take door flap piece D and put it right sides together with door piece A. Pin together. Don’t forget to add the hair elastic (or ribbon or whatever it is you are using for a closure) in with the pins.

Slipcover Steps Collage 1
You want to sew this and turn it out first. Make sure it fits. Once that is done you can go onto the actual box cover.

Slipcover Steps Collage 2
With right sides together, pin B to E just like in the bottom left photo. This will make your arch and give your slipcover it's mailbox shape.
Sew. Take out pins and turn right side right and insert mailbox to make sure it fits properly.
Now, flip inside out again and pin C to E like in the top left photo.

Slipcover Steps Collage 3

Once you have made sure the cover fits the mailbox you are going to pull our your handy dandy glue gun! Ignore those pins in the bottom left corner. I forgot to add flap G (in the diagram)and had to sew one on to come down over the edge and into the mailbox. It was no big deal but just now the picture made me realize I could save you the step. Now you just glue down the trim to the inside of the mailbox like in the upper right hand corner. When that is fastened, add a ribbon (I used trim from the sheet)to cover the seam inside the arch. Now, glue the flap from the door pocket to the inside base of the mailbox. This was a bit tricky with the whole HOT glue thing, but I got away with only a few battle scars, I am sure you can do way better. Seriously, I haven't picked up a glue gun in years.

Slipcover Steps Collage 4
We are at the home stretch. At the front of the mailbox, you need to add a 'catch' for your elastic closure.
I used this nifty little tack we had laying around from Christmas time. After that it is embellishment time which is completely personal.

Valentine Mailbox Slipcover
After that you can make your 'flippy thingy' our of felt and stuffing. Simply trace, stitch, stuff and close. I added some great buttons and red thread but you needn't.

Slipcover Details
Now, the uber fun stuff. Embellishing! First I glued some green ric rack down as the stems of the flowers. Then I used some felt circles folded into quarters and glued in the middle for flowers. I covered the base of the felt with some groovy green buttons and snipped some green felt like leaves. Loved it, like for serious me and my mailbox are BFFs. To jazz up the rest I added two stripes of red ric rac (BTW I won the ric rac bunches off a woman on Ebay selling off her vintage stash, the plastic near degraded when I opened the package lol.)one stripe has two more buttons that had these great wide holes. And then I hot glued the 'flipper thingy' in place.

Valentine Mailbox SlipcoverValentine Mailbox Slipcover

Ta-Daaa! You are now ready to receive some oh so sweet Valentines!

Click the photo to be taken to the papier mache construction instructions.

Valentine Papier Mache Mailbox

*Second Author's Note* I realize this how-to doesn't read very smoothly, I tried to keep it simple but I am still learning how to write an effective how to, and as my projects get more complicated, so shall my tutes I guess. I appreciate any and all feedback. And even if I confused the heck out of yas, I hope I mayhaps inspired you even a wee bit?!

Friday, January 29, 2010

Junk Mail to Mail Box Papier Mache Valentine Fun!

Paper and scissors and glue oh my! Paper and scissors and glue oh my! Paper and scissors and glue oh my!

Valentine Papier Mache Mailbox

Whew, almost got carried away there! Truth is, this project nearly carried me away. I have spent all week on it on and off from conception, to mock up to execution to re-execution. And through it all, I took photos so you could learn from my mistakes! :) Well, actually I didn't make too many mistakes, but I did absolutely detest the paint job. But, that is another post for another time. (Later today thanks to my internet connection going down over the weekend) Right now we are just going to play with glue and torn junk mail and a wee bit o' the corrugated cardboard.

At first I wasn't sure if I should make it a photo tutorial, seeing how I was call on skills from what, like third grade? But I thought hey, instead of leaving ya'll to look up paste recipes and what not, I would just share with you what I learned with some photos. Plus, if you already know how to do this you can just skip this post, or go straight to my flickr photoset detailing the process.
Because of the simple nature of the process and the amount of photos, I will try to condense them so you can browse without spraining your scrolling finger. I just nice like that ya know.

First off, you need a good papier mache paste mix. I made the one from Amanda Blake Soule's Handmade Home. While it cools, you can cut the cardboard and shape your mailbox.

I didn't supply you with a pattern this time because it really is to your tastes. You could make a bunch of little tiny ones or a giant family one etc. This one finished at almost 5" wide, 8.5" deep and 7.5" tall. HINT: I used a cd to start with. The arch from it decided the proportions for the rest of my mailbox.

Materials

Papier mache paste (If you are making your own this is a good time to make it, so that it can cool down while you prepare your other materials.)
Corrugated cardboard
Paper ripped into strips and chunks (I read that newspaper is good for this but I had none so I just ripped up a bunch of security envelopes and junk mail I had in the recycling box)
Coloured paper (So you needn't prime and paint the inside)
Foam or paint brushes (I really like the foam brushes for this sort of thing)
Utility knife (scissors work too but a utility knife/box cutter works really well)

Construction Instructions


We are going to layout our mailbox pattern and cut it out. I found it was easiest to cut it with the back piece attached. It is a pretty straight forward design. Cut out the door flap (to be exactly the same as the back) separately.

score lines
Score the cardboard where indicated in the picture. Here is a larger version in case the writing is too small.

Steps Collage 1 for Valentine Mailbox
Fold at score lines and tape in place. Use lots of tape if you need to. I used low tack painters tape so I needed to.
Now, curl the arch into itself so that the lines in the cardboard have now been bent. This will help you shape your arch as you tape it to the back piece. Continue in this fashion until you have yourself a mailbox! Tape as much as you think you need to because you will be going over it with glue and paper soon anyways.

Steps Collage 2 for Valentine Mailbox
Now, in all honesty I have not done this, probably since grade three? Grade four tops. But, somehow it stuck with me. Pretty hard to forget how to glue shredded paper to more shredded paper. Anyhoo! In Amanda Blake Soule’s book Handmade Home she says she likes to put the paste to the paper and then to the bowl. I say that is asking for way more patience than I myself have. Slather it on I say! If you do this in small sections you can stick the paper to the box and just slather more paste on top. Do this for approximately four layers. Give or take a layer. I used thicker paper so I probably could have gotten away with as little as two layers, but it was fun I tell you! F-U-N! To avoid painting the inside I used coloured scrapbook paper so that it would appear to be finished. It was pink, and it worked. You could also do this to the outside too and not have to paint it. In hindsight, I probably should have but I love the results from the slipcover (next post).

Steps Collage 3 for Valentine Mailbox
Continue doing this to the mailbox door and flippy thingy. (Although, I made a different one in the next set of instructions.)

Steps Collage41 for Valentine Mailbox

Let dry. I set mine in front of a fan on low and it was ready to prime within a couple of hours. Depending on how gloopy your layers and if you use a fan, you might have to wait a day or even two. But once dry you can prime it. I think I did two coats. Maybe even three because again, it was fun! The next day, I taped off some stripes and painted. Then I came back and painted it again. Then I came back and painted more. I hated it all though. Like Men on Films hated it. But you can probably paint way better than I can. *glares* So, instead I made a slip cover and decorated it with fabric and buttons.

In short, if you love your painted mailbox, you are nearly done. You just have to attach the door and the flippy thingy. If I hadn’t did what I did in the next post, my plan was to paint the flippy thingy and attach it using hot glue. (I wanted to make it movable but some of my craft supplies are still in storage.) For the door I was going to Modge Podge a piece of fabric to both the door and floor of the inside mailbox to act like a fabric hinge.

Click on the pictures of the finished (really finished) product to take you to part two of the tutorial. It was fun and this time turned out even better than in my head.Here is a link to the photoset with finished product and detail shots at flickr.
Slip cover embellishmentsSlip cover embellishments


monogram