Showing posts with label organization. Show all posts

Tuesday, May 17, 2011

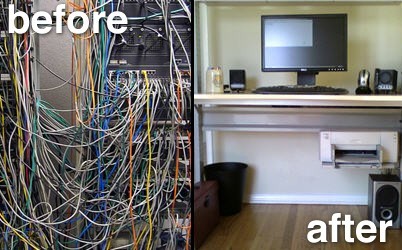
Reader Question: DIY Hiding Cables & Wires

Over at my Storage Geek blog, I get asked advice questions on organization and storage. (I know! Isn't that just the coolest?!) And since the posts take some time to search and type I thought I would post them here as well. 
Photo Credit: Adam Pash
imakesht asked: Do you know of any ways to store/hide wires both inside a house and out? It's making my place look cluttered and disorganized.


Cables got you down? Wires tripping you up? Go wireless. Just kidding. Unfortunately, wireless doesn't work for power cords. Boo-urns! But I did some searching and found a lot of options. Unfortunately, most are not cheap and/or little effort required.
The other thing was without clarification on where your wires were located I just kind of collected a general assortment of cable corralling solutions. So lets start with the cheapest and easiest first.
This computer cord tamer from Instructables user trainwiththom is fashioned from wire hanger and hangs off the back of your flat screen monitor. Super easy and super cheap. Bonus. But unfortunately not a help to thos of us with lap tops (Or giant pre-flat screen monitors).
Photo Credit: Adam Pash
The first step in hiding your cords and cables is to corral them together. At your computer area (If you have a desk) you can use an under desk basket like this one from Ikea to keep them flowing together tangle free and in the same direction (toward your surge protector and/or cable outlets). Use a few cable ties to keep them neat. You could also cable tie them to your desk legs if you have legs on your desk.
This is my new favourite. Created by Karl Zahn for the 2006 MUJI International Design Competition it is not in production yet but could easily be DIYed for little to no money I think. The effort is there though with the cutting, painting and installing but I think it would be totally worth it. Some 1/4" thick plywood, paint and double sided tape and your sitting on a lovely little fence.
That pretty much takes care of the minimal effort alternatives. After that you can install WireTracks CM which "WireTracks CM WireTracks CM kits turn regular crown molding into removable wiring channels that you can use to hide low voltage or electrical cables (check your local codes). They can be used for simple jobs such as getting wiring from the front of a home theater to the back. Or, they can be installed throughout a building to give building owners the ability to run wiring between any two points that are linked by connected walls. And because crown molding is installed above doorframes, it is easy to get uninterrupted coverage of an entire floor." I am not going to lie, I think this is brilliant. I couldn't find a price but I see it being worth it if you have a serious amount of wires and cables to conceal.
UT Wire cord protector and concealer. This looks to be a great option for renters as it does not require permanent installation and you can also take it with you when you move. From the website "Our unique flexible material makes installation simple to do.Ÿ Easy to lie flat and ready to tape on the floor in seconds.Ÿ Three individual separate compartments for extra storage and easy identification of cords.Ÿ Remove cords from the 2 top loading compartments for any future adjustment needed.Ÿ Adjust the length of this cord cover to desire length using a pair of scissors.
Finally, you could also hide them in your walls using various wall plates at various locations in your house. If you feel up to this sort of project (Because you own or have really nice landlords) here is a great link about Doing It Yourself.
Regarding outdoor wires, I am sorry, short of burying them in PVC pipe I haven't any ideas.
A few goodies I have posted over the last little while include:


Wireless peripherals are not the be all end all solution although I sure wish they were and not everything can be wireless (Right?) so I hope these suggestions helped in some way.
Thanks for asking such a great question! Don't forget to stop by the Storage Geek blog for more great storage tips and fantastic DIY inspiration!

Thursday, May 5, 2011

Reader Question: Handbag Storage


Over at my Storage Geek blog, I get asked advice questions on organization and storage. (I know! Isn't that just the coolest?!) And the code copies perfectly to here, so I thought I would share with you the bigger posts I write up as a warm up to the new website (Which is ages from being launched!) so I hope you enjoy.

teafondknee asked:

Any  advice on how to store purses and bags? I have a ton but haven't found a  good way to store them!

Another fabulous question! Purse storage can be tricky much like shoes, we tend to acquire so  many so quickly. And a great bag is worth holding onto until it no  longer functions. I never used to be a handbag gal, I was so picky about  them that I rarely found one that 'did it for me'. Now though, I can't  get enough quality leather purses, granny purses, vintage beaded party  bags, plus I love making clutches so storage has become an issue for me  as well. That being said I have done some googling and this is what I  have discovered.


First off, for storing your high end bags I recommend a shelf system with divider supports. You can use these stylish clear Acrylic Shelf Dividers or more practical metal ones. The reason I recommend a shelf system is because long term storage by hanging can eventually damage(stretch) the strap.


These hanging closet organizers are probably my favourite because they are reasonably priced and also protect against dust. I had one for shoes given to me by my mom because she was tired of wiping the clear vinyl free of dust. To clean it, I just throw it in the washing machine with towels and hang to dry.Unfortunately, I haven't the space for the sweater hanger or carousel one though. *tear* US residents can purchase the two pack of organizers here on Ebay and the carousel organizer can be purchased here on EBay.

If you are not lucky enough to have shelf space to devote to your handbags, or none at all you have other options.


These Handy Hold Alls from Simply Sarah Shaw are definitely handy. My room mate bought me one for Christmas years ago and when I had grown out of it I passed it on to my mom who loves hers. For those with a small to medium sized purse collection this is definitely an option. I like it because it doesn't have to hang on a door (Which are of short supply in lofts and studio spaces.) but is small enough to fit in closets of all sizes or on bedroom walls. You could also DIY one these easy enough with fabric and snaps/buttons/ribbons etc.


Although I haven't the door for this you might and I think it is a fabulously pratical solution. The Jokari Purse rack holds up to eight purses per strap and mounts on a door. That is a lot of purse storage for under twelve dollars.


Source: beckster740

For those of you with more space and higher budgets you can always build cubbies and store your purses like works of art like this lucky lady on Flickr.

♥♥I would like to add two quick tricks as well; The first came from a Tweet on Twitter and that is to stuff the purses with newspaper. I thought brilliant because we already do that with our boots. Right ladies? You have boot forms for those fabulous boots right?!
The second was for your little handbags (You know the gorgeous beaded vintage ones you take to dinner parties.) You can keep them dust free and still visible by putting them in clear shoe bins.

There you go, handbag storage solutions for every budget and (hopefully) space limitations. Thanks so much for asking another great question! For those of you who have storage and organization questions you can reach me at any of the four links on my sidebar. And for those of you who haven't yet checked out my Storage Geek blog I encourage you to do so. Lots and lots of great DIY projects, fabulous design photos and even some container gardening and library photos.

Tuesday, September 28, 2010

How To : Organize Carded Vintage Buttons

Happy Tuesday! I have a super quick post for you today. A little bit of craft-y storage. I am a storage geek. Seriously, if I pass by a magazine rack with a DIY organizational theme, I buy it, I don't even look inside. If I pass a book claiming to make my closet a better place, I buy it. Don't even get me started on the home organization isles at Lowes! (Seriously don't, I won't stop just ask The Mister.) So, when I had this flash of brilliance, I thought I would share it with you!

Shiny Vintage buttons!
Remember these? Mmm shiny vintage(ish) buttons! Well as much as I loved having a giant box ful it just wasn't working for me in the organized department. I had to root through looking for that perfect set only to find out I didn't have enough! *wistful sigh* Fret not! Because I have come up with a super simple, super sleek and super fabulous solution!

Spine

Tadaa!! I know, it doesn't look like much but stay with me! This is a super cheap, super fast and super fabulous way to store all your carded buttons.

All you need are:
Binder(s)
Sports card protecter binder pages
Paper or fabric (Whichever you would like to cover your binder in)
Buttons on cards

Watch how simple this is!

grey binder
Acquire your binder. If you don't have any laying around you can find them at your local thrift shop or dollar store. I bought some second hand for fifty cents a piece.

Covered Binder
Cover your binder with any material you have/want. I used white paper I had on a roll. I like white. It makes me happy. Also, the "BUTTONS" sticker I made for the spine stands out perfectly.

pro9t_100
Acquire your card sheets. I bought mine at our local hobby/comic/collector shop for twenty five cents each. Super sweet score. You can also find them at the dollar store (these ones are a little flimsy though) or online like EBay. Put them in your binder.

Card Pockets
Add your buttons! I have a separate sheet for each colour. And for now I don't bother using both sides of the sheets so that I can see the next page through any empty sections. Like in this pic I can see the orange page, some of the yellow page and some of one blue page.

I seriously love this idea. While I was at the comic book store I saw more card sheets with different sized pockets. You could organize your fabric swatches (for those of us who store our fabric in bins, I think this is a lovely idea!), you could organize your clear stamps (I am so on top of that one when I get my scrapbooking supplies unpacked!) and your scrapbooking embellishments! I can't wait to do all of these, a simple shelf or two with white binders will look so much better than the billions of mismatched boxes and containers I have.

Linking here and here: