Showing posts with label papercraft. Show all posts

Tuesday, September 7, 2010

How To : Vintage Halloween Garland

Before you say anything I know! I know that Halloween is months away. Two to be precise, and to celebrate I thought I would post my first Halloween tutorial! I love Halloween, I love the costumes, the parties, the trick or treating (Which I did off and on until I was twenty!)the decorations and of course watching Wednesday get excited about it is wonderful as well.


hanging garland


Pretty sweet right? Sorry if the photo is kinda meh, but I have yet to learn the finer art of garland photo taking. Moving on. The images were all courtesy of The Graphics Fairy. I found her site when I was searching for Alice in Wonderland Images but hadn't been back to it. When it popped up in a search for vintage Halloween images, it was a match made in heaven. I didn't need to look elsewhere because I found all of the great images. I recommend visiting her site if you haven't already.

This craft is great for many reasons. The first being it's nearly free-ness. And if you have all the materials on hand like I did; it pretty much is. The other awesome thing is the recycled content. The graphics can be printed on scrap paper and upcycled box board is used to back said images. Plus tea and jute, very natural. Okay, enough talky talky, let's get to the crafty crafty.
Materials:
Paper
Vintage images (I do provide some but you can always google more)
Recycled box board
Mod Podge
Jute twine
Black and orange ribbon
Tea bags
Black embroidery floss
Scissors
Embroidery needle


Print SheetsPrint Sheets

Click here for the first image and here for the second in a larger size that prints on letter size paper.

First things first, collect your clip art and re-size accordingly so they print out on letter sized paper. For your convenience I have shared the two sheets that I made up. Click on the links to take you to print sized copies.

cut out printed images
Once you have printed your images, cut them out.

collect boxboard
Collect your box board.

glue images to cardboard
Glue images to cardboard,but learn from my mistake, glue to printed side of boxes so that your painted side isn't slick.

steep tea bags
Steep tea bags.
dab tea bag
Squeeze tea out of tea bag and dab it on the image.

splotchy tea
If you have the patience to do this in layers, it looks really good when you're done.

Dried tea
Once the tea has dried cut out the images.

Turn and paint
Turn images over and paint the reverse side black. This took two coats for me because I glued them to the wrong sides.Don't worry if some paint end up on the front of the image, it lends to the aged look.

mod podge front
Once paint has dried, apply one coat of Mod Podge to front of image.

mod podge reverse
When the Mod Podge on the front is dry, apply a coat to the painted side.

Turn after painting
This is after the Mod Podge has dried. See how the black ink has popped out a bit and the black paint splotches look awesome. What a happy mistake.

looped end
Cut three pieces of jute twine roughly six feet long. Loop together and knot at one end. I made this knot big enough to fit over a doorknob to aid in braiding.

Braided Twine
Once you have braided the length of twine and looped the other end in a knot for hanging, you can add your ribbon now by wrapping it around the twine. I waited until after I hung the images though.

insert needle through back
To hang images on the twine and knot, thread your needle with black floss. Insert needle through back of image.

needle in twine
Insert needle through front of twine and tie to the knotted end of the image.

knot thread tightly
Knot thread tightly.

threaded closeup
Trim.

Halloween Cut Out close-ups
Close-ups of the images. I think they look fab-u-lous!
That is all she wrote! Have fun crafting!

Linking to some of these parties as well as:


And I just discovered Iron Crafter @ Fireflies & Jellybeans and it just so happens the round five secret ingredient is cardboard boxes! How much of a super awesome coincidence is that? So I am adding the Iron Crafter button to my post to be considered for judging!

Tuesday, March 30, 2010

How To : Felt Flowered Papier Mache Easter Basket

aboveshot


Good morning! The sun is shining here today and it is slowly warming up. After I post this I am getting pretty and Wednesday and I are going out to play! But, before that I have a photo tutorial to share with you. I had it in my mind to make Wednesday's Easter basket this year, to go along with the eggs I made her and the soon-to-be-felt-food I am making her. I had a few issues though. It needed to be big enough to hold two dozen soft eggs, it needed to be light enough for her to carry and comfortable enough for her to want to carry it. I kept going back to papier mache for simplicity. I re-examined the mailbox I made her and found it to be light enough so, I went with it. The next snag was how to cover it. My head was not in the place to make a slip cover for it like the mailbox but I knew I wanted a nice soft look. Enter this tutorial from Love 2 Create. It was inspiring in both its simplicity and prettiness. Over the course of the weekend I think I made about 160 felt rosettes.


Tuesday, February 16, 2010

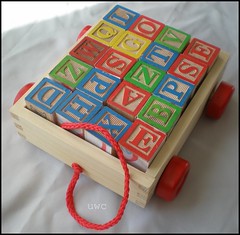
How To - ABC Photo Block Puzzle

I really went crazy this year for Valentine's Day. I don't think I have ever crafted as much as I have in the last thirty days! It was a lot of fun, and I am super happy that I was able to turn so many of them into tutorials to share with the blogosphere! This is the last one (for now)I think.

I got this idea from a newsletter sent out by Photojojo. I haven't visited the site that the newsletter linked to so I cannot give credit (I try to bookmark inspiration pages for crediting later) but I figured it could not be too difficult. Into the vault it went for later use. At Christmas I was in a chain department store and they had these alphabet block sets on for five dollars each. Now, Wednesday already has a plethora of wooden blocks and wooden alphabet blocks but five bucks, I couldn't pass them up. And when I remembered the photo puzzle and with Christmas on it's way at the time, I thought I was a genius. Well, Christmas came and went and I didn't crack the plastic fo the block sets let alone get to play with Modge Podge.

This valentine's Day and the obsessive nature in which I embraced it was perfect. Forget the fact that I made one on the eve of and the second on the day of! But, that should give you an idea of how easy and quick these come together! So, without further ado, I bring you our ABC Photo Block Puzzle construction instructions.

Materials:


Wooden ABC block set
Photos and artwork of and by child
Modge Podge
Foam brush
Pen
Ruler
Paper trimmer or scissors (A paper trimmer was my very first investment in my craft tools and it was the best fifteen dollars I have ever spent. Watch for Michael's sales if you do not already have one!)
Razor blade or Xacto knife


Construction Instructions


Start with a set of alphabet blocks.


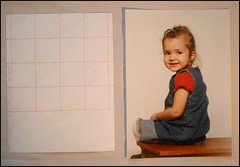
Turn the photo over and grid it off the section you want to be included on the blocks with squares the same size as your blocks.


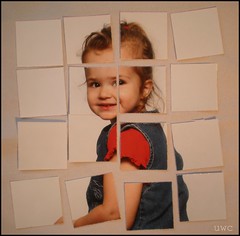
Cut photo into squares.


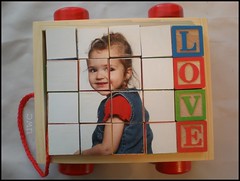
Coat side of block with Modge Podge, add picture and coat once with Modge Podge once more.


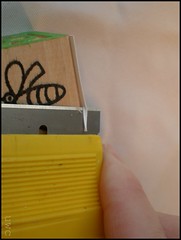
Trim any overhang with a razor blade or exacto knife.


Shampoo, rinse and repeat until all your blocks are covered.


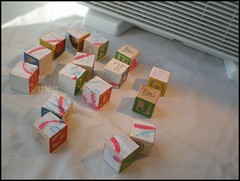
You can cover more block sides with more photos or artwork. I used a hand print and a drawing to cover a total of three sides.


Let dry, if you put them in front of a fan it dries in record time and you can wrap them up for gift giving.


Once dry, you can put them back int heir cart thing and give them to a special person. I gave one of these to each Grandma in Wednesday's life. I should have made a third for Wednesday because she loves puzzles right now and continues to play with these.


This was so easy and a great way to hang out at the kitchen table with family instead of in the back room sewing. So maybe I'll make that one for Wednesday sooner rather than later!

Happy Crafting!

P.S. I know that my tutorials have been taking all sorts of different formats, I am trying to find a cohesive way to format them, but I find it really depends on the pictures, how of them there are and how clear the photos are the smaller they get. Because really, what is the point to a photo tutorial if you cannot see what the heck I am talking about right? So yeah, just saying, I noticed it too ;)

Linked up to Whatever Goes Wednesday @ Someday Crafts

Friday, January 29, 2010

Junk Mail to Mail Box Papier Mache Valentine Fun!

Paper and scissors and glue oh my! Paper and scissors and glue oh my! Paper and scissors and glue oh my!

Valentine Papier Mache Mailbox

Whew, almost got carried away there! Truth is, this project nearly carried me away. I have spent all week on it on and off from conception, to mock up to execution to re-execution. And through it all, I took photos so you could learn from my mistakes! :) Well, actually I didn't make too many mistakes, but I did absolutely detest the paint job. But, that is another post for another time. (Later today thanks to my internet connection going down over the weekend) Right now we are just going to play with glue and torn junk mail and a wee bit o' the corrugated cardboard.

At first I wasn't sure if I should make it a photo tutorial, seeing how I was call on skills from what, like third grade? But I thought hey, instead of leaving ya'll to look up paste recipes and what not, I would just share with you what I learned with some photos. Plus, if you already know how to do this you can just skip this post, or go straight to my flickr photoset detailing the process.
Because of the simple nature of the process and the amount of photos, I will try to condense them so you can browse without spraining your scrolling finger. I just nice like that ya know.

First off, you need a good papier mache paste mix. I made the one from Amanda Blake Soule's Handmade Home. While it cools, you can cut the cardboard and shape your mailbox.

I didn't supply you with a pattern this time because it really is to your tastes. You could make a bunch of little tiny ones or a giant family one etc. This one finished at almost 5" wide, 8.5" deep and 7.5" tall. HINT: I used a cd to start with. The arch from it decided the proportions for the rest of my mailbox.

Materials

Papier mache paste (If you are making your own this is a good time to make it, so that it can cool down while you prepare your other materials.)
Corrugated cardboard
Paper ripped into strips and chunks (I read that newspaper is good for this but I had none so I just ripped up a bunch of security envelopes and junk mail I had in the recycling box)
Coloured paper (So you needn't prime and paint the inside)
Foam or paint brushes (I really like the foam brushes for this sort of thing)
Utility knife (scissors work too but a utility knife/box cutter works really well)

Construction Instructions


We are going to layout our mailbox pattern and cut it out. I found it was easiest to cut it with the back piece attached. It is a pretty straight forward design. Cut out the door flap (to be exactly the same as the back) separately.

score lines
Score the cardboard where indicated in the picture. Here is a larger version in case the writing is too small.

Steps Collage 1 for Valentine Mailbox
Fold at score lines and tape in place. Use lots of tape if you need to. I used low tack painters tape so I needed to.
Now, curl the arch into itself so that the lines in the cardboard have now been bent. This will help you shape your arch as you tape it to the back piece. Continue in this fashion until you have yourself a mailbox! Tape as much as you think you need to because you will be going over it with glue and paper soon anyways.

Steps Collage 2 for Valentine Mailbox
Now, in all honesty I have not done this, probably since grade three? Grade four tops. But, somehow it stuck with me. Pretty hard to forget how to glue shredded paper to more shredded paper. Anyhoo! In Amanda Blake Soule’s book Handmade Home she says she likes to put the paste to the paper and then to the bowl. I say that is asking for way more patience than I myself have. Slather it on I say! If you do this in small sections you can stick the paper to the box and just slather more paste on top. Do this for approximately four layers. Give or take a layer. I used thicker paper so I probably could have gotten away with as little as two layers, but it was fun I tell you! F-U-N! To avoid painting the inside I used coloured scrapbook paper so that it would appear to be finished. It was pink, and it worked. You could also do this to the outside too and not have to paint it. In hindsight, I probably should have but I love the results from the slipcover (next post).

Steps Collage 3 for Valentine Mailbox
Continue doing this to the mailbox door and flippy thingy. (Although, I made a different one in the next set of instructions.)

Steps Collage41 for Valentine Mailbox

Let dry. I set mine in front of a fan on low and it was ready to prime within a couple of hours. Depending on how gloopy your layers and if you use a fan, you might have to wait a day or even two. But once dry you can prime it. I think I did two coats. Maybe even three because again, it was fun! The next day, I taped off some stripes and painted. Then I came back and painted it again. Then I came back and painted more. I hated it all though. Like Men on Films hated it. But you can probably paint way better than I can. *glares* So, instead I made a slip cover and decorated it with fabric and buttons.

In short, if you love your painted mailbox, you are nearly done. You just have to attach the door and the flippy thingy. If I hadn’t did what I did in the next post, my plan was to paint the flippy thingy and attach it using hot glue. (I wanted to make it movable but some of my craft supplies are still in storage.) For the door I was going to Modge Podge a piece of fabric to both the door and floor of the inside mailbox to act like a fabric hinge.

Click on the pictures of the finished (really finished) product to take you to part two of the tutorial. It was fun and this time turned out even better than in my head.Here is a link to the photoset with finished product and detail shots at flickr.
Slip cover embellishmentsSlip cover embellishments


monogram

Monday, January 18, 2010

How To - Handmade Photo Valentine Garland

Happy Monday ladies and gents. With Valentine's day coming up I was wondering what sort of crafty bit of awesome I may be able tor broadcast from my corner of the blogosphere when I remembered this garland I made last year.

A Better Garland Collage

Last year, when I was still living in Kelowna, BC Mr. Until Wednesday made me a workstation in the back room of our house. It was wonderful, a large benched work top with large shelves flanking each side all anchored to the wall. He even had the foresight to build it at bar height to keep Wednesday curious fingers away from things of both a delicate and dangerous nature. I eventually ended up sharing the room with our fabulous pantry and Wednesday's toy overflow. I also eventually added a mini t.v. and dvd player for myself at night or Wednesday during the day. (I really do miss those days when she would watch A Wiggly Wiggly World over and over and over.)

But I digress, my point is I had sufficient space to take out my scrapbooking supplies and make this garland. It is super simple and a total stash buster craft. And if you have little ones older than mine was at the time (1.5 years)they can help you or even make their own. I had initially made this garland thinking I could add a couple hearts each year, but I made my hearts too big too begin with and so my garland was huge, I even shortened the string in between the hearts but still the garland stretched out pretty far. So I shrunk the pattern for you from the six inches that I used to four and a half inches.

Materials:
Photos of loved ones you are okay with cutting and pasting. (I printed black and whites out for just this purpose)
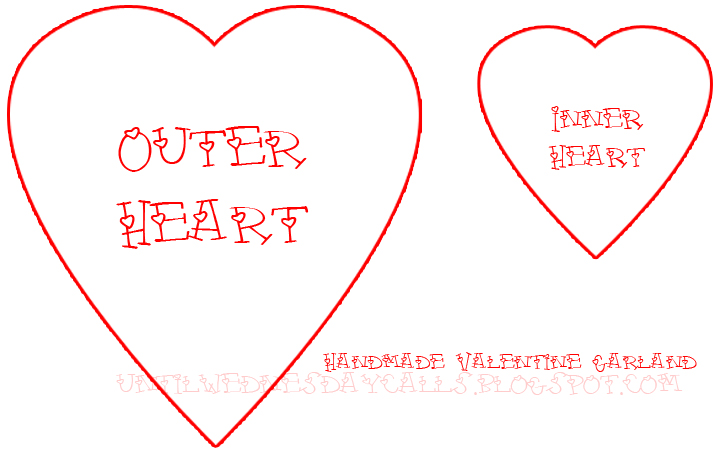
Heart Pattern found here. Or your own sizes, my inner heart is half the size of the outer.
Valentinish paper (I used paper that I really didn't like by itself but as the backdrop for these it worked well. Also, you can use small pieces to lighten the load on your scrap piles.)
Embellishments. I used so many different kinds I couldn't list but I kept gluing to a minimum with a plethora of brads, flowers, ribbons and staples.
Hole Punch or stapler (For stringing hearts together)
String I used this really neat stuff I bought at Value Village, you don't even need one long piece as you can tie each heart to another.

Homemade Valentine Garland

Construction Instructions

I cut out sixteen hearts, but you can cut out as little or as many as you want from the background paper using the outer heart template. I used the inner heart template to cut out my photos.
Glue a photo to each heart.
Embellish as you please.
Tie the string to the hearts, I used one long string that threaded the hearts together but you could use different coloured scrap pieces to tie one to another. Just remember to incorporate the length between hearts into the finished garland length. (I forgot and had to re-do this step).
String up in a high traffic area so loved ones can see the great pictures of themselves, and your handiwork.

Homemade Valentine Garland
Here is a link to the flickr set.

I do so love Wednesday's baby pictures. This is such a great craft. I can't wait to add pictures from this year. So what if the garland is already a bazillion feet long, I'll find somewhere to hang it proper.

Link Events:

monogram